RESIDENTIAL WOOD DOORS BARN DOOR INSTALLATION RESIDENTIAL WOOD DOORS IMPORTANT INFORMATION ABOUT YOUR ENVIVO BARN DOOR RESIDENTIAL WOOD DOORS • Wood is a natural product and can warp, swell, or shrink if exposed to moisture or changes in temperature. To reduce the risk of damage due to warp, swelling, or shrinking, avoid installing in areas that are exposed to moisture or where the relative humidity is not controlled. • For indoor installation only. • Do not trim or cut the doors.
RESIDENTIAL WOOD DOORS INSTALLATION OVERVIEW - WHAT’S INCLUDED RESIDENTIAL WOOD DOORS RESIDENTIAL WOOD DOORS (1) Left Cushioned Angle Stopper (4) Strap Bolts (4) 2-3/8” Strap Mounting Bolts, (4) Hex Nuts, (4) Cap Nuts, (8) Washers (2) Bent Straps (5) Rail Mounting Bolts, (5) Washers, (5) Drywall Anchors (1) Right Cushioned Angle Stopper (1) 7-1/2” Matte Black Handle (1) Handle, (2) Screws (1) Hex Key (4) Hex Screws (5) Rail Mounting Bolts (1) Floor Guide (5) Wall Spacers (1) Floor Mounted Do
RESIDENTIAL WOOD DOORS PASO 1 – INSTALACION DE LA PUERTA DE BARRA CINTA DOBLADA RESIDENTIAL WOOD DOORS RESIDENTIAL WOOD DOORS STRAP BOLT HEX NUT WASHER WASHER CAP NUT Figure 1-1 Front Door Face The barn door comes ready to install, with pre-drilled holes for mounting the bent strap. To install the bent strap, place the bent strap on the front of the door and install the bolts, washers, and nuts in the order demonstrated in (Figure 1-1).
RESIDENTIAL WOOD DOORS STEP 3 - HANDLE INSTALLATION RESIDENTIAL WOOD DOORS RESIDENTIAL WOOD DOORS Based on how your barn door will operate, determine the side of the door on which you want to install the handle. Measure 40” from the bottom of the door and mark lightly with a pencil. Measure over 2” from the edge of the door and mark lightly with a pencil.
RESIDENTIAL WOOD DOORS STEP 4A/4B – DRYWALL & CONCRETE INSTALLATION A Figure 4-2 B C Installation Line Figure 4-3 85-3/4” 85-3/4” 85-3/4” Figure 4-1 RESIDENTIAL WOOD DOORS To achieve the correct amount of RESIDENTIAL DOORS clearance for the barn door,WOOD measure 85-3/4” from the floor with a measuring tape in three different locations equal distance apart spanning the length of your rail as shown in image (a, b, c) and mark with a pencil (Figure 4-1).
RESIDENTIAL WOOD DOORS STEP 5B – CONCRETE INSTALLATION RESIDENTIAL WOOD DOORS RESIDENTIAL WOOD DOORS Do not use the primed mounting board included in this kit when installing into a concrete wall. Skip to Step 6B. STEP 6A - DRYWALL INSTALLATION RESIDENTIAL WOOD DOORS RESIDENTIAL WOOD DOORS RESIDENTIAL WOOD DOORS Figure 6-1 1-1/2” Position the sliding rail in the center of t he primed mount ing board making certain it is level and mark the holes in the sliding rail using a pencil (Figure 6-1).
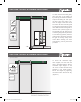
RESIDENTIAL WOOD DOORS STEP 7A - DRYWALL INSTALLATION 2 Figure 7-2 4 1 RESIDENTIAL WOOD DOORS 5 Figure 7-2 3 DRYWALL ANCHOR WALL SPACER Figure 7-2 (Left) WASHER RAIL MOUNTING BOLT When installing the sliding rail, first insert the drywall anchors, wall RESIDENTIAL WOOD DOORS spacers, the sliding rail, and secure on the primed mounting board using the rail mounting bolts (with washers) provided, securing with a socket wrench (Figure 7-1).
RESIDENTIAL WOOD DOORS STEP 8A/8B – DRYWALL & CONCRETE INSTALLATION Figure 8-1 Figure 8-2 Floor Guide Figure 8-1 RESIDENTIAL WOOD DOORS To install the floor-mounted guide, place the door on RESIDENTIAL the sliding rail WOOD DOORS by centering the wheels of the bent straps on the sliding rail. Then open the door. Place the guide 1-1/2” from the edge of the door frame and insert the floor-mounted guide into the groove at the bottom of the door.
RESIDENTIAL WOOD DOORS STEP 9A/9B – DRYWALL & CONCRETE INSTALLATION RESIDENTIAL WOOD DOORS Figure 9-2 Open Figure 9-2 Next, put the door in the open RESIDENTIAL WOOD DOORS position. Insert two hex screws into the cushioned angle stopper. Place the other cushioned angle stopper on the rail so that it meets the bent strap hardware in the open position. Secure the cushioned angled stopper by tightening the screw with the hex key (Figure 9-2). This completes the Barn Door Installation process.
Envivo Barn Door Info & Install (E&S) Guide.
Envivo Barn Door Info & Install (E&S) Guide.
RESIDENTIAL WOOD DOORS INSTALACION DE PUERTA DE GRANERO RESIDENTIAL WOOD DOORS INFORMACION IMPORTANTE DE SU PUERTA DE GRANERO ENVIVO RESIDENTIAL WOOD DOORS • La madera es un producto natural y puede deformarse, hincharse o encogerse si se expone a la humedad o cambios en la temeratura. Para reducer el riesgo de daños debidos a la deformacion, hinchazon o encogimiento, evite la instalacion en areas que estan expuestas a la humedad o donde la humedad relative no esta controlada.
RESIDENTIAL WOOD DOORS DESCRIPCION GENERAL DE LA INSTALACION – LO QUE ESTA INCLUIDO (1) Tapon de Angulo Acolchado Izquierdo RESIDENTIAL WOOD DOORS RESIDENTIAL WOOD DOORS (5) Tornillos de Montaje en Carril (5) Tornillos de Montaje en Carril, (5) Arandelas, (5) Anclajes Para Pared de Yeso (4) Tornillos de Correa (4) Pernos de Montaje de Correa 2-3/8”, (4) Tuercas Hexagonales, (4) Tuercas de Tapa, (8) Arandelas (1) Tapon de AnGulo Acolchado Derecho (1) Manija Negra Mate 7-1/2” (2) Correas Dobladas (1
RESIDENTIAL WOOD DOORS PASO 1 – INSTALACION DE LA PUERTA DE BARRA CINTA DOBLADA RESIDENTIAL WOOD DOORS RESIDENTIAL WOOD DOORS TORNILLOS DE CORREA TUERCAS HEXAGONALES ARANDELAS ARANDELAS TUERCAS DE TAPA Figura 1-1 Cara De La Puerta Delantera La puerta del establo viene lista para instalarse, con agujeros perforados para montar la correa doblada. Para instalar la correa doblada, apriete y asegure los pernos y arandelas d la correa de 2-3/8” con una llave de tubo para apretar y asegurar la manija.
RESIDENTIAL WOOD DOORS PASO 3 – INSTALACION DE MANIJA RESIDENTIAL WOOD DOORS RESIDENTIAL WOOD DOORS En function de como funcionara la puerta de su establo, determine el lado de la puerta en el que desea instalar la manija. Mida 40” desde la parte inferior de la puerta y marque ligeramente con un lapiz. Mida mas de 2” desde el borde de la puerta y marque ligeramente con un lapis.
RESIDENTIAL WOOD DOORS PASO 4A /PASO 4B – INSTALACION DE PARED Y CONCRETO Linea De Instalacion A Figura 4-2 B C Figura 4-3 85-3/4” 85-3/4” 85-3/4” Figura 4-1 RESIDENTIAL WOOD DOORS Para lograr la cantidad correcta de e s p a c i o l i b r e p a r a RESIDENTIAL la pue r t aDOORSd e l WOOD establo, mida 85-3/4” desde el piso con una cinta metrica en tres ubicaciones diferentes distancia igual que abarca la longitud de su carril como se muestra en la imagen (a,b,b) y marque con un lapiz (Figura 4-
RESIDENTIAL WOOD DOORS PASO 5B – INSTALACION DE CONCRETO RESIDENTIAL WOOD DOORS WOOD DOORSde No utilice el tablero de montaje imprimado incluido en este juego cuando lo instale en unaRESIDENTIAL instalacion conrecto. Salta al paso 6B.
RESIDENTIAL WOOD DOORS PASO 7A – INSTALACION DE PARED DE YESO 2 Figura 7-2 4 1 5 Figura 7-2 RESIDENTIAL WOOD DOORS 3 ANCLAJES PARA PARED DE YESO SEPARADORES DE PARED Figura 7-2 (Izquierdo) ARANDELAS TORNILLOS DE MONTAJE EN CARRIL Figura 7-1 Al instalar el riel desl izante, primero inserte RESIDENTIAL los WOOD anclajes DOORS para paneles de yeso, los separadores de pared, el riel deslizante y asegú los en el tablero de montaje imprimado utilizando los pernos de montaje del riel (con arandelas) p
RESIDENTIAL WOOD DOORS PASO 8A/ PASO 8B – INSTALACION DE PARED DE YESO Y CONCRETO RESIDENTIAL WOOD DOORS externos de riel, dependiendo de donde esea queRESIDENTIAL se detenga WOOD DOORS la puerta de su establo (Figura 7-2). Figura 8-1 Figura 8-2 Guia de piso Figura 8-1 1-1/2” Para instalar la guia montada en el piso, coloque la puerta en el riel desllizante y abra la puerta.
RESIDENTIAL WOOD DOORS STEP 9A/9B – DRYWALL & CONCRETE INSTALLATION Figura 9-2 Abrió Figure 9-2 RESIDENTIAL WOOD DOORS Siguiente, ponga la puerta en RESIDENTIAL WOOD DOORS la posicion abierta. Inserte dos tornillos hexagonales en el tope de angulo amortiguado. Coloque el otro tope de angulo acolchado en el riel para que se junte con el hardware de la correa doblada en la posicion acolchado en angulo apretando el tornilllo con la llave hexagonal (Figura 9-2).