
Instructions / Assembly


ENVIVO BARN DOOR
7
14 5 32
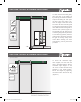
STEP 7A - DRYWALL INSTALLATION
When installing the sliding rail,
rst insert the drywall anchors, wall
spacers, the sliding rail, and secure
on the primed mounting board
using the rail mounting bolts (with
washers) provided, securing with
a socket wrench (Figure 7-1). For
ease, secure in the order shown in
the diagram (starting with number
1 through 5).
Note: You may need to pre-insert
the left and right cushioned angle
stoppers inside the outer holes on
the rail, depending on where you
want your barn door to stop (Figure
7-2). The cushioned angle stoppers’
hex screws will be tightened later
in the installation process.
RESIDENTIAL WOOD DOORS
RESIDENTIAL WOOD DOORS
R
ESIDE
N
TIA
L
W
O
O
D
D
O
O
R
S
Figure 7-2 (Left)
Figure 7-2 (Right)
Figure 7-2
Figure 7-2
Figure 7-1
WALL SPACER
DRYWALL ANCHOR
WASHER
RAIL MOUNTING BOLT
STEP 7B - CONCRETE INSTALLATION
1-1/2”
14 5 32
When installing the sliding rail, rst
install the masonry anchors. Next,
place the wall spacers on top of the
anchors. Then secure the sliding
rail directly to the wall with the rail
mounting bolts and washers. Be sure
the rail mounting bolts pass through
the washer, mounting rail, wall spacers
and into the masonry anchors (Figure
7-1). For ease, secure in the order
shown in the diagram (starting with
number 1 through 5).
Note: You may need to pre-insert
the left and right cushioned angle
stoppers inside the outer holes on
the rail, depending on where you
want your barn door to stop (Figure
7-2). The cushioned angle stoppers’
hex screws will be tightened later in
the installation process.
RESIDENTIAL WOOD DOORS
RESIDENTIAL WOOD DOORS
R
ESIDE
N
TIA
L
W
O
O
D
D
O
O
R
S
Figure 7-2 Figure 7-2
Figure 7-1
WALL SPACER
MASONRY ANCHOR
WASHER
RAIL MOUNTING BOLT
Figure 7-2 (Left)
Figure 7-2 (Right)
Envivo Barn Door Info & Install (E&S) Guide.indd 7 7/26/19 9:37 AM