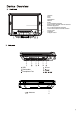
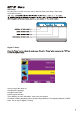
13 12 11 10 14. 1. 2. 3. 4. 5. 6. 7. USB 8. 1.DVD/TV 2.VOL3.VOL+ 4.DVD MENU 5.SETUP 6.USB 7.(<<):Rewind/left nevigation 8.CH-:Previous chapter/or channels selection 9.OK:DVD play/pause 10.(>>):Fast forward/right navigation 11.CH+:Next chapter/or channels selection 12.LCD screen 13.Speaker 14.Signal receiver 9.
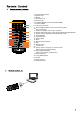
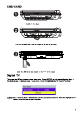
1 17 2 18 3 4 5 6 7 19 8 9 10 11 12 13 14 15 16 20 21 22 23 24 25 26 27 28 1. Switch DVD/TV button 2. Number Keys 3. SETUP 4. Up/Channel up 5. Direction Key 6. Play(DVD MODE) channel list (ATSC MODE) 7. Volume DOWN 8. Down/Channel down 9. Switch USB/card(DVD mode)/Channel list(ATSC) 10. Play Information 11. Switch languages that the disc supports 12. Switch OSD languages on the DVD mode/Closed caption(ATSC) 13. Recall channel playback(ATSC)/A-B(DVD mode) 14. PLAY/PAUSE 15. Fast backward 16.
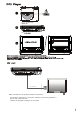
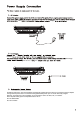
plastic cover Turn etc. AV out Ye llo w Re d wh it e AV connect Notice:Please turn off all devices before connection. As shown in the picture, use the A/V cable to connect the portable TV player with other devices. Switch the portable TV player to AV mode.
DVD Setup The setup menu consists of four sub-menus, General Setup, Audio Setup, Video Setup, and Preference Setup. Digital TV Setup Here,you have the option to: Change OSD Language Change Screen Ratio Set the region and time Timer Setting: for more information, refer to the next section. Channels or Menu operations can be locked using password. The original password is “0000”. Note: This is only for Digital TV Setup.
The usage Car Adapter car Caution! this range Be sure to u the Operating instructions: The internal battery automatically charges when the device is connected to the AC adapter through a main power outlet. The internal rechargeable battery lasts up to 2.5 hours while fully charged. Warning: To prevent fire or shock hazard, do not expose the device to water, rain, or moisture. Never expose battery pack to temperature above 140 °F.
back “Search”
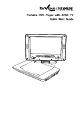
1 inch.