38.AS GB Assembly and operating instruction MADE IN GERMANY IPx4 Druck Nr. 29342172en 09.
English Table of Contents General notes .........................................................................................................3 Important notes .......................................................................................................4 Electrical connection ..............................................................................................5 Sample wiring diagram for a sauna system ............................................................
Dear Customer, You have purchased a high quality technical system which will provide you with many years of enjoyable sauna bathing. This sauna heating system was constructed in accordance with state-of-the-art European safety standards, inspected and manufactured in accordance with the Quality Standard DIN EN ISO 9001:2000. This detailed installation and user‘s guide was created for your information. Please note especially the important information and the data dealing with the electrical connection.
air intake and exhaust vents must not be closed. Please observe the information provided by your sauna cabin supplier. Important notes If assembled incorrectly, the system will present a fire hazard. Please read this installation guide thoroughly. It is especially important to consider applicable dimensions and observe the following instructions: • This device has not been designed for being used by persons (including children) that are physically or mentally handicapped or have sensory disabilities.
in the table. • During the installation of the sauna heating unit, make certain that the vertical clearance between the upper edge of the sauna heating unit and the sauna ceiling is sufficient . The horizontal (lateral) clearance between the sauna heating unit and the cabin wall is provided in the dimension diagram of the respective sauna heating unit. The required distance between the lower edge of the sauna heating unit and the floor is also provided by the dimension diagram.
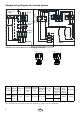
Sample wiring diagram for a sauna system N L1 L2 L3 4-hr. operating timer M a i n power switch Temperature limiter Fuses Thermostat Sauna lamp Distributor box Heater Important! The ground lead (N) must always be connected. U V W N PE Connecting Temperature Installation Capacity Electrical. Fuse heater cable main regulation dimensions acc.
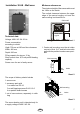
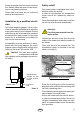
Installation 38 AS - Wall oven Minimum clearances The minimum height of the sauna cabin must be 1.90m on the inside. The vertical clearance between the upper edge of the sauna heating unit and the sauna ceiling is at least 90 cm. 36 cm Cabin wall Voltage: 400 V AC 3N 50 Hz 8 cm 42 cm 8 cm Oven safety grid Technical data 8 cm Power consumption: Illust. 1 according to model Hight: 730 mm at 180 mm floor clearance 1. Center wall mounting over the air intake vent as in Illust.
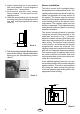
2. Attach connecting line in accordance with circuit diagram. A circuit diagram is located in the terminal box. 3. Seal terminal box with cover, spacer facing outwards. For this use 2 ea. selftapping screws 4. Hook the sauna heating unit into the wall mounting using the mounting slots on the rear wall and place against the spacer (Illust. 3). Sensor installation The built-in control unit is equipped with a thermostat and an a temperature limiter.
Please remember that the sensor lines are thin, flexible tubes that must not be squeezed or subjected to pressure. Safety cutoff The sauna heater is equipped with a temperature limiter for security. These lines must never be cut, as this will destroy the components. In case of a malfunction this temperature limiter cuts off all 3 phases by safety reasons. Once the temperature limiter has cut off the current, he must be reset mechanically.
Commissioning/Initial operation Heater operation is initiated with the timer unit. You may select a heating period of up to 4 hours. The timer runs for the selected time period and then automatically shuts the heater off. Thermostat Timer The sauna must heat up for approximately 45 minutes to achieve a typical sauna climate. The thermostat enables you to select the temperature you desire within a range of approx. 40° C to 110° C.
Sauna stones Maintenance and care The sauna stone is a natural product. Check the sauna stones at regular intervals. Strong infusion concentrates especially can weaken the sauna stones and cause them to disintegrate over time. Consult your sauna supplier if necessary. All sauna heating units are made of lowcorrosion material. Still, to enjoy your sauna heating unit for a long time, you should maintain and care for the unit.
For the installation of sauna heaters, please pay attention to the DIN VDE 0100 part 703 ! This standard makes the following statement valid in your newest expenditure, since February 2006, paragraph 703.412.05; Quotation: The additional must be planned for all electric circuits of the Sauna by one or more fault current protection device (RCDs) with a calculation difference stream not more largely than 30 mA, excluded of it is Saunaheating.
Guarantee The guarantee is taken over according to the legal regulations at present. Manufacturer’s warrenty - The period of warrenty starts from the date of purchase and lasts up to 2 years for commercial use and 3 years for private use. - Always include the completed warrenty certificate when returning equipment. - The warrenty expires for appliances which have been modified without manufacturer’s explicit agreement.
Handling procedures for return shipments (RMA) - Details for all returns ! Dear customer we hope that you will rejoice in the ordered articles. Just in case that you are not entirely contented as an exeption, please follow the procedures specified below.This enabling us to ensure a quick and smooth handling of the return shipment.