EPIC OPTIX, INC Preface Copyright Epic Optix is a pending trademark of Epic Optix, Inc. Other trademarks are the properties of their respective owners and are hereby recognized. Disclaimer This document is subject to change without notice. The manufacturer makes no representations or warranties with respect to the contents hereof and disclaims any implied warranties of merchantability or fitness for any particular purpose.
EPIC OPTIX, INC The following warnings are used in this manual to notify you of important information: Note: Provides additional information on the topic at hand. Important: Provides additional information that should not be overlooked. Caution: Alerts you to situations that may damage the unit. Warning: Alerts you to situations that may damage the unit, create a hazardous environment, or cause personal injury.
EPIC OPTIX, INC Symbol Explanations DISPOSAL: Do not use household or municipal waste collection services for disposal of electrical and electronic equipment. EU countries require the use of separate recycling collection services. Consult your local regulations before disposing of this product. Main Features • Lightweight and easy to pack and transport. • High brightness rating allows for presentations in daylight or in lit rooms with adjustments in projected image size.
EPIC OPTIX, INC Table of Contents Preface .......................................................................................................................... i Chapter 1. At a Glance ................................................................................................. 1 Overview .................................................................................................................. 1 Accessories ...................................................................................
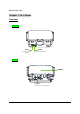
EPIC OPTIX, INC Chapter 1.
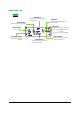
EPIC OPTIX, INC Keypad Left Button Navigate and change Mode Menu • iOS mode select Up Button Navigate, change Source Menu and increase Volume Menu Button Shows On‐Screen Display (OSD) OK Button Power Button Change settings & Input source select • Short press: 2.
EPIC OPTIX, INC Accessories The following accessories are included with the HUD: Regional Power Cord and Power Adapter Cigar type Power Cable HDMI Standard HDMI Cable HDMI Glare shield Clip Ball Mount with 2 mounting screws Double Socket Arm Suction Cup Mount Optical Lens Cloth Documentation Kit (Quick Start Guide, Warranty Card) If any items are missing, appear damaged, or if the unit does not work, please contact your dealer immediately.
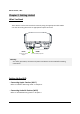
EPIC OPTIX, INC Chapter 2. Getting started What You Need These devices can be connected to the HUD by using the appropriate cable. Make sure the connecting device has an appropriate output connector. DC IN HDMI Connect the Power Adapter Connect HDMI peripherals Warning: As a safety precaution, disconnect all power and devices to the HUD before making connections. Setting Up the HUD ‐ Connecting Apple® Devices (Wi‐Fi) Refer to “iOS Wi‐Fi Mirroring mode” in Chapter 3.
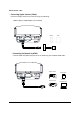
EPIC OPTIX, INC ‐ Connecting Apple® Devices (Cable) Connect an Apple® device to the HUD by using the following: HDMI to Apple® HDMI Adapter (not included) iPhone® iPad® ‐ Connecting Peripherals by HDMI Connect HDMI‐compatible peripherals to the HUD using the Standard HDMI cable.
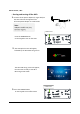
EPIC OPTIX, INC ‐ Starting and turning off the HUD 1. Connect the AC power adapter (or cigar cable) to the HUD. Connect the opposite end of the AC power adapter to a wall outlet. Note: Adapter models may vary between regions. POWER button Press the POWER button on the keypad to turn on the HUD. 2. The HUD splash screen will appear, followed by the Wi‐Fi Mirroring screen. The Wi‐Fi Mirroring screen will appear, then the HUD is ready to use Wi‐Fi Mirroring on iOS mode. POWER button 3.
EPIC OPTIX, INC ‐ Icon Guide 1. iOS Mode iOS Mode Network iOS Device HUD (Wi‐Fi) Connection Status Connection Status (iOS device to HUD) (HUD to Wi‐Fi hotspot) 5G Wi‐Fi band frequency (2.
EPIC OPTIX, INC 2.
EPIC OPTIX, INC Chapter 3. HUD Wi‐Fi Mirroring Suite Overview The HUD Wi‐Fi Mirroring Suite is designed to provide easy access to Wi‐Fi devices, such as smartphones or tablets.
EPIC OPTIX, INC iOS Wi‐Fi Direct Mirroring mode : Not using Wi‐Fi router Perform the following: 1. Press the “Left” button to select the iOS Mode on the Wi‐Fi Mirroring Screen. (If the HUD is already in iOS Mode, you do not have to press the “Left” button.) 2. Tap on “Settings” on your iOS device. 3. Tap “Wi‐Fi” and choose the Epic device in the “Wi‐Fi” network.
EPIC OPTIX, INC 4. Enter the HUD password (PSK). 5. The connection status from the iOS device to the HUD will be 6. Tap the “Home” button on your iOS device.
EPIC OPTIX, INC 7. Swipe up and tap Airplay (Screen Mirroring) on your iOS device. 8. Select Epic device to Airplay.
EPIC OPTIX, INC iOS Wi‐Fi AP Mirroring mode : Using Wi‐Fi router Perform the following: 1. Press the “Left” key to select the iOS Mode on the Wi‐Fi Mirroring Screen. 2. (If the HUD is already in iOS Mode, you do not have to press the “Left” button.) 3. If necessary, switch from 5G to 2.4G with a short press of the “Select” button. 4. Tap on “Settings” on your iOS device. 5. Tap “Wi‐Fi” and choose the Epic device in the “Wi‐Fi” network.
EPIC OPTIX, INC 6. Enter the HUD password (PSK). The connection status from the iOS device to the HUD will be The connection status from the HUD to the Wi‐Fi hotspot will be Default HUD Password 7. Tap the “Home” button on your iOS device.
EPIC OPTIX, INC 8. Connect to your iOS device browser (Safari, Firefox, etc.) and input IP address 192.168.203.1. 9. Establish your Wi‐Fi hotspot. Tap “Internet” and wait for a list of networks to appear. Tap on your Wi‐Fi router. 10.
EPIC OPTIX, INC 11. Exit your iOS browser by tapping the Home button of your iOS device. 12. Swipe up and tap Airplay (Screen Mirroring) on your iOS device.
EPIC OPTIX, INC 13. Select Epic device to Airplay.
EPIC OPTIX, INC Android Mirroring mode Perform the following: 1. Press the “Right” button to select the Android Mode on the Wi‐Fi Mirroring Screen. Android icon will become highlighted. (If the HUD is already in Android Mode, you do not have to press the “Right” button.) Icons under the Android icon will be changed from iOS mode to Android mode. This process may be delayed for a while. Android Mode iOS Mode 2. Swipe down and tap “Smart View” icon*.
EPIC OPTIX, INC How to Update your Firmware 1. Update with iOS device. 1) Power on HUD. 2) System is initialized when you see below. 3) Tap on “Settings” on your iOS device. 4) Tap “Wi‐Fi” and choose the Epic device in the “Wi‐Fi” network.
EPIC OPTIX, INC 5) The connection status from the iOS device to the HUD will be 6) Connect to your Android device browser (Google Chrome, etc.) and input IP address http://192.168.203.1 7) Tap “Internet” and wait for appearance of a list of networks. 8) Tap on Wi‐Fi name of your router. 9) The HUD has connected to your Wi‐Fi router when changes to 10) The HUD and Wi‐Fi router are connected, they are automatically updated. Please update near a Wi‐Fi router.
EPIC OPTIX, INC 2. Update with Android device. 1) Power on HUD. 2) System is initialized when you see below. 3) Tap on “Settings” on your Android device. 4) Tap “Wi‐Fi” and choose the Epic device in the “Wi‐Fi” network.
EPIC OPTIX, INC 5) The connection status from the Android device to the HUD will be 6) Connect to your Android device browser (Google Chrome, etc.) and input IP address http://192.168.203.1 7) Tap “Internet” and wait for appearance of a list of networks. 8) Tap on Wi‐Fi name of your router. 9) The HUD has connected to your Wi‐Fi router when changes to 10) The HUD and Wi‐Fi router are connected, they are automatically updated. Please update near a Wi‐Fi router.
EPIC OPTIX, INC Chapter 4. HDMI Mode How to Connect a HDMI. 1. Connect HDMI‐compatible peripherals to the HUD using the Standard HDMI cable. 2. Please keep press “Select” button until Main Screen (Wi‐Fi Mirroring Screen) changes to HDMI Mode. (approx. 5 seconds) If you press too short time, the HUD will not change to HDMI Mode, but the Wi‐Fi band frequency will be changed to 2.4GHz or 5GHz. If there is no HDMI signal, “No Signal” message will appear.
EPIC OPTIX, INC Chapter 5. On‐Screen Display (OSD) Settings OSD Menu Controls The HUD has an On‐Screen Display (OSD) settings menu that allows you to make adjustments and changes to Settings, such as Display Settings. • Information – This menu show you the information of the HUD state. • Keystone – The HUD adjusts the image shape when the HUD and screen/wall are not perpendicular.
EPIC OPTIX, INC • Factory Reset – Reset your HUD back to default factory settings.
EPIC OPTIX, INC Chapter 6. Taking Care of Your HUD Cleaning the HUD It is only necessary to gently wipe your HUD when dust or dirt accumulates. When cleaning the combiner, mirror and cover window, use an optical lens cloth and enough cleaning solution just to dampen the cloth. Warning: Your HUD should not be connected to any electrical outlet when cleaning. Use only a damp, lint‐free cloth. NEVER USE WATER. Using water, which could enter the case, may VOID your warranty.
EPIC OPTIX, INC Regulatory Compliance This equipment has been tested and found to comply with the limits for a Class B digital device pursuant to Part 15 of the FCC Rules. These limits are designed to provide reasonable protection against harmful interference when the equipment is operated in a commercial environment.
EPIC OPTIX, INC Chapter 7 ‐ Warranty Statement 1. Epic Optix, INC. warrants hardware products against defects in materials and workmanship for a period of one (1) year from date of purchase (“Warranty Period”). The customer is responsible for keeping all original proof of purchase documents during this time. 2. Epic’s Limited Warranty covers only those defects which arise as a result of normal use of the product, and does not apply to: a. Improper or inadequate maintenance or modification b.
20C