
User Manual


ZENMUSE X5S
User Manual
©
2017 DJI All Rights Reserved.
11
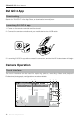
1. Live HD Video
2. Current Camera Settings
3. Spot Metering/ Focus
Switch
4. AF/MF
5. AE Lock
6. Shutter/Record Switch
7. MF Adjustment (in MF mode)
8. Shutter/Record
9.Gimbal Slider
10. Photography Congurations
and Parameter Settings
11. Playback
12. FPV(Tablets only)
Basic Shooting
Insert supported Micro SD card into the Inspire 2 to activate still capturing and video recording.
Insert a DJI CINESSD to activate continuous DNG burst shooting at 20fps, and lossless video
recording in CinemaDNG and ProRes formats.
Taking Photos
Tap the Shutter/Record Switch to select Shutter. Tap the button to take photos.
Single shooting is set by default. Choose from one of the shooting modes via the DJI GO 4 app.
Tap -> -> Video / Photo Setting -> Photo
Or tap the Current Camera Settings to quick set.
1. Multiple Mode
Take 3, 5, 7, 10, or 14 shots in a row.
2. AEB (Auto Exposure Bracketing)
Take 3 or 5 bracketed frames with ±0.7EV steps for exposure compensation.
3. Timed Shot
Take photos in 2, 3, 5, 7, 10, 15, 20, 30 or 60 second intervals.
4. RAW Burst Mode
Take 3, 5, 7, 10 or 14 shots in RAW format continuously. Also supports continuous burst
shooting at 20fps.
Recording
You can start recording in the following two ways:
DJI GO 4 app: Tap Shutter/Record Switch button to activate video recording mode, and
then tap the button . Tap once to start recording video, then tap again to stop recording. The
recording time length will be displayed below the Shutter/Record button.
Remote Controller: You can also press the Video Recording Button on the remote controller,
which has the same function.
Advanced Settings
Exposure Mode
Tap -> to choose from the exposure modes
,
including: Auto. Aperture Priority(A), Shutter
Priority(S), Manual Exposure(M). By setting different EV values, a variety of exposure can be