
User Manual


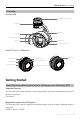


ZENMUSE X5S
User Manual
8
©
2017 DJI All Rights Reserved.
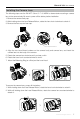
Always power o the battery during installation or removal.
It is recommended to wrap a dust cover around the lens to prevent contamination. DJI
produces dedicated dust covers for the DJI MFT 15mm f/1.7 ASPH and the Panasonic
Lumix 15mm f/1.7 . Other lenses may require a third-party dust cover.
Always tighten the Lens Lock after attaching the camera lens, as this reduces lens vibration
during ight. Always loosen the Lens Lock before attaching and detaching the camera lens.
Remember to use a lter that fulls the weight requirements. For some lenses, use a lter and
a balancing ring/balancing cap simultaneously if required.
Some lenses must not be used with a lens hood. Check the table above for accessory
requirements for your lens.
Always hold down the lens release button before rotating the lens to detach it.
Always hold down the lens release button to unlock the lens lock.
Attach the camera body cap to the lens mount, and the lens cap and rear cap to the lens for
protection after removal.
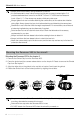
Mounting the Zenmuse X5S to the aircraft
Mounting the Zenmuse X5S to the Inspire 2
1. Remove the Gimbal Cap from the Zenmuse X5S.
2. Press the gimbal and the camera release button on the Inspire 2. Rotate to remove the Gimbal
Cap from the Inspire 2.
3. Align the white dot on the gimbal to the red dot on Inspire 2 and insert the gimbal.
4. Rotate the Gimbal Lock to the locked position by aligning the red dots.
2
3
4
11
Always ensure that the Gimbal Connector 2.0 on the Inspire 2 is in the right position when
mounting, otherwise the camera will not mount.
Remove the lens cap when the Zenmuse X5S is in use.
DO NOT detach the Zenmuse X5S when the aircraft is powered on.