Centerpoint 2x16 and 2x8 Installation and User’s Manual Epicenter Inc. 211B Calle Pintoresco San Clemente, CA 92672 949-366-5370 www.epicenterinc.
Epicenter, Inc. Centerpoint User Guide © 2000 Epicenter, Inc. All rights reserved. First Edition July 2000 Pat # 6,609,034 The information contained in this guide is subject to change without notice. Epicenter Inc. shall not be liable for technical or editorial errors or omissions contained herein; nor is it liable for incidental or consequential damages resulting from the furnishing, performance, or use of this material.
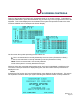
T ABLE OF CONTENTS Introduction................................................................................................ 4 Using This Manual ..................................................................................... 5 Safety Warnings and Cautions................................................................... 6 Product Features ....................................................................................... 7 Rack Mount Installation..............................................
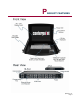
I NTRODUCTION PRODUCT OVERVIEW The Fully Integrated KVM Solution Epicenter’s Centerpoint, 2x8 and 2x16 are Keyboard, Video and Mouse (KVM) solutions that integrate 16 or 8 port switches with a 14.1” TFT display, keyboard and mouse control in a single 1.75” high unit. Centerpoint is a one-stop solution to managing your rack-mounted servers. One control unit eliminates wasted rack space and provides you with control of up to 16 or more servers in a single, compact, design.
U SING THIS MANUAL This manual covers the Centerpoint 2x8 and Centerpoint 2x16 two-user models. Centerpoint 2x8 provides two user access to up to eight servers through the eight integral KVM ports. Centerpoint 2x16 provides two user access to up to 16 servers through the 16 integral KVM ports. Generally, all of this information in this user manual pertains to both products. However, the number of accessible ports ( 16 or 8) controls what will be seen on the On-Screen display.
S AFETY WARNINGS AND CAUTIONS DO NOT open top cover, Hazardous Voltages Present! When mounting Centerpoint 2x16 or Centerpoint 2x8 heating issues must be taken into account! Centerpoint 2x8 and Centerpoint 2x16 must be mounted in a way that ensures the integrity of the rack! Use caution when lowering monitor! Fingers may be pinched. Do not lean on drawer when pulled out! DO NOT OPEN CENTERPOINT.
P RODUCT FEATURES Epicenter, Inc.
R ACK MOUNT INSTALLATION FOR INSTALLATION YOU WILL NEED THE FOLLOWING: • • • • • STANDARD 1U INSTALLATION Centerpoint 2x8 or 2x16 Product Power cord Rails with hardware User Guide Epicenter KVM Cables for connecting video, keyboard, and mouse Warning! To reduce the risk of personal injury or damage to the equipment, be sure that the following items are completed BEFORE performing any work on the rack: • The leveling jacks are extended to the floor.
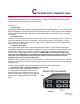
C ENTERPOINT CONNECTIONS POWER Check that the power switch is in the off position (O). Connect the included power cable to the receptacle located on the back of the Centerpoint unit. KVM CABLES Cable Lengths Cable length affects video quality as well as keyboard and mouse data timing. The maximum cable length is determined in part by the computer and peripherals used. Not all systems give satisfactory results at the maximum length.
O N-SCREEN CONTROLS Control of the Centerpoint’s functions is accessed through our on-screen controls. To activate the Centerpoint Main Menu, press the Pause/Break key (or PrtSc key) in the top right hand corner of the keyboard. This screen displays the current status of the system and provides access to the other functions available on the Centerpoint On-Screen Display.
Setup Menu From the Main Menu pressing the F9 brings up the SETUP Menu. Select the item that you want to change by using the up and down arrow keys and then press the Enter Key to change the value of each option item. Edit System Name Edit System Name allows the user to assign a name for the current KVM switch. After selecting, simply type I n the name you choose to use and to then return to the Setup Menu. The name appears t the top of the main screen.
Menu Position Adjust Menu Location displays a submenu that is used to adjust the position of the menu window on the display. It can be set for each port independently or the same setting applied to all of the ports. Use the arrow keys to move the menu box to the desired position on the display. When you are finished press the F11 to have the new position apply to all ports or the F10 key to apply only to the selected port. After pressing either F11 or F10 keys the SETUP Menu is displayed.
Change Password Change Password displays a submenu that allows the user to change the password that is needed to save the changes to any of the Setup changes. The submenu will prompt for the old password and then the new password twice. Highlight the OLD PASSWORD entry field and type the old password (default is blank). Then highlight the NEW PASSWORD entry field and type a password of 11 characters or less. Highlight the TYPE AGAIN entry field and retype the new password.
O PERATION Primary User GETTING STARTED Slide the inner drawer of the system out until the detents of the ball bearing slides catch. Open the TFT to a comfortable viewing angle. We suggests that all servers be set to 1024x768 resolution (optimal TFT performance) and that the refresh frequency be set to a level that creates a crisp video signal. INVOKE CENTERPOINT ON-SCREEN DISPLAY Press the Pause/Break key (or PrtSc if defined in SETUP menu) to bring up the MAIN MENU screen of the Centerpoint .
TFT SETUP AND CONTROLS Control of the TFT functions, Brightness, Contrast, Clock, etc., is accessed through our on-screen controls. To activate the TFT on-screen display, press the enter key to the right of the display. The screen shows the current settings of the TFT display. These buttons provide access to screen adjustments including position, contrast and brightness and auto adjust. To access the on-screen TFT controls press the enter button. This brings up the display’s main menu.
A PPENDICES Epicenter, Inc.
O NE YEAR WARRANTY Epicenter, Inc. warrants this product against defects in materials and workmanship for one year. If a defect is discovered, Epicenter, Inc. will, at its option, repair or replace the product at no charge provided it is returned during the warranty period, with transportation charges prepaid. This warranty does not apply if the product has been damaged by accident, abuse, misuse, or misapplication; if the product has been modified without the written permission of Epicenter, Inc.
F ACTORY DEFAULT SETTINGS System Name = KVM Switch Port Names 1- 8 PORT-01-SERVERNAMEHERE PORT-02-SERVERNAMEHERE PORT-03-SERVERNAMEHERE PORT-04-SERVERNAMEHERE PORT-05-SERVERNAMEHERE PORT-06-SERVERNAMEHERE PORT-07-SERVERNAMEHERE PORT-08-SERVERNAMEHERE Port Names F1-F8 PORT-F1-SERVERNAMEHERE PORT-F2-SERVERNAMEHERE PORT-F3-SERVERNAMEHERE PORT-F4-SERVERNAMEHERE PORT-F5-SERVERNAMEHERE PORT-F6-SERVERNAMEHERE PORT-F7-SERVERNAMEHERE PORT-F8-SERVERNAMEHERE Wake Up Server = None Adjust Menu Offset Xpos=10 Ypos=8 fo
I NSTALLING UPDATES As new features become available Epicenter will occasionally release updates to the Centerpoint KVM software. You may want to update the Centerpoint firmware or software to take advantage of these improvements. The upgrade procedure can be completed quickly and easily via a Window-based application.
F USE REPLACEMENT AND MAINTENANCE FUSE REPLACEMENT Centerpoint is equipped with fuse protection located next to the on-off switch. To assure proper operation of the unit and prevent possible damage or fire, always replace the fuse with the same specifications: Fuse Value: 250V, 2.0A Maximum CARE AND CLEANING Clean the LCD monitor surface with a lint-free, non-abrasive cloth. Avoid using any cleaning solution or glass cleaner! • Adjust the monitor’s brightness and contrast controls to enhance readability.
R EGULATORY INFORMATION Intended Use of Product: Video Display and Keyboard, and Mouse control Indoor Central Office Location Centerpoint is compliant with the following standards and specifications: European Union: Directive No.
S PECIFICATIONS ENVIRONMENTAL Temperature Operating: 32° to 104° F (0° to 40° C). Non-operating: -4° to 140° F (-20° C to 60° C). Humidity Non-condensing, operating: 10 to 90% Non-condensing, non-operating: 5 to 95% Altitude Operating: 0 to 10,000 ft (0 to 3048 m) Non-operating: 0 to 30,000 ft (0 to 9144 m) Audible Noise Less than 60 dbA. Heat Dissipation 85 Btu/hr maximum Shock Operating: 5 to 500 Hz, 0.5 g (0.1 oct/min) Non-operating: 5 to 100 Hz, 1 g (0.1 octave/min); 100 to 500 Hz, 1.5g (0.
C ONNECTING TO A SUN SERVER SETTING UP THE VIDEO DISPLAY OPTION ON THE SERVER: If the server is running with an existing graphics monitor and resolution, please use the following step to change the resolution at the console and window mode: Note: The Sun device MUST be capable of running at 1024x768 resolution to display on a Centerpoint system. Hook up an external multi-sync XGA monitor (capable of 1280x1024 and higher). Power On the server.
Once all connections are complete: • Power ON the Centerpoint unit. • Press the Pause/Break key and choose the port number that the Sun server is attached to and press return. • Power ON the Server. The server is ready for entering the Boot command. TROUBLE SHOOTING If these steps do not allow the Sun to be displayed please follow these steps: • • • Check ALL cable connections using information provided in Cable Connections section.
Epicenter Inc. 211B Calle Pintoresco San Clemente, CA 92672 949-366-5370 www.epicenterinc.com Epicenter, Inc.