
User Manual

Installation Steps for the Windows Video Capture Workstation
13
DVI2PCIe Duo User Guide
1. Shut down and power off the video capture workstation.
2. Disconnect all cables from the video capture workstation.
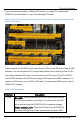
3. Open the system unit to expose the PCIe slots (usually located at the back of
the PC).
4. Attach the antistatic wrist strap to the metal casing of the PC power supply
and to your wrist according to the instructions supplied with the wrist strap.
5. Select a PCIe slot and remove the corresponding filler panel from the PC slot
opening.
6. Holding the DVI2PCIe Duo card by the edges, align the card edge connector
with the PCIe slot.
7. Slide the card mounting bracket into the small slot at the end of the PCIe
opening.
8. Applying even pressure at both corners of the card, push the card down until
it is firmly seated in the slot.
Caution: Do not use excessive force when installing the card into the PCIe slot. You
may damage the card’s PCIe connector. If the card does not seat properly when you
apply even pressure, remove the card and carefully reinstall it.
9. Secure the card mounting bracket to the system unit using a screw at the top
of the mounting bracket.
10. Detach the wrist strap and close the system unit.
11. Power on the video capture workstation.
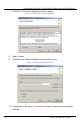
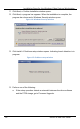
12. Install the DVI2PCIe duo drivers and Epiphan Capture Tool as described
below.
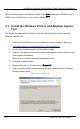
5 Installation Steps for the Windows Video
Capture Workstation
Follow the step-by step procedures provided in this section when you use a Windows
PC as the video capture workstation to view and record images captured by a
DVI2PCIe duo frame grabber.