User Guide Epiphan AV.io SDI Septem ber 26, 2016 Release 3.1.
Term s and conditions This document, the Epiphan web site, and the information contained therein, including but not limited to the text, videos and images as well as Epiphan System Inc.’s trademarks, trade names and logos are the property of Epiphan Systems Inc. and its affiliates and licensors, and are protected from unauthorized copying and dissemination by Canadian copyright law, United States copyright law, trademark law, international conventions and other intellectual property laws.
Thank you for choosing Epiphan Video! At Epiphan Video, product function and quality are our top priority. We make every effort to make sure that our products exceed your expectations. Product feedback Your feedback is important! We regularly contact our customers to ensure our products meet your performance and reliability requirements. We strive to continually enhance our products to accommodate your needs.
Firm ware 3.1.0 release notes Firmware 3.1.0 updates brings all Epiphan Video capture cards in line with the latest behind-the-scenes efficiency, fixes to limitations and known issues and new changes to the AV.io Config Tool. With this latest version of the firmware, each grabber will provide the same effortless, high-quality video capture experience. Overview AV.io SDI is the easiest SDI capture card you’ll ever use.
About AV.io SDI To use AV.io SDI, there's no software to install; simply connect the cables and go. It works on Windows, Mac and Linux and integrates seamlessly with your favorite third-party applications such as Skype, Adobe FMLE, Wirecast, VLC media player and Quicktime.
Registering your AV.io SDI Why should I register m y AV.io SDI? It will allow you to activate your product warranty, give you notifications of firmware and software updates and get you our free personalized customer support. How to register 1. Go to epiphan.com/register 2. Provide the required information. Your six digit serial number is found on your device. A valid e-mail address is required for product registration.
Table of contents Thank you for choosing Epiphan Video! iv Firmware 3.1.0 release notes v What's new v Use input signal resolution v Custom resolution creation v Significant changes to limitations, known issues and troubleshooting v About AV.io SDI vi Registering your AV.
User modes 15 Install the AV.io Config tool 18 Windows 18 Mac 19 Linux 20 Configure settings using AV.io Config tool 22 Identifying the input resolution on your AV.io SDI 24 Update firmware using the AV.
AV.io SDI User Guide Quickstart Quickstart Setting up your AV.io SDI device to capture live video and audio content couldn’t be easier! Before you begin the connection process, you will require: l A 3G-SDI, HD-SDI or SD-SDI video source (with or without audio) l Your AV.io SDI device l A capture desktop computer, laptop or notebook l A USB 3.0 cable (included with purchase) to connect to your AV.
AV.io SDI User Guide Getting started Getting started Welcome and thank you for buying Epiphan Video’s AV.io SDI! This guide contains all the information necessary to successfully use AV.io SDI to quickly and easily capture live video content without any configuration – simply connect the cables and you’re ready to go! This guide starts off by jumping right into it by showing you how to start capturing video, then we’ll take you through how AV.
AV.io SDI User Guide What's in the box? The USB 3.0 cable connects your USB 3.0 cable (1 m / 3 AV.io SDI video grabber with ft) your computer’s USB 3.0 or 2.0 port.
AV.io SDI User Guide System requirements System requirem ents System requirements are the barebones technical essentials your computer needs to work with AV.io SDI. System requirements to use AV.io SDI include: Video source A 3G-SDI, HD-SDI or SD-SDI video source. Any computer (laptop/desktop/other format) with: l Video capt ure workst at ion a compatible USB 3.0 host controller for SuperSpeed operation; or, l a USB 2.
AV.io SDI User Guide Technical specifications LED LED indicates the status of AV.io SDI OS support Windows 7, Windows 8.1, Windows 10 (32-bit and 64- Mac OSX 10.10 and up bit ) Linux distribution with kernel 3.5.0 or higher USB support USB 3.0 and 2.0 Input Resolut ion Standard and non-standard resolution from 640x360 up to 1920×1080 Support ed out put 640×360 640×480 (at 15, 23.97, 24, 960×540 1280×720 25, 29.97, 30, 50, 1920×1080 resolut ions 59.94 or 60 fps) Dimensions 3.54″× 2.
AV.io SDI User Guide Hardware Hardware This section describes the physical features of your AV.io SDI, including diagrams and hardware feature descriptions. Topics covered include: l Hardware diagrams; and, l Indicator LED details Hardware diagram s Your AV.io SDI device includes an input, an output and an indicator light. Input/output ports and indicator lights are identified and explained in the top and bottom cap view AV.io SDI images below.
AV.io SDI User Guide Indicator LED details Indicator LED details The color and action of the indicator LED depends on whether you are connected by USB 3.0 or USB 2.0. For maximum performance, always use a USB 3.0 port and the included USB 3.0 cable. Note that frame capture rate will be reduced when connected via USB 2.0. From the operating system's UVC drivers, the application will receive the AV.io SDI supported color space, resolution and frame rates. If you’re not sure if your controller is USB 3.
AV.io SDI User Guide Capture Capture Setting up your AV.io SDI device to capture live video content couldn’t be easier! Before you begin the connection process, you will require: l A 3G-SDI, HD-SDI or SD-SDI video source l Your AV.io SDI device l A capture computer, laptop or notebook l A USB 3.0 cable (included with purchase) to connect to your AV.io SDI to your capture computer l An SDI cable (included with purchase)to connect your video source to your AV.
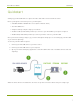
AV.io SDI User Guide How AV.io SDI works How AV.io SDI works Once you’re ready to start capturing, you’ll need either a built-in or third-party application to capture video and audio content with AV.io SDI. The application communicates with AV.io SDI and negotiates a frame rat e (frequency at which frames in a video sequence are displayed) and frame resolut ion (size of a single video frame in pixels).
AV.io SDI User Guide Set up your AV.io SDI for capture Set up your AV.io SDI for capture Connecting your AV.io SDI to your capture computer is simple and is accomplished in three easy steps. To connect your AV.io SDI for capture: 1. Connect your AV.io SDI device to your video source 2. Connect your AV.io SDI device to your desktop computer, laptop or notebook 3. Open your favorite third-party application, select AV.
AV.io SDI User Guide Resolutions, capture rates and aspect ratios Resolutions, capture rates and aspect ratios The resolut ion (also known as frame size or display mode) of a video signal, digital image, TV screen, computer monitor or other display device is a count of the number of pixels displayed horizontally and vertically. For example the resolution 1920×1080 (which is 1080p) creates an image that is 1920 pixels wide and 1080 pixels tall.
AV.io SDI User Guide Automatic image scaling & audio resampling Autom atic im age scaling & audio resam pling If your source content is larger or smaller than the frame size chosen by the application, AV.io SDI automatically scales your source to match the desired frame size! No user configuration required! AV.io SDI also automatically performs audio resampling, meaning that no matter the bit depth or frequency of audio through an SDI audio source, AV.
AV.io SDI User Guide Configuration options Configuration options Your AV.io SDI device is ready to use right out of the box; however, there is support for additional configuration should you need it. AV.io SDI allows you to make adjustments to a captured VGA source and save the new capture settings to your AV.io SDI for future use. For detail on how to adjust VGA capture settings, see Advanced settings for VGA capture. Firmware updates and changes to default capture settings can be applied to your AV.
AV.io SDI User Guide Preserve aspect ratio (enabled by default) The Use Input Signal Resolut ion option allows you to use a video format that is not included on the EDID or UVC descriptors. When Use Input Signal Resolut ion is selected in the AV.io config tool, the input signal format is added to the UVC descriptor, which allows a 1:1 capture from the input video source. If the program you are using is compatible with the signal, you can capture your source in its original format.
AV.io SDI User Guide User modes Now that you've learned what these configuration settings do, you may want to Configure settings using AV.io Config tool or Update firmware using the AV.io Config tool. User m odes The AV.io Config tool gives users the ability to specify custom resolutions. You can make use of up to three at one time, so you don't have to worry about changing the list every time you change which source you have connected. To change the custom resolutions with the AV.io Config tool: 1.
AV.io SDI User Guide User modes 5. Click the User modes tab; the User modes page appears. 6. To create a custom resolution, click the check box for one of the user modes. The grayed-out area becomes open for changes. 7. Select the text box labeled Widt h, erase the number that is currently in the box, and type out the width of the custom resolution you wish to use. Then do the same for the resolution height in the text box labeled Height . 8.
AV.io SDI User Guide User modes 9. If needed, you may follow the same process for User mode 2 and User mode 3. If all three are checked and applied, all three custom resolutions selected will appear in the list of resolutions. You may change the definition of any of these three resolutions at any time. There are two scenarios in which this feature will not perform as expected. 1. Not all third-party applications are able to support custom resolutions. AV.
AV.io SDI User Guide Install the AV.io Config tool Install the AV.io Config tool Epiphan’s AV.io Config tool is used for loading firmware updates on your AV.io SDI and for advanced settings changes. You may install AV.io Config on the same computer(s) where you use AV.io SDI, or only on one computer for configuration. All firmware updates and settings changes are saved to the device and work without any software installed on the computer. To install the AV.
AV.io SDI User Guide Mac Mac 1. Download the AV.io Config package under the M ac OS X heading on the AV.io SDI Downloads page on Epiphan’s web site. 2. Double-click the downloaded file to open the disk image package. 3. If desired, drag the AVioConfig application to your desktop or another location where you will find it for future use. 4. Double-click the AVioConfig application icon to launch AV.io Config; a warning box appears.
AV.io SDI User Guide Linux 5. Click Open. 6. AV.io Config starts! If you video grabber is connected to the computer by USB, it is detected. Linux 1. Download the AV.io Config package under the Linux heading on the AV.io SDI Downloads page on Epiphan’s web site. 2. Untar and unzip the contents of the .tar.bz2 file (tar -xjvf can be used to untar and unzip in one command). 3. Browse (or change directories) to the unzip folder. 4. Either: Double-click the AV.io Config application icon or execute the AV.
AV.
AV.io SDI User Guide Configure settings using AV.io Config tool Configure settings using AV.io Config tool Epiphan’s AV.io Config tool gives advanced users the ability to change several settings to their video capture experience. The settings that can be changed include: Re-numerate input signal resolution, aspect ratio preservation, audio pair selection and performance mode. See Configuration options for more details. To change the configurable settings with the AV.io Config tool: 1.
AV.io SDI User Guide Configure settings using AV.io Config tool 5. Click the Set t ings tab; the settings page appears. 6. Enable or disable the individual settings by clicking each checkbox according to your needs. See Configuration options for a description of each setting.
AV.io SDI User Guide Identifying the input resolution on your AV.io SDI Identifying the input resolution on your AV.io SDI The AV.io Config tool can help you figure out exactly what information your video source is sending. Plug in the source and select your device. The UI detects information about the source and presents it at the bottom of the window.
AV.io SDI User Guide Update firmware using the AV.io Config tool Update firm ware using the AV.io Config tool From time-to-time Epiphan Video releases firmware updates for our video grabbers. If you register your product and agree to be notified of product updates, you’ll receive an email when there is an AV.io SDI update available for download. When new firmware is available, you can load this firmware onto your AV.io SDI using the AV.io Config tool and the steps below.
AV.io SDI User Guide Update firmware using the AV.io Config tool 5. Select your AV.io SDI device from the list under the Devices heading. If your AV.io SDI device is not displayed, press the Refresh icon to refresh the list of connected devices. 6. Using the diagram below, check the current firmware version of your AV.io SDI. If it is the same version as the new firmware you downloaded, there is no need to do the firmware update. 7. Click the Firmware tab 8.
AV.io SDI User Guide Update firmware using the AV.io Config tool Do not disconnect your AV.io SDI at any point during the update process! Doing so may cause irrevocable errors and/or permanently damage the device. 9. When the update is finished the progress bar turns green and displays “Update Completed” (Note the firmware update will not be automatically reflected in the Devices list unless the Refresh icon is clicked). You may now safely disconnect your AV.io SDI if needed.
AV.io SDI User Guide Advanced settings for VGA capture Advanced settings for VGA capture AV.io HD allows you to precisely adjust the bright ness/ cont rast and pan/ t ilt (horizontal and vertical sync) capture settings when capturing from a VGA source. VGA capture adjustments are made using a third-party application and are saved to your AV.io HD device.
AV.io SDI User Guide Advanced settings for VGA capture Adjusting VGA capture settings on Windows/Mac (using Adobe FMLE) VGA capture settings can be set on your AV.io HD device using any number of different applications on Windows/Mac (see VGA capture applications). This example shows how to use Adobe's free Flash Media Live Encoder (FMLE) to make these changes. You do not need to use Adobe FMLEfor the rest of your capture session, the changes are saved to the AV.io SDI device. To adjust your AV.
AV.io SDI User Guide Advanced settings for VGA capture 5. Click the Camera Cont rol tab and set the Pan and Tilt values. Pan affects horizontal sync and can resolve issues where the image is too far to the left or right of the screen. Tilt controls vertical sync and can resolve issues where the bottom edge of the frame isn't properly detected. For best results, change the values in small increments and test. 6. Click OK to save your changes.
AV.io SDI User Guide Advanced settings for VGA capture To restore the default AV.io HD VGA capture settings on your Windows or Mac computer (using Adobe FMLE): 1. Connect your AV.io HD to both your source and capture computer and open Adobe FMLE. 2. In the default view under the Encoding Opt ions tab, select AV.io HD from the Device dropdown menu. 3. Click the wrench icon; the Settings windows opens. 4.
AV.io SDI User Guide Advanced settings for VGA capture 5. Select the Camera Cont rol tab and click the Default button; the pan/tilt default settings are restored. 6. Click OK to save your changes. Adjusting VGA capture settings on Linux (using v4l2ucp) VGA capture settings can be set on your AV.io HD device using any number of different applications on Linux (see VGA capture applications). This example shows how to use v4l2ucp to make these changes.
AV.io SDI User Guide Advanced settings for VGA capture 2. Adjust the Brightness, Contrast, Pan and/or Tilt slider values as required. Pan affects horizontal sync and can resolve issues where the image is too far to the left or right of the screen. Tilt controls vertical sync and can resolve issues where the bottom edge of the frame isn't properly detected. For best results, change the values in small increments and test. 3.
AV.io SDI User Guide Advanced settings for VGA capture 3. Press Updat e for each setting changed; the respective setting adjustments are saved.
AV.io SDI User Guide Limitations and known issues Lim itations and known issues This section includes known issues or limitations that affect functionality or usability and ways that you can work around these limitations. Affecting all operating system s l UVC-314: With the exception of the first capture after system reboot, the very first captured frame is always green. o Workaround: Remove the green frame in post-production editing.
AV.io SDI User Guide Troubleshooting Troubleshooting Use the follow table for help if you are experiencing problems or unexpected behavior from your AV.io SDI. Affecting all operating system s Sympt om(s) The captured VGA source is too bright/dark or is shifted out of the frame. Act ion(s) t o resolve See Advanced settings for VGA capture for stepby-step instructions on how to customize VGA capture settings. Affecting Windows Sympt om(s) Act ion(s) t o resolve If using Windows 8.
AV.io SDI User Guide Affecting Mac Affecting Mac Sympt om(s) AV.io SDI is specified as the capture device in the application, but capture occurs using a different device connected to the computer (such as a web cam). Act ion(s) t o resolve If using VLC M edia Player 2.2.1, disconnect all capture devices except AV.io SDI, downgrade to an older version of VLC media player or use a different capture application. If using VLC M edia Player 2.2.1, downgrade to Recorded file does not have audio.
AV.io SDI User Guide Affecting Chromebook and WebRTC on Google Chrome OS v43.0.2357.125 (64 bit ), use a different Chromebook app to capture both video and audio, such as Screencastify or MediaCore Capture.
Software and docum entation license ATTENTION: THESOFTWAREAND DOCUMENTATION PROVIDED UNDER THISAGREEMENT AREBEING LICENSED TO YOU BYEPIPHAN SYSTEMSINC. (“LICENSOR”) AND ARENOT BEING SOLD. THISAGREEMENT CONTAINSLIMITATIONSON REPRESENTATIONS, WARRANTIES, CONDITIONS, REMEDIES, AND LIABILITIES THAT AREAPPLICABLETO THESOFTWAREAND DOCUMENTATION. Epiphan Systems Inc.
3. Open Source Soft ware: Binary, bytecode and source code versions of certain open source software packages may be embedded in or distributed with the Software (“Open Source Software”). If a separate license agreement for an item of open source software is: delivered to You with the Software; included in the download package for the Software; referenced in any material (including the Documentation) that is included in the download or distribution package for the Software; or listed at www.epiphan.
6.
enhancements to the Software provided pursuant to any technical support You may procure from Licensor shall be governed by the terms and conditions of this Agreement. Licensor reserves the right at any time not to release or to discontinue the release of any Software and to alter prices, features, specifications, capabilities, functions, licensing terms, release dates, general availability or other characteristics of the Software. 9.
otherwise provide to any third party any portion of the Software, except as expressly permitted in this Agreement. 14. General: This Agreement is the entire agreement between You and Licensor in respect to the Software, superseding any other agreements or discussions, oral or written.
ATTENTION, RISQUEDECHOC ÉLECTRIQUE: Cet appareil peut être équipé de multiples cordons d'alimentation en courant alternatif. Pour placer cet appareil hors tension, débrancher tous les cordons d'alimentation sans exception. FCC & CE Com pliance St at em ent This device complies with Part 15 of the FCC Rules. Operation is subject to the following two conditions: 1. This device may not cause harmful interference 2.
In no event shall any reference to any third party or third party product or service be construed as an approval or endorsement by Epiphan of that third party or of any product or service provided by a third party. M iscellaneous It is the user's responsibility to ascertain whether any information downloaded from the Epiphan web site or other websites is free of viruses, worms, trojan horses, or other items of a potentially destructive nature.