
User guide

23
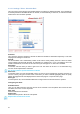
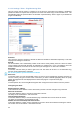
3.3.8.2. Settings / Rules - Timer Rule
This rule can be used to trigger some actions according to a defined time table.
For instance, you could create a rule to switch OFF a Power Outlet every Friday at 6 PM and create
another rule to switch the Power Outlets ON again every Monday at 8 AM.
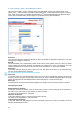
Activated
This check box must be checked to activate the rule. It enables to deactivate temporarily a rule while
keeping all its settings for a later use.
Rule ID
The Power Switch automatically creates an ID Code to clearly identify each rule. These codes start with
the letter "R" followed by a number.
Rule Name
In this field, enter the name you want to give to the rule. The name can be from 1 to 32 characters long,
and can contain alphanumeric characters.
Do not use quotes or special characters in labels!
Rule Color:
In this field, select one of the 48 standard colours you want to use to highlight the rule when executed. To
use own colours, just type in the Hex value of the colour you want. The Rule highlighting allows to quickly
identify the triggered rule when displayed in the Rule Panel page or in a special user's page.
Rule Type
In this Drop-Down list, choose Schedule Rule.
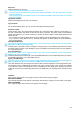
Rules are used to control actions according to a specific event. To create a rule, you will first have to
configure the chosen event and then to choose the actions to perform.
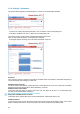
Configuring the Event
Timer Action
Start Time
Defines what time the rule starts.
Stop Time
Defines what time the rule ends.
Applicable weekday
Defines which day(s) the rule has to be executed.
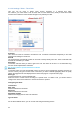
Type of Action
For the Event defined above, you can choose and configure following actions: