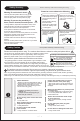
Safety directory Please cautiously read before installing and using. Please be sure to observe the following Warning-To avoid electric shock 1.Do not place the product where it may get wet. 2.Do not drop the remote control into the water. 3.Do not spray water into the product or plug. Warning:To prevent the possibility of burns, electric shocks,fires and injuries. Please don't sprinkle urine at the essence and spray. Please do not open the seat ring or cover violently.
Do not continue to use the product when it breaks down When the following occurs, please unplug the power plug, close the inlet Angle valve, stop the inlet. Do not damage the power cord or toilet seat cable - Don’t pull - Don’t process - Don’t heat - Don’t forcibly bent - Do not place heavy objects on the power cord and toilet seat connection line.
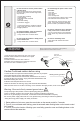
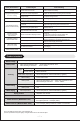
POWER DRYING STOP Press this key to open or shut off the power Press this button to start drying when you are seated. Warm air drying will stop automatically after 3 minutes. You can stop the "Hip cleaning", "Female cleaning", "Drying" and other functions in operation. HIP/ MOBILE FLUSH FEMALE/ MOBILE Press this button when you are seated, the Hip wash cleaning nozzle will spray at the fixed position for 2 minutes and then stop spraying automatically. Press this button and will start flushing.
Description of other functions Flushing by foot sensor Close to the foot sensor, turn on the scour function (manual clamshell) Open cover and seat by foot sensor Radar automatic clamshell function Close to the foot sensor, automatically open/close cover and seat (automatic flip cover) Close to the toilet, automatically open the cover, automatically close the cover after leaving and flush automatically (automatic flip cover) Note: During cleaning and maintenance, please be sure to unplug the power switch
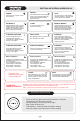
Fault phenomenon Fault analysis Misoperation of remote control Drying/seat temperature too low/no heating Fault handling Check the battery level of the remote control is it too low Check whether the temperature is set at low or normal temperature Whether to turn on the power saving function Please replace the battery Adjust the temperature according to the instruction Refer to the manual to choose to turn off the power saving function Please get professional maintenance technicians Seat/ cover falling
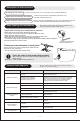
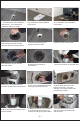
1.The confirmation of the installation environment,The measurement distance is 300mm or greater The confirmation of the installation environment The confirmation of the installation environment 2.Put the flange ring into the drain outlet and mark the screws positions 3.Take off the flange ring and drill four holes for screws 4.Put the screws into the holes 5.Put the flange ring into the drain outlet and install it 6.Install two long screws as below picture 7.Unscrew the screws on the toilet seat 8.
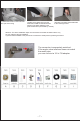
14.Install the screws on the toilet seat and put on the fixing 16.Finally connecting the flexible tube 15.Apply some glass glue to fix the to the inlet angle valve toilet and insulate the outside dirt from entering.(The glass adhesive in the picture needs to be purchased by oneself.) Attention: The above installation steps are universal for all models of toilets and are only for your reference during installation.
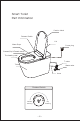
Smart Toilet Part Information Caution Label Rotated Switch Lid Warm Dryer Power plug Cleaner(Hip & Female wash) The heating seat T-valve Toilet Water valve Hose Rotated Switch Female washing Hip Cleaning -8-