
Specifications


Computer Architecture and Maintenance (G-Scheme-2014)
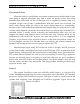
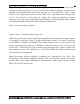
Figure. 237-pin Intel Socket 3 configuration.
Notice that Socket 3 has one additional pin and several others plugged in compared
with Socket 2. Socket 3 provides for better keying, which prevents an end user from
accidentally installing the processor in an improper orientation. However, one serious
problem exists: This socket can't automatically determine the type of voltage that is
provided to it. You will likely find a jumper on the motherboard near the socket to
enable selecting 5V or 3.3V operation.
Caution
Because this jumper must be manually set, a user could install a 3.3V processor in this
socket when it is configured for 5V operation. This installation instantly destroys the
chip when the system is powered on. So, it is up to the end user to ensure that this
socket is properly configured for voltage, depending on which type of processor is
installed. If the jumper is set in 3.3V configuration and a 5V processor is installed, no
harm will occur, but the system will not operate properly unless the jumper is reset for
5V.
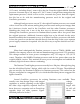
Socket 4
Socket 4 is a 273-pin socket designed for the original Pentium processors. The original
Pentium 60MHz and 66MHz version processors had 273 pins and plugged into Socket
4. It is a 5V-only socket because all the original Pentium processors run on 5V. This
socket accepts the original Pentium 60MHz or 66MHz processor and the OverDrive
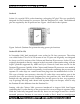
processor. Figure . shows the pinout specification of Socket 4.
Figure . 273-pin Intel Socket 4 configuration.
Somewhat amazingly, the original Pentium 66MHz processor consumes up to 3.2
amps of 5V power (16 watts), not including power for a standard active heatsink (fan).
Prepared By – Prof. Manoj.kavedia (9860174297 – 9324258878 ) (www.kavediasir.yolasite.com)
24