Register your instrument! www.eppendorf.
Copyright © 2013 Eppendorf AG, Hamburg. No part of this publication may be reproduced without the prior permission of the copyright owner. Trademarks Eppendorf and the Eppendorf logo are registered trademarks of Eppendorf AG, Hamburg, Germany. Microtainer is a registered trademark of Becton Dickinson, Franklin Lakes, NJ, USA. Trademarks are not marked in all cases with ™ or ® in this manual. Operating manual. . . . . . . . . . . . . . . . . . . . . . . . . . . . . . . . . . . . . . . . . . . . . . . . . .
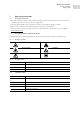
Table of contents Centrifuge 5427 R English (EN) Table of contents Operating Centrifuge on see p. Tab. Fig. p. manual 5427 R English Operating (EN) manual 1 Operating instructions . . . . . . . . . . . . . . . . . . . . . . . . . . . . . . . . . . . . . . . . . . . . . . . . . . . . . . . . . . . . . . 1.1 Using this manual . . . . . . . . . . . . . . . . . . . . . . . . . . . . . . . . . . . . . . . . . . . . . . . . . . . . . . . . . . . . . 1.2 Danger symbols and danger levels . . . . . . . . . . . .
Table of contents Centrifuge 5427 R English (EN) 5.5 Cooling . . . . . . . . . . . . . . . . . . . . . . . . . . . . . . . . . . . . . . . . . . . . . . . . . . . . . . . . . . . . . . . . . . . . 5.5.1 Set the temperature. . . . . . . . . . . . . . . . . . . . . . . . . . . . . . . . . . . . . . . . . . . . . . . . . . . . 5.5.2 Temperature display . . . . . . . . . . . . . . . . . . . . . . . . . . . . . . . . . . . . . . . . . . . . . . . . . . . 5.5.3 Temperature monitoring . . . . . . . . . . . .
Operating instructions Centrifuge 5427 R English (EN) 1 1.1 Operating instructions Using this manual Read this operating manual completely before using the device for the first time. Please also note the operating instructions for the accessories, if applicable. This operating manual is part of the product. Thus, it must always be easily accessible. Enclose this operating manual when transferring the device to third parties. If this manual is lost, please request another one.
Operating instructions Centrifuge 5427 R English (EN) 1.
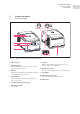
Product description Centrifuge 5427 R English (EN) 2 2.1 Product description Main illustration Abb. 2-1: Front and rear view of the Centrifuge 5427 R USB 6 7 1 2 open 3 menu enter short start stop rpm rcf 4 fast temp 5 8 9 10 Fig.
Product description Centrifuge 5427 R English (EN) 2.2 Delivery package Quant Order no. Order no. Description ity (International) (North America) Centrifuge 5427 R 1 See chapter Ordering Information for corresponding device version, equipment and order number Fuse 1 5301 850.249 022654403 4.0 A (230 V), 2 pieces or 5427 850.341 022654381 8.0 AT UL (120 V/100 V), 2 pieces or 5811 352.006 022664107 10.0 AT UL (100 V), 2 pieces Rotor key 1 5416 301.001 022634305 Standard 1 Mains power cable 1 5409 850.
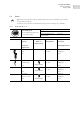
Product description Centrifuge 5427 R English (EN) 2.4 Rotors Eppendorf centrifuges may only be operated with rotors that are intended for use with the corresponding centrifuge. Only use rotors which are marked with the name of the centrifuge (e.g., 5427 R). 2.4.1 Rotor FA-45-12-17 Rotor FA-45-12-17 Aerosol-tight fixed-angle rotor for 12 reaction tubes Vessels Vessel Capacity Max. g-force: 20 598 × g Max. speed: 14 000 rpm Max. load (adapter, tube and contents): 12 × 9.
Product description Centrifuge 5427 R English (EN) 2.4.2 Rotor FA-45-24-11 Rotor FA-45-24-11 Aerosol-tight fixed-angle rotor for 24 tubes Vessels Vessel Capacity Max. g-force: 25 001 × g Max. speed: 16 220 rpm Max. load (adapter, tube and contents): 24 × 3.75 g Adapters Adapter base Max. g-force: Order no. (international) Tube diameter Max. speed Vessels per adapter/rotor Vessel Centrifugation radius – 1.5 mL/2.0 mL – 25 001 × g Ø 11 mm 16 220 rpm -/24 8.
Product description Centrifuge 5427 R English (EN) 2.4.3 Rotor FA-45-24-11-Kit Rotor FA-45-24-11-Kit Aerosol-tight fixed-angle rotor for 24 tubes Vessels Vessel Capacity Max. g-force: 19 090 × g Max. speed: 13 200 rpm Max. load (adapter, tube and contents): 24 × 3.75 g Adapters Adapter base Max. g-force: Order no. (international) Tube diameter Max. speed Vessels per adapter/rotor Vessel Centrifugation radius – 1.5 mL/2.0 mL – 19 090 × g Ø 11 mm 13 200 rpm -/24 9.
Product description Centrifuge 5427 R English (EN) 2.4.4 Rotors FA-45-30-11 and F-45-30-11 Rotor FA-45-30-11 Aerosol-tight fixed-angle rotor for 30 tubes Rotor F-45-30-11 Fixed-angle rotor for 30 tubes Vessels Vessel Capacity Max. g-force: 20 817 × g Max. speed: 14 000 rpm Max. load (adapter, tube and contents): 30 × 3.75 g Adapters Adapter base Max. g-force: Order no. (international) Tube diameter Max. speed Vessels per adapter/rotor Vessel Centrifugation radius – 1.5 mL/2.
Product description Centrifuge 5427 R English (EN) 2.4.5 Rotors FA-45-48-11 and F-45-48-11 FA-45-48-11 rotor Aerosol-tight fixed-angle rotor for 48 tubes Rotor F-45-48-11 Fixed-angle rotor for 48 tubes Vessels Vessel Capacity Max. g-force: 18 213 × g (outer ring) 16 049 × g (inner ring) Max. speed: 12 700 rpm Max. load (adapter, tube and contents): 48 × 3.75 g Adapters Adapter base Max. g-force: Outer ring Inner ring Order no. (international) Tube diameter Max.
Product description Centrifuge 5427 R English (EN) 2.4.6 Rotor F-45-48-5-PCR Rotor F-45-48-5-PCR Fixed-angle rotor for 48 PCR tubes Tubes Tube Max. g-force: 11 710 × g Max. speed: 10 500 rpm Max. load (tube and contents): 48 × 0.43 g Adapter Capacity Adapter base Max. g-force: Tube diameter Max. speed Tubes per adapter/ rotor Centrifugation radius – 0.2 mL conical 11 710 × g Ø 6 mm 10 500 rpm –/48 PCR strips 9.5 cm – 0.2 mL conical 11 710 × g Ø 6 mm 10 500 rpm –/6 × 8 2.
Safety Centrifuge 5427 R English (EN) 3 3.1 Safety Intended use The Centrifuge 5427 R is intended exclusively for indoor use and for separating aqueous solutions and suspensions of various densities in approved test tubes. 3.2 User profile This device may only be operated by trained specialist staff. They must have carefully read the operating manual and be familiar with the function of the device. 3.3 Application limits 3.3.
Safety Centrifuge 5427 R English (EN) Beginning with the first commissioning, the following rotors including the corresponding buckets, carriers and rotor lids have a maximum service life of 7 years or of the number of cycles specified in the table (depending on what occurs first).
Safety Centrifuge 5427 R English (EN) 3.5 Warnings for intended use Read the operating manual and observe the following general safety instructions before using the Centrifuge 5427 R. 3.5.1 Personal injury or damage to the equipment WARNING! Electric shock due to damage to device or mains cable. Only switch on the device if the device and mains cable are undamaged. Only use devices that have been properly installed or repaired.
Safety Centrifuge 5427 R English (EN) CAUTION! Poor safety due to incorrect accessories and spare parts. The use of accessories and spare parts other than those recommended by Eppendorf may impair the safety, functioning and precision of the device. Eppendorf cannot be held liable or accept any liability for damage resulting from the use of incorrect or non-recommended accessories and spare parts, or from the improper use of such equipment.
Safety Centrifuge 5427 R English (EN) CAUTION! Risk of injury from overloaded rotor. The Centrifuge 5427 R is designed for the centrifugation of material with a max. density of 1.2 g/mL at maximum speed and filling volume and/or load. Do not exceed the maximum load of the rotor. NOTICE! Damage to rotors from aggressive chemicals. Rotors are high-quality components which withstand extreme stresses. This stability can be impaired by aggressive chemicals.
Safety Centrifuge 5427 R English (EN) 3.5.5 Aerosol-tight centrifugation WARNING! Risk to health due to limited aerosol tightness with incorrect rotor/rotor lid combination. Aerosol-tight centrifugation is guaranteed only if the rotors and rotor lids intended for this purpose are used. The designation of aerosol-tight fixed-angle rotors always starts with FA.The aerosol-tight rotors and rotor lids of this centrifuge are additionally marked with a red ring on the rotor and a red rotor lid screw.
Installation Centrifuge 5427 R English (EN) 4 4.1 Installation Selecting the location NOTICE! If an error occurs, the objects in the immediate proximity of the device will be damaged. In accordance with recommendations in EN 61010-2-020, leave a safety clearance of 30 cm around the device during operation. Please remove all materials and objects from this area. NOTICE! Damage from overheating. Do not install the device near heat sources (e.g. heating, drying cabinet).
Installation Centrifuge 5427 R English (EN) 4.3 Installing the instrument Prerequisites The device is on a suitable lab bench. NOTICE! Damage to electronic components due to condensation. Condensate can form in the device after it has been moved from a cool environment to a warmer environment. After installing the device, wait for at least 4 h. Only then connect the device to the mains power supply. NOTICE! Centrifuge 5427 R: compressor damage after improper transport.
Operation Centrifuge 5427 R English (EN) 5 5.1 Operation Overview of operating controls Before using the Centrifuge 5427 R, familiarize yourself with the display and operating controls. Abb. 5-1: Operator panel of the Centrifuge 5427 R 1 10 Fig. 5-1: 2 10 4 3 time temp speed 9 8 7 5 6 Operator panel of the Centrifuge 5427 R 1 Call and select the menu parameters (see Menu navigation on p.
Operation Centrifuge 5427 R English (EN) Abb. 5-2: Display of the Centrifuge 5427 R. 1 2 3 4 5 6 9 Fig. 5-2: 7 8 Display of the Centrifuge 5427 R. 1 Centrifugation time 6 g-force (rcf) or speed (rpm) (see Rotors on p. 9) 2 Key lock Key lock. Centrifugation parameters cannot be 7 Status of centrifuge : Centrifuge lid unlocked. accidentally changed. : Centrifuge lid locked. No key lock. Centrifugation parameters can (Flashing): Centrifuging in progress. be changed.
Operation Centrifuge 5427 R English (EN) 5.2 Menu navigation Proceed as follows to change settings in the device menu: 1. Open the menu. 2. Select the desired menu item. 3. Confirm your selection. 4. Select the setting of the corresponding parameters. 5. Confirm the changed setting. The BACK menu item belonging to the first menu level appears. 6. Exit the menu. To exit the second menu level without changing a parameter, select the BACK menu item and confirm with menu/enter. 5.3 Menu Tab.
Operation Centrifuge 5427 R English (EN) Menu level 1 (M 1) Menu level 2 (M 2) SHORT Set the speed of the short spin centrifugation. No SOFT function with short spin centrifugation. MAX Short spin centrifugation at the maximum speed of the inserted rotor Set Short spin centrifugation with set speed (g-force (rcf) or speed (rpm)). Temp Set the time limit for continuous cooling ("ECO shut-off") (see p. 30). 8h Default setting: Continuous cooling ends after 8 h.
Operation Centrifuge 5427 R English (EN) 5.4 Preparing for centrifugation 5.4.1 Switching on the centrifuge Switch the centrifuge on using the mains/power switch. The centrifuge lid opens automatically after switching on using the mains/power switch. The parameter settings of the last run are displayed. 5.4.2 Inserting the rotor 1. Fit the rotor vertically on the motor shaft. 2. Insert the supplied rotor key into the rotor nut. 3. Turn rotor key clockwise until the rotor nut is firmly tightened.
Operation Centrifuge 5427 R English (EN) 5.4.5 Loading the rotor 5.4.5.1 Loading a fixed-angle rotor CAUTION! Risk of injury due to asymmetric loading of a rotor. Load rotors symmetrically with identical tubes. Only load adapters with suitable tubes. Always use the same type of tubes (weight, material/density and volume). Check symmetric loading by balancing the adapters and tubes used with scales. CAUTION! Risk from damaged or overloaded tubes.
Operation Centrifuge 5427 R English (EN) Spin columns For centrifuging spin columns in the rotor FA-45-24-11-Kit, you can leave the tube lids open. However, this can only be done using the tubes provided by kit manufacturers for this purpose. For reliable centrifugation, you must lean the open tube lids against the edge of the rotor. Ensure that the lids do not protrude past the edge of the rotor in the process, then attach the matching rotor lid. 5.4.5.
Operation Centrifuge 5427 R English (EN) 5.4.6 Closing the rotor lid 1. Only QuickLock rotor lid: check that the external sealing ring correctly fits in the groove. 2. Vertically fit the rotor lid on the rotor. 3. Turn the rotor lid screw clockwise to seal the rotor. Only QuickLock rotor lid: Turn the rotor lid screw clockwise as far as it will go, until an audible "click" can be heard. The rotor is not properly closed until an audible click is heard! 5.4.
Operation Centrifuge 5427 R English (EN) 5.5.3 Temperature monitoring After the set temperature has been reached, the centrifuge reacts to temperature deviations during centrifugation as follows: Deviation from target temperature Action ±3 °C Temperature display flashes. ±5 °C Display shows Err 18. Centrifugation is stopped automatically. 5.5.4 Start FastTemp With the FastTemp function, you can immediately start a temperature run without samples, at rotor-specific or temperature-specific speeds.
Operation Centrifuge 5427 R English (EN) 5.5.5 Continuous cooling Continuous cooling Continuous cooling maintains the rotor chamber at the set temperature if the rotor stops. • During continuous cooling the display shows the set temperature. • To prevent the rotor chamber from freezing or condensation from forming, the temperature does not go below 4 °C , irrespective of the set temperature. • If the rotor stops, temperature control is slower than during centrifugation or a temperature control run.
Operation Centrifuge 5427 R English (EN) 5.6 Centrifuging CAUTION! Risk from incorrectly-loaded rotors and damaged/overloaded tubes! Before commencing centrifugation, follow the safety instructions relating to risks from asymmetrically loaded and/or overloaded rotors and from overloaded, damaged and/or open tubes (see Warnings for intended use on p. 17). WARNING! Risk of injury from improperly attached rotors and rotor lids. Only centrifuge with rotor and rotor lid firmly tightened.
Operation Centrifuge 5427 R English (EN) 5.6.2 Centrifuging in continuous operation Perform the following steps in the sequence described. 1. Use time to set the continuous run. The continuous run function can be set above 9:59 h or below 10 s. The timer shows oo to indicate continuous operation. 2. Use temp to set the temperature. 3. With speed, set the g-force (rcf) or speed (rpm). 4. Press the start/stop key to start the centrifugation. The symbol blinks in the display when the rotor is running.
Operation Centrifuge 5427 R English (EN) 5.6.4 Setting the centrifugation radius If an adapter for tubes is used in a rotor, this changes the centrifugation radius. In the RAD menu item, the parameter for the tube/adapter combination has to be set. Prerequisites • Rotor is inserted. • The centrifuge has detected the rotor (see Automatic rotor detection on p. 27). 1. Press the menu/enter key. 2. Select the RAD menu item using the arrow key. Confirm with the menu/enter key.
Operation Centrifuge 5427 R English (EN)
Maintenance Centrifuge 5427 R English (EN) 6 6.1 Maintenance Prepare cleaning/disinfection Clean all accessible surfaces of the device and the accessories at least weekly and when contaminated. Clean the rotor regularly. This way the rotor is protected and the durability is prolonged. Furthermore, observe the notes on decontamination (see Decontamination before shipment on p. 40) when the device is sent to the authorized Technical Service for repairs.
Maintenance Centrifuge 5427 R English (EN) Autoclaving All rotors, rotor lids and adapters can be autoclaved (121 °C, 20 min). Aerosol tightness Check that the seals are intact before use. Only QuickLock rotor lid: Replace the sealing ring in the lid groove when it becomes worn. The sealing rings require regular care to protect the rotors.
Maintenance Centrifuge 5427 R English (EN) 4. Rinse the rotors and accessories thoroughly with distilled water. Rinse the rotor bores of fixed-angle rotors particularly thoroughly. Do not immerse the rotor in liquid as liquid can get trapped inside the cavities. 5. Place rotors and accessories on a cloth to dry. Place fixed-angle rotors with the rotor bores facing downwards to allow the bores to also dry. 6. Correctly reinsert the rotor lid sealing ring in the clean and dry groove. 7.
Maintenance Centrifuge 5427 R English (EN) How to proceed in case of glass breakage 1. Remove all splinters and glass powder from the rotor chamber and accessories. 2. Thoroughly clean the rotor and rotor chamber. Thoroughly clean the bores of the fixed-angle rotors, in particular. 3. If required, replace the adapters to prevent any further damage. 4. Regularly check the rotor bores for deposits and damage. 6.5 Replacing fuses DANGER! Electric shock.
Troubleshooting Centrifuge 5427 R English (EN) 7 Troubleshooting If you cannot remedy an error with the recommended measures, please contact your local Eppendorf partner. The contact address can be found online at: www.eppendorf.com. 7.1 General errors Symptom/message Cause Remedy No display. No mains power connection. Check the mains power connection. No display. Power failure. Check the mains fuse of the laboratory. Lid of the device cannot be opened. Rotor is still running.
Troubleshooting Centrifuge 5427 R English (EN) 7.2 Error messages Proceed as follows if the following error messages appear: 1. Remove fault (see remedy). 2. If necessary, repeat centrifugation. Symptom/message Cause Remedy ERR 1 Rotor not detected. Check rotor. If this error message appears again, test with a different rotor. Err 2 Electronics fault. Switch centrifuge off and back on again after > 20 s. NO RPM (ERR 3) Error in speed measuring system.
Troubleshooting Centrifuge 5427 R English (EN) Symptom/message Cause Remedy Err 22 Switch centrifuge off and back on again after > 20 s. Electronics fault. NO E-FAN (ERR 23) Electronic fan is faulty. Switch centrifuge off and back on again after > 20 s. Err 24 Failure at the compressor. Allow the centrifuge to cool down and repeat the run. INT (ERR 25) Power failure during a run. Check the mains connection. Err 28 Error during speed check.
Troubleshooting Centrifuge 5427 R English (EN) 7.3 Emergency release If the centrifuge lid cannot be opened, you can activate the emergency release manually. WARNING! Risk of injury from rotating rotor. If the emergency release of the lid is operated, the rotor may continue rotating for several minutes. Wait until the rotor stop before operating the emergency release. Check the monitoring glass in the centrifuge lid.
Transport, storage and disposal Centrifuge 5427 R English (EN) 8 8.1 Transport, storage and disposal Transport CAUTION! Risk of injury due to lifting and carrying heavy loads The device is heavy. Lifting and carrying the device can lead to back injuries. Transport and lift the device with an adequate number of helpers only. Use a transport aid to transport the device. Remove the rotor from the centrifuge before transport.
Transport, storage and disposal Centrifuge 5427 R English (EN)
Technical data Centrifuge 5427 R English (EN) 9 9.1 Technical data Power supply Centrifuge 5427 R Mains connection 230 V, 50 Hz – 60 Hz 120 V, 50 Hz – 60 Hz 100 V, 50 Hz – 60 Hz Current consumption 2.4 A (230 V ) 4.6 A (120 V ) 5.
Technical data Centrifuge 5427 R English (EN) 9.4 Application parameters Run time 10 s – 9:59 h, infinite (∞), • 10 s – 2 min: can be set in increments of 10 s • 2 min – 10 min: can be set in increments of 30 s • 10 min – 9:59 h: can be set in increments of 1 min Temperature -11 °C – 40 °C Relative centrifugal force 1 × g – 25 001 × g can be set in increments of 50 × g Speed 100 rpm – 16 220 rpm can be set in increments of 50 rpm Maximum load 48 tube with 2.
Technical data Centrifuge 5427 R English (EN) 9.
Technical data Centrifuge 5427 R English (EN)
Ordering Information Centrifuge 5427 R English (EN) 10 10.1 Ordering Information Centrifuge 5427 R Order no. (International) 5409 000.012 5409 000.136 5409 000.039 Order no. (North America) 5409000136 10.2 Accessories 10.2.1 Rotors and rotor lids Order no. (International) Order no. (North America) 5409 702.009 5409702009 5409 703.005 5409703005 5409 717.006 5409717006 5409 706.004 5409706004 5409 707.000 5409707000 5820 762.004 5820762004 5409 708.007 5409708007 5409 709.
Ordering Information Centrifuge 5427 R English (EN) Order no. (International) Order no. (North America) 5409 713.000 5409713000 5409 704.001 5409704001 5409 705.008 5409705008 5820 767.006 5820767006 5409 700.006 5409700006 5409 701.002 5409701002 5409 716.000 5409716000 5409 714.007 5409714007 5409 715.003 5409715003 5409 720.007 5409720007 5409 721.003 5409721003 5409 719.
Ordering Information Centrifuge 5427 R English (EN) 10.2.3 Other accessories Order no. (International) Order no. (North America) 5416 301.001 5409 850.083 022634305 10.3 Description Rotor key Standard Tray for condensation water Safety Order no. (International) Order no. (North America) 5301 850.249 5427 850.341 5811 352.006 022654403 022654381 022664107 Description Fuse 4.0 A (230 V), 2 pieces 8.0 AT UL (120 V/100 V), 2 pieces 10.
Ordering Information Centrifuge 5427 R English (EN)
Índice Centrifuge 5427 R Español (ES) Índice Manual Centrifuge ver en Tab. Fig. pág. de instrucciones 5427 R Español Manual de (ES) instrucciones 1 Instrucciones de empleo . . . . . . . . . . . . . . . . . . . . . . . . . . . . . . . . . . . . . . . . . . . . . . . . . . . . . . . . . . . 57 1.1 Utilización de estas instrucciones. . . . . . . . . . . . . . . . . . . . . . . . . . . . . . . . . . . . . . . . . . . . . . . . 57 2 Descripción del producto . . . . . . . . . . . . . . . . . . . . . . . . .
Índice Centrifuge 5427 R Español (ES) 6 Mantenimiento . . . . . . . . . . . . . . . . . . . . . . . . . . . . . . . . . . . . . . . . . . . . . . . . . . . . . . . . . . . . . . . . . . . 6.1 Preparación de la limpieza / desinfección . . . . . . . . . . . . . . . . . . . . . . . . . . . . . . . . . . . . . . . . . 6.2 Realización de la limpieza / desinfección . . . . . . . . . . . . . . . . . . . . . . . . . . . . . . . . . . . . . . . . . . 6.2.1 Limpieza y desinfección del equipo . . . . . . . . . .
Instrucciones de empleo Centrifuge 5427 R Español (ES) 1 1.1 Instrucciones de empleo Utilización de estas instrucciones Lea detenidamente este manual de instrucciones antes de poner en funcionamiento el equipo por primera vez. Tenga en cuenta, en caso necesario, los manuales de instrucciones de los accesorios. Este manual de instrucciones es parte del producto. Consérvelo en un lugar accesible. Incluya siempre este manual de instrucciones cuando entregue el equipo a terceros.
Instrucciones de empleo Centrifuge 5427 R Español (ES)
Descripción del producto Centrifuge 5427 R Español (ES) 2 2.1 Descripción del producto Ilustración general Abb. 2-1: Vista anterior y posterior de la Centrifuge 5427 R USB 6 7 1 2 open 3 menu enter short start stop 4 rpm rcf fast temp 5 8 9 10 11 Imag. 2-1: Vista anterior y posterior de la Centrifuge 5427 R 1 Tapa de la centrifuga 2 Tubito de control Control visual de la parada del rotor y/o posibilidad de controlar las revoluciones mediante estroboscopio.
Descripción del producto Centrifuge 5427 R Español (ES)
Instrucciones generales de seguridad Centrifuge 5427 R Español (ES) 3 3.1 Instrucciones generales de seguridad Uso de acuerdo con lo previsto La Centrifuge 5427 R está destinada exclusivamente para su uso en interiores y sirve para la separación de soluciones acuosas y suspensiones de diferente densidad en tubos de muestras autorizados. 3.2 Requerimiento para el usuario Este aparato debe ser manejado exclusivamente por personal técnico debidamente formado.
Instrucciones generales de seguridad Centrifuge 5427 R Español (ES) ¡ATENCIÓN! Peligro de lesiones a causa de tapas o cubiertas de rotor químicamente deterioradas. Las tapas de rotor o cubiertas transparentes de PC, PP o PEI pueden perder resistencia por el efecto de disolventes orgánicos (p.ej. fenol, cloroformo). Si las tapas de rotor o cubiertas entran en contacto con disolventes orgánicos, límpielas inmediatamente.
Instrucciones generales de seguridad Centrifuge 5427 R Español (ES) 3.5 Peligros durante el uso previsto Antes de utilizar la Centrifuge 5427 R, lea primero el manual de instrucciones y tenga en cuenta las siguientes indicaciones generales de seguridad. 3.5.1 Daños personales o al equipo ¡ADVERTENCIA! Descarga eléctrica por daños en el equipo o cable de alimentación. Solo encienda el equipo si este y el cable de alimentación no presentan ningún daño.
Instrucciones generales de seguridad Centrifuge 5427 R Español (ES) ¡ATENCIÓN! Riesgos de seguridad debido a accesorios y piezas de recambio equivocados. Los accesorios y piezas de recambio no recomendados por Eppendorf merman la seguridad, el funcionamiento y la precisión del equipo. Por daños producidos por accesorios y piezas de recambio no recomendados por Eppendorf o por un uso incorrecto, Eppendorf queda eximido de cualquier responsabilidad o garantía.
Instrucciones generales de seguridad Centrifuge 5427 R Español (ES) 3.5.3 Manipulación errónea de los rotores ¡ADVERTENCIA! Peligro de lesión por rotores y tapa del rotor incorrectamente fijados. Centrifugue solo cuando el rotor y la tapa del rotor estén bien fijados. Si al arrancar la centrífuga se producen ruidos no habituales, puede que el rotor o la tapa del rotor no estén fijados correctamente. Finalice el centrifugado de inmediato pulsando la tecla start/stop.
Instrucciones generales de seguridad Centrifuge 5427 R Español (ES) 3.5.4 Utilización extrema de los tubos de centrifugado ¡ATENCIÓN! Peligro de lesión por tubos sobrecargados. Observe los valores límite especificados por el fabricante de los tubos sobre la capacidad de carga de los mismos. Utilice exclusivamente tubos autorizados por el fabricante para la fuerza de la gravedad (FCR) deseada. ¡AVISO! Peligro por tubos dañados. No deben utilizarse tubos dañados.
Instrucciones generales de seguridad Centrifuge 5427 R Español (ES) 3.5.5 Centrifugado hermético a los aerosoles ¡ADVERTENCIA! Riesgos para la salud debido a una hermeticidad a los aerosoles limitada por una combinación incorrecta de rotor/tapa del rotor. El centrifugado hermético a los aerosoles solo está garantizado en caso de utilizar los rotores y tapas de rotor previstos para ello. Las denominaciones de los rotores de ángulo fijo herméticos a los aerosoles siempre empiezan con FA.
Instrucciones generales de seguridad Centrifuge 5427 R Español (ES) 3.6 Indicaciones de seguridad en el equipo Representación Significado Lugar Lugar peligroso Lado derecho del equipo ATENCIÓN Apriete siempre el rotor con la llave de rotor adjunta. Lado superior del equipo, debajo de la tapa de la centrífuga. ATENCIÓN Lado superior del equipo, Cierre todos los tubos y utilice una tapa de rotor. debajo de la tapa de la centrífuga.
Instalación Centrifuge 5427 R Español (ES) 4 4.1 Instalación Seleccionar ubicación ¡AVISO! En caso de error se pueden dañar objetos que se encuentran junto al equipo. Respete las recomendaciones de la norma EN 61010-2-020, dejando durante el funcionamiento un espacio de seguridad de 30 cm alrededor del equipo. Retire todos los materiales y objetos que se encuentren en esta área. ¡AVISO! Daños por sobrecalentamiento. No coloque el equipo cerca de fuentes de calor (p. ej.
Instalación Centrifuge 5427 R Español (ES) 4.3 Instalación del aparato Requisitos El equipo está colocado sobre una mesa de laboratorio apropiada. ¡AVISO! Daños en los componentes electrónicos debido a la formación de condensación. Después de transportar el equipo de un entorno frío a un entorno más caliente se puede formar líquido de condensación en el equipo. Después de emplazar el equipo, debe esperar por lo menos 4 h.
Manejo Centrifuge 5427 R Español (ES) 5 5.1 Manejo Visión general de los elementos de control Familiarícese, antes de la primera utilización de la Centrifuge 5427 R con el indicador y los elementos de control. Abb. 5-1: Panel de manejo de Centrifuge 5427 R 1 10 2 10 4 3 time temp speed 9 8 7 5 6 Imag. 5-1: Panel de manejo de Centrifuge 5427 R 1 Llamar y seleccionar parámetros de menú (ver Navegación por el menú en pág.
Manejo Centrifuge 5427 R Español (ES) Abb. 5-2: Indicador de la Centrifuge 5427 R. 1 2 3 4 5 6 9 7 8 Imag. 5-2: Indicador de la Centrifuge 5427 R. 1 Duración del centrifugado 2 Bloqueo del teclado Bloqueo del teclado. Los parámetros de centrifugado no se pueden cambiar inintencionadamente. Sin bloqueo del teclado. Los parámetros de centrifugado pueden cambiarse. 6 Fuerza de la gravedad (FCR) o número de revoluciones (rpm) 7 Estado de la centrífuga : tapa de centrífuga desbloqueada.
Manejo Centrifuge 5427 R Español (ES) 5.2 Navegación por el menú Para modificar ajustes en el menú del equipo, tiene que proseguir de la siguiente manera: 1. Abrir menú. 2. Seleccionar el punto de menú deseado. 3. Confirmar la selección. 4. Seleccionar el ajuste del respectivo parámetro. 5. Confirmar el ajuste modificado. Usted accede al punto del menú BACK del primer nivel del menú. 6. Abandone el menú.
Manejo Centrifuge 5427 R Español (ES) Nivel del menú 1 (M 1) Nivel del menú 2 (M 2) ATSET Ajuste del inicio de un ciclo de centrifugado. ON La cuenta atrás de la duración de ciclo ajustada empieza al alcanzar el 95% del valor de la fuerza de la gravedad (FCR) o el número de revoluciones (rpm) predeterminado. OFF La cuenta atrás del tiempo que dure el ciclo empieza de inmediato. MAX SHORT Ajuste de la velocidad del centrifugado de corta duración.
Manejo Centrifuge 5427 R Español (ES) 5.4 Preparación del centrifugado 5.4.1 Conexión de la centrífuga Conexión de la centrífuga con el interruptor de red. Después de la conexión con el interruptor de red, la tapa de la centrífuga se abre automáticamente. Los ajustes de los parámetros del último ciclo se visualizan. 5.4.2 Inserción del rotor 1. Coloque el rotor verticalmente en el eje del motor. 2. Inserte la llave de rotor suministrada en la tuerca del rotor. 3.
Manejo Centrifuge 5427 R Español (ES) Mensaje de error después del cambio de rotor • Si inicia un centrifugado directamente después de haber sustituido el rotor, la centrífuga todavía no ha realizado una detección automática del mismo. Las revoluciones ajustadas para el rotor anterior pueden sobrepasar las revoluciones máximas permitidas del nuevo rotor. En este caso, la centrífuga se detiene después de la detección automática e indica SPEED.
Manejo Centrifuge 5427 R Español (ES) Columnas de centrifugado Durante el centrifugado de columnas de centrifugado en el rotor FA-45-24-11-Kit se pueden dejar abiertas las tapas de estos tubos. No obstante, esto sólo está permitido con tubos previstos para ello por sus fabricantes. Para un centrifugado seguro, tiene que apoyar las tapas abiertas en el borde del rotor. Preste atención a que las tapas no sobresalgan y cierre luego el rotor con la tapa de rotor correspondiente. 5.4.5.
Manejo Centrifuge 5427 R Español (ES) 5.4.6 Cierre de la tapa del rotor 1. Sólo con la tapa de rotor QuickLock: Compruebe el asiento correcto del anillo de obturación exterior en la respectiva ranura. 2. Coloque la tapa del rotor perpendicularmente al rotor. 3. Para cerrar el rotor, gire el tornillo de la tapa del rotor en el sentido de las agujas del reloj.
Manejo Centrifuge 5427 R Español (ES) 5.5.4 Iniciar el ciclo de atemperado FastTemp Con la función FastTemp inicia directamente un ciclo de atemperado sin muestras con un número de revoluciones específico del rotor y la temperatura, para que la cámara del rotor con rotor y adaptador alcance rápidamente la temperatura ajustada. Requisitos • • • • La centrífuga está encendida. El rotor y la tapa de rotor están montados correctamente. La tapa de la centrífuga está cerrada.
Manejo Centrifuge 5427 R Español (ES) 4. Para activar ECO shut-off después de 1 h, 2 h o 4 h, abra la tapa de la centrífuga después del ciclo y vuelva a cerrarla. El equipo cambia al modo standby después de 1 h, 2 h o 4 h. El indicador muestra EP. • Cuando la tapa de la centrífuga no se abre y vuelve a cerrar después del ciclo, se realiza el ECO shut-off después de 8 h (ajuste estándar). • Para terminar la refrigeración continua con cuidado, abra la tapa de la centrífuga. 5.5.
Manejo Centrifuge 5427 R Español (ES) Finalización del centrifugado • Una vez transcurrido el tiempo ajustado, la centrífuga se detiene automáticamente. Durante el proceso de frenado se indica el tiempo de duración del centrifugado de forma parpadeante. En cuanto el rotor se haya detenido por completo, se escucha una señal acústica. • La tapa de la centrífuga permanece cerrada para conservar la temperatura de las muestras. Puede abrirla pulsando la tecla open.
Manejo Centrifuge 5427 R Español (ES) 5.6.3 Ajuste del radio de centrifugado Si en un rotor utiliza un adaptador para tubos, el radio de centrifugado cambia. En el elemento del menú RAD debe ajustarse el parámetro para la combinación tubo/adaptador. Requisitos • El roto está insertado. • La centrífuga ha reconocido el rotor (ver Detección automática del rotor en pág. 75). 1. Pulse la tecla menu/enter. 2. Seleccione con la tecla de flecha el elemento del menú RAD. Confirme con la tecla menu/enter.
Mantenimiento Centrifuge 5427 R Español (ES) 6 6.1 Mantenimiento Preparación de la limpieza / desinfección Limpie las superficies accesibles del aparato y de los accesorios por lo menos una vez por semana, y en caso de un fuerte ensuciamiento. Limpie el rotor con regularidad. De esta manera se protege y se prolonga su vida útil. Consulte además las indicaciones de descontaminación (ver Descontaminación antes del envío en pág.
Mantenimiento Centrifuge 5427 R Español (ES) ¡AVISO! Corrosión producida por productos de limpieza y desinfección agresivos. No utilice productos de limpieza corrosivos ni disolventes agresivos o abrillantadores. No incube los accesorios durante un tiempo prolongado en productos de limpieza o desinfectantes agresivos. ¡AVISO! Daños por radiación UV u otro tipo de radiación rica en energía.
Mantenimiento Centrifuge 5427 R Español (ES) 6.2.2 Limpieza y desinfección del rotor 1. Controle que el rotor y los accesorios no presenten daños ni corrosión. No utilice rotores ni accesorios dañados. 2. Limpie y desinfecte los rotores y accesorios con los productos de limpieza recomendados. 3. Limpie y desinfecte la tapa del rotor. SÓLO QuickLock: Retire siempre el anillo de obturación para poder limpiar exhaustivamente la ranura que se encuentra debajo. 4.
Mantenimiento Centrifuge 5427 R Español (ES) 6.4 Rotura de vidrio Al utilizar tubos de vidrio se pueden producir roturas en la cámara del rotor. Las astillas de vidrio producidas se arremolinan durante el centrifugado en la cámara del rotor y afectan al rotor y los accesorios como un chorro de arena. Las partículas de vidrio más pequeñas se acumulan en las piezas de goma (p.ej. en el manguito del motor, el anillo de obturación de la cámara del rotor y las esterillas de goma de los adaptadores).
Mantenimiento Centrifuge 5427 R Español (ES) 6.6 Descontaminación antes del envío Cuando envíe el equipo en caso de reparación al servicio técnico autorizado o en el caso de eliminación del mismo a su concesionario, tenga en cuenta lo siguiente: ¡ADVERTENCIA! Riesgo para la salud debido a la contaminación del equipo. 1. Tenga en cuenta las indicaciones del certificado de descontaminación. Encontrará estas indicaciones como fichero PDF en nuestra página de Internet (www.eppendorf.com/ decontamination). 2.
Mantenimiento Centrifuge 5427 R Español (ES)
Solución de problemas Centrifuge 5427 R Español (ES) 7 Solución de problemas Si no puede solucionar el error con las medidas sugeridas, póngase en contacto con su socio local de Eppendorf. Encontrará la dirección de contacto en Internet bajo www.eppendorf.com. 7.1 Errores generales Síntoma/mensaje Causa Ayuda Ningún dato. No hay alimentación eléctrica. Controle la conexión de la red de distribución. Ningún dato. Caída de corriente. Compruebe el fusible de la red eléctrica del laboratorio.
Solución de problemas Centrifuge 5427 R Español (ES) 7.2 Mensajes de error Si aparece uno de los siguientes mensajes de error, debe proseguir de la siguiente manera: 1. Eliminar el fallo (véase la sección de ayuda). 2. Si ha tenido éxito, repita la centrifugación. Síntoma/mensaje Causa Ayuda Err 1 El rotor no es detectado. Controle el rotor. En caso de repetirse el mensaje de este error, comprobar con otro rotor. Err 2 Avería en el sistema electrónico.
Solución de problemas Centrifuge 5427 R Español (ES) Síntoma/mensaje Causa Ayuda Err 19 Condensador sobrecalentado. Compruebe la circulación de aire libre a través de las ranuras de ventilación. Deje que el equipo se enfríe. Err 20 El sensor de temperatura en la cámara Desconecte la centrífuga y del rotor está defectuoso. conéctela de nuevo después de > 20 s. Err 21 El sensor de temperatura en el condensador está defectuoso. Desconecte la centrífuga y conéctela de nuevo después de > 20 s.
Solución de problemas Centrifuge 5427 R Español (ES) 7.3 Desbloqueo de emergencia En caso de que no pueda abrir la tapa de la centrífuga, puede pulsar manualmente el desbloqueo de emergencia. ¡ADVERTENCIA! Peligro de lesión debido a la rotación del rotor. Con el desbloqueo de emergencia de la tapa, el rotor puede seguir girando durante varios minutos. Espere a que el rotor se detenga antes de pulsar el desbloqueo de emergencia.
Transporte, almacenaje y eliminación Centrifuge 5427 R Español (ES) 8 8.1 Transporte, almacenaje y eliminación Transporte ¡ATENCIÓN! Peligro de lesiones por elevar y cargar cargas pesadas El equipo es pesado. Elevar y cargar el equipo puede causar dolores de espalda. Transporte y eleve el equipo con un número de ayudantes suficiente. Utilice para el transporte una ayuda de transporte. Saque el rotor de la centrífuga antes del transporte.
Transporte, almacenaje y eliminación Centrifuge 5427 R Español (ES)
Evaluate your manual Give us your feedback. www.eppendorf.com/manualfeedback Your local distributor: www.eppendorf.com/contact Eppendorf AG · 22331 Hamburg · Germany eppendorf@eppendorf.com · www.eppendorf.