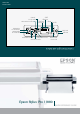
QUICK REFERENCE GUIDE Epson Stylus Pro 11880 ® Control Panel Lights and Buttons Pause or reset button and light Paper Feed up button Menu or cleaning button Enter or barcode button Auto take-up reel backward button Power light Power button Auto take-up reel forward button Paper light Maintenance tank gauges Ink light Paper Feed down button Ink cartridge gauges Paper source or cut button Printed in USA CPD-24469
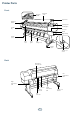
Printer Parts Front Roll paper cover Roll paper spindle Paper lever Roll paper holder Control panel Ink bay lights Left ink bay Ink cover button Right ink bay Locking caster Front cover Paper guide Auto take-up reel Locking caster Take-up reel sensor Back Auto take-up reel connector Left maintenance tank Right maintenance tank AC inlet Network connector USB connector 1 Center maintenance tank Take-up reel reflector
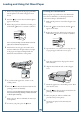
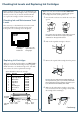
Loading Roll Paper 1 Slide the black paper stop off the end of the spindle. 9 Release the paper lever. If the lever is locked, press and hold the button for 3 seconds to unlock it. 10 Feed the paper into the slot and pull it all the way through. 11 Turn the roll back to remove any slack. Then align the bottom edge with the horizontal and vertical lines. 12 Return the paper lever to the locked position. Then close the roll paper cover. 13 Press the Pause button.
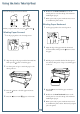
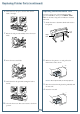
Using the Auto Take-Up Reel You can wind paper forward or backward. 6 Hold down the Auto Forward button on the control panel to rotate the take-up reel and wind a small length of paper. 7 When you’re ready to print, make sure Auto Cut is set to Off in the printer driver. Winding Paper Backward Before you print, make sure you press and select . 1 Set the paper guides to the vertical position. 2 Align the edge of the paper with the horizontal and vertical lines.
Loading and Using Cut Sheet Paper 1 2 3 4 Press the Paper Source button until the appears on the LCD. Release the paper lever. If the lever is locked, press and hold the button for 3 seconds to unlock it. Feed the sheet into the paper slot until it meets resistance. Make sure the right and bottom edges of the paper are straight and aligned with the horizontal and vertical lines on the printer. 6 Press the Pause button. The sheet feeds into the printing position automatically.
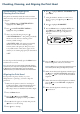
Checking, Cleaning, and Aligning the Print Head Automatically Checking and Cleaning the Print Head 6 Press to highlight SELECT THICKNESS, then press Menu. The printer automatically checks the nozzles and cleans them if necessary. You can specify how often you want this to happen. 7 Select the thickness (0.2 mm or 8 mil for most Epson® papers), press , then press twice to back up. 8 Press 9 Press the Menu button to highlight AUTO, then press Menu again. UNI-D (uni-directional) is highlighted.
Checking Ink Levels and Replacing Ink Cartridges Before you begin a large print job, you should check your ink levels. If one of your cartridges is low, you can replace it before you start. Or you can wait until the ink runs out, replace the cartridge, and then continue the job. When one of the icons is blank and NOT ENOUGH INK is displayed, the cartridge is expended. To replace the cartridge, first make sure the printer is on.
Replacing Ink Cartridges (continued) 5 Hold the cartridge with the arrow mark pointing toward the printer. Then insert the cartridge into the slot. Don’t force it. 6 Close the ink bay cover. 3 Press Menu to display EXECUTE, then press . The paper cutter holder moves to the replacement position. 4 Open the front cover. 5 Locate the cutter assembly with a blue plastic cover. Note: If you can’t insert the cartridge smoothly, you may have the wrong cartridge. Check the package and product code.
Replacing Printer Parts (continued) 6 Replacing the Maintenance Tank Hold down the side pin, as shown, then turn the latch to the right. You need to replace one of the maintenance tanks (part # C12C890191) when you see MAINT TANK FULL on the LCD, along with an indication of which tank is full. 1 7 Check the LCD to determine which tank needs to be replaced. Left tank Release the side pin and carefully remove the cutter blade. Right tank Center tank 8 Insert the new cutter blade.
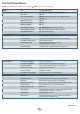
Control Panel Menus Boldface type indicates the default setting. Press the Menu button to access the menus.
Control Panel Menus (continued) PAPER SETUP PAPER TYPE Media type loaded in the printer ROLL PAPER REMAINING Setting appears only when no paper is loaded REMAINING PPR SETUP OFF, ON:PRINT EVERY PAGE, ON:AT ROLL EXCHANGE ROLL PAPER LENGTH From 15 to 300 ft ROLL LENGTH ALERT From 3 to 50 ft CUSTOM PAPER PAPER TYPE Photo, Proofing, Fine Art, Matte, Plain, Others PLATEN GAP STANDARD, NARROW, WIDE, WIDER, WIDEST THICKNESS PATTERN PRINT CUT METHOD STANDARD, THIN PAPER, THICK PAPER FAST, THICK PA
Where To Get Help Epson PreferredSM Unit ID number Date of purchase Service Access Telephone support Call (888) 377-6611. Make sure you have your Unit ID number. Serial number If you experience any difficulty with the toll-free number or your Unit ID number, call (562) 276-1305. World Wide Web Go to epson.com/support to download drivers and firmware, access product documentation and troubleshooting, and get technical advice through e-mail. Support for non-Epson RIP Contact the RIP manufacturer.
QUICK REFERENCE GUIDE Epson Stylus Pro 11880 ® Control Panel Lights and Buttons Paper Feed up button Menu or cleaning button Enter or barcode button Pause or reset button and light Auto take-up reel backward button Power light Power button Auto take-up reel forward button Paper light Ink light Maintenance tank gauges Ink cartridge gauges Paper Feed down button Paper source or cut button Printed in USA CPD-24469