
User Manual


Table Of Contents
- Front
- Contents
- Introduction to Your Projector
- Setting Up the Projector
- Using the Projector on a Network
- Wireless Network Projection
- Setting Up Projector Network E-Mail Alerts
- Setting Up Monitoring Using SNMP
- Controlling a Networked Projector Using a Web Browser
- Using Basic Projector Features
- Turning On the Projector
- Turning Off the Projector
- Selecting the Language for the Projector Menus
- Adjusting the Image Height
- Image Shape
- Resizing the Image With the Zoom Ring
- Focusing the Image
- Remote Control Operation
- Selecting an Image Source
- Projection Modes
- Image Aspect Ratio
- Color Mode
- Controlling the Volume with the Volume Buttons
- Projecting a Slide Show
- Adjusting Projector Features
- Adjusting the Menu Settings
- Maintaining and Transporting the Projector
- Solving Problems
- Projection Problem Tips
- Projector Light Status
- Using the Projector Help Displays
- Solving Image or Sound Problems
- Solutions When No Image Appears
- Solutions When Image is Incorrect Using the USB Display Function
- Solutions When "No Signal" Message Appears
- Solutions When "Not Supported" Message Appears
- Solutions When Only a Partial Image Appears
- Solutions When the Image is Not Rectangular
- Solutions When the Image Contains Noise or Static
- Solutions When the Image is Fuzzy or Blurry
- Solutions When the Image Brightness or Colors are Incorrect
- Solutions When There is No Sound or Low Volume
- Solving Projector or Remote Control Operation Problems
- Solutions When Network Alert E-Mails are Not Received
- Where to Get Help
- Technical Specifications
- General Projector Specifications
- Projector Lamp Specifications
- Remote Control Specifications
- Projector Dimension Specifications
- Projector Electrical Specifications
- Projector Environmental Specifications
- Projector Safety and Approvals Specifications
- Supported Video Display Formats
- USB Display System Requirements
- Notices
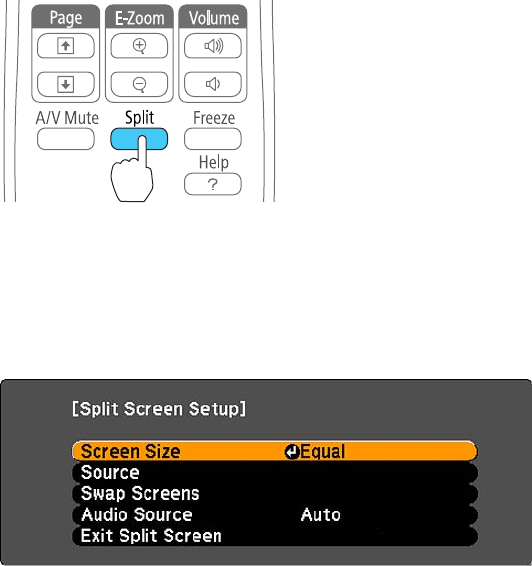
Projecting Two Images Simultaneously
You can use the split screen feature to simultaneously project two images from different image sources
next to each other. You can control the split screen feature using the remote control or the projector
menus (PowerLite 1761W/1771W/1776W).
Note: While you use the split screen feature, other projector features may not be available and some
settings may be automatically applied to both images.
1. Press the Split button on the remote control.
The currently selected input source moves to the left side of the screen.
2. Press the Menu button.
You see this screen:
3. To select an input source for the other image, select the Source setting, press Enter, select the
input source, select Execute, and press Enter. (You can also change image sources, if necessary.)
4. To switch the images, select the Swap Screens setting and press Enter.
97