
Specifications


PowerLite 1810p/1815p
3/08 PowerLite 1810p/1815p - 13
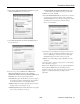
3. Make sure Location is set to
Automatic.
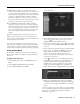
4. Select
Network Port Configurations in the Show pull-
down menu.
5. Under Port Configurations, select
AirPort.
6. Click
Apply Now. Then close the window.
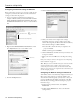
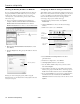
7. Click the AirPort icon on the menu bar at the top of the Mac
desktop. You see the AirPort status menu:
8. Check to make sure AirPort is turned on.
9. Select your projector’s ESSID.
Note: If you don’t need the other network port configurations,
disable them by deselecting their checkboxes.
Now you’re ready to connect to the projector. See “Projecting
Over a Network” on page 17.
Using Access Point Mode
To use Access Point (infrastructure) mode, first adjust your
projector and wireless access point or AirPort base station
settings as described in this section.
Configuring the Projector
1. Press the Menu button, then choose Network and press
Enter.
2. Choose
Network Configuration and press Enter.
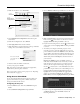
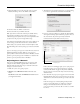
3. Choose
Wireless LAN and press Enter. You see this screen:
4. Make sure
Advanced is selected for the Connection mode.
If not, use the pointer button on the remote control to
highlight
Advanced, then press Enter to select it.
5. If your network is using 802.11a, use the pointer button
on the remote control to highlight
802.11a, then press Enter
to select it.
6. To enable your computer to find the projector on the
network, you need to enter the SSID name of your access
point or AirPort network in the
ESSID text box. (The name
of your AirPort network may be different from that of your
AirPort base station; select your base station in the AirPort
Admin utility and click
Configure to check the name of
your network.)
Highlight the
ESSID text box, press Enter, and enter a
name. Note that the ESSID is case-sensitive (if you enter the
name in uppercase on the projector, you must type it the
same way on the computer connecting to the projector).
Use the pointer button to select individual letters; then
press
Enter to input a character. To add a blank space or to
navigate backward and forward through the input text,
highlight the arrows and press
Enter. To toggle symbol
settings or capital letters, highlight the option and press
Enter. When you’re done, highlight Finish and press Enter.
7. If your access point assigns IP addresses automatically, turn
on
DHCP. Otherwise, turn off DHCP and enter the
following information:
Select
Automatic
then select
AirPort
Select
Network Port
Configurations
Choose the ESSID
you assigned to the
projector