
User`s guide


Fine-Tuning the Projector 131
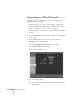
Choosing When to Display the Image
After your image is saved, you can set it to display as the startup
screen, the screen you see when there’s no signal, or the screen you see
when you press the
A/V Mute button (see page 31).
1. Press the
Menu button, highlight the Extended menu, and press
Enter.
2. Select
Display and press Enter.
3. Choose from these display options:
■ Set Display Background to Logo to display your image
when there is no signal.
■ Set Startup Screen to On to display your image when the
projector is warming up.
■ Set A/V Mute to Logo to display your image when you press
the
A/V Mute button.
4. When you’re finished, press
Menu to exit.
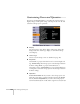
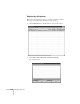
Disabling the Projector’s Buttons
When you enable the Operation Lock function, you can lock all the
projector’s buttons, or all buttons except the
Power button. The
remote control can still be used to operate the projector.
1. Press the
Menu button, highlight the Settings menu, and press
Enter.
2. Select
Operation Lock and press the Enter button.
3. Select
Full Lock (to lock all projector buttons) or Partial Lock (to
lock all buttons except the
Power button) and press Enter.
4. Select
Yes and press Enter to confirm the setting.
5. Press the
Menu button to exit.
To disable the Operation Lock function, select
Off in the Operation
Lock menu. Or press and hold the
Enter button on the projector’s
control panel for 7 seconds. A message is displayed and the lock is
released.
note
You can lock these settings to
prevent them from being
changed without a password
(see page 127).