IMAGEPRINT Quick Start Guide Windows 2000/XP Edition © Colorbyte Software 2003
This Quick Start Guide is designed to assist in the basic installation and setup of IMAGEPRINT . The complete IMAGEPRINT manual is provided in PDF format on the enclosed CD-ROM. Please read the manual for a comprehensive explanation of IMAGEPRINT and its powerful toolset. You are also encouraged to run the Interactive Tutorial which is included on the CD.
INSTALLING IMAGEPRINT IMPORTANT: DO NOT INSERT THE USB DONGLE UNTIL INSTRUCTED TO DO SO. THE SOFTWARE WILL NOT INSTALL PROPERLY IF THE STEPS ARE NOT FOLLOWED IN THE ORDER PRESENTED . Before installing IMAGEPRINT, verify that the printer is operating properly and that there is proper communication with the computer. LOCATE THE PROPER PORT NAME Skip this step if installing a Fuji Pictrography or a printer connected via ethernet.
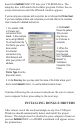
Insert the IMAGEPRINT CD into your CD-ROM drive. The autoplay disc will launch the Installer program. Follow the onscreen instructions until the IPInstall window appears. If you’re using one computer and one printer, do not change the Printer Host. If you have multiple printers and computers you should refer to the complete User’s manual for detailed instructions. 1. For parallel, USB or Firewire port connections Click Local. In this example we’re using USB002.
THE IPMANAGE WINDOW You will now use the IPManage utility to enter the encryption code that will enable you to print using IMAGEPRINT. Before launching IPManage, you will need to get your encryption. The fastest way is via the internet and your email address. Enter the complete address www.colorbytesoftware.com/getcode.php into your browser. You will be asked to enter the Login ID and dongle number printed on the back of your IMAGEPRINT package.
IMAGEPRINT is now installed. You may now double-click on the IMAGEPRINT icon to launch the application. MAKING YOUR FIRST PRINT There are just a few key settings that need to be adjusted before a print is made. It helps to have a reference image open for both viewing on screen, and to make a test print. We recommend using one of the sample images that are automatically installed with ImagePrint. To locate a sample image open the ImagePrint folder, then open the Test Images folder.
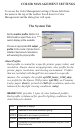
COLOR MANAGEMENT SETTINGS To access the Color Management settings Choose Edit from the menu at the top of the toolbar. Scroll down to Color Management and the dialog box will open. The System Tab Set the monitor profile. Monitor 2.2 D93 should be used if there is no custom display profile available. Choose an appropriate ICC output profile for the model of printer that is installed. See below for assistance with selecting the proper profile.
Epson 2200, 7600, 9600 Ultrachrome printer owners should refer to the end of this guide for additional information on printing greyscale images. The Bitmap Tab Moving to the Bitmap tab of color management reveals more settings. In this example “Adobe RGB 1998” is chosen as the RGB source space in the “RGB” box. This setting should generally coincide with the settings used in programs such as Photoshop so that all applications are synchronized.
Click the Setup Button. The Printer Setup window is where Ink set, number of Copies, and paper cutting options are set. NOTE: The ink, quality, and resolution are set automatically when using IMAGEPRINT profiles for all Epson Ultrachrome printers. If you’re using your own ICC profiles, refer to “Choosing Your Ink Set Manually”. For all other printers please consult the IMAGEPRINT manual for details selecting the proper inkset. Click OK to close the Print Setup window.
of the IMAGEPRINT manual to learn more about this powerful tool. CHOOSING YOUR INK SET MANUALLY If you’re using your own ICC profiles you will need to select the proper ink set from the Printer Settings window. Select your proper ink set according to the chart below. KCMYcm Pigment (color printing) Epson printers with pigment/CF/archival inks and Ultrachrome printers using Photo Black . KMCMYcm Pigment Ultrachrome printers using Matte Black. (color printing) K Pigment Not currently supported.
you with our naming convention. Example 1: ep2200 luster_1440_eday This profile is for the Epson 2200 (ep2200), using standard Photo Black ink, Luster paper (luster), 1440 dpi (1440), and daylight balanced viewing environment (eday). Example 2: ep2200MK Velvet_1440_ECWF This profile is for the Epson 2200, using Matte Black ink (MK), Epson Velvet paper (Velvet), 1440 dpi, and color balanced for cool white fluorescent lighting conditions.