Proof Sign-off: M.Otsuka, CRE M.Moriyama_______ N.Nomoto _______ _______ R R4C624Setup Guide Rev_C A5 size 6/15/00 Printing Your First Page SETUP.
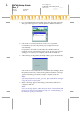
L R4C624Setup Guide Rev_C A5 size 6/15/00 SETUP.FM Pass 0 Proof Sign-off: M.Otsuka, CRE M.Moriyama_______ N.Nomoto _______ _______ Attaching the Paper Support Insert the paper support into the slots at the rear of the printer. Plugging in the Printer Follow the steps below to plug in your printer. 1. Make sure that the printer is turned off. It is off when the P power button protrudes slightly from the surface of the control panel. 2.
Proof Sign-off: M.Otsuka, CRE M.Moriyama_______ N.Nomoto _______ _______ R4C624Setup Guide Rev_C A5 size 6/15/00 SETUP.FM Pass 0 Connecting the Printer If you are connecting the printer to a PC, it is possible to use either the parallel or USB interface. Macintosh computers must be connected via the USB interface. Depending upon your geographic location, you may need to acquire the appropriate cable. See "Options and Consumable Products" in the Daily Use guide for details.
L R4C624Setup Guide Rev_C A5 size 6/15/00 SETUP.FM Pass 0 Proof Sign-off: M.Otsuka, CRE M.Moriyama_______ N.Nomoto _______ _______ Using the USB interface for PCs and Macintosh To connect the printer to a USB port, you need a standard shielded USB cable. Follow these steps. 1. Make sure that both the printer and computer are turned off. 2. Plug the appropriate end of the cable into the USB port at the back of the printer.
Proof Sign-off: M.Otsuka, CRE M.Moriyama_______ N.Nomoto _______ _______ R4C624Setup Guide Rev_C A5 size 6/15/00 SETUP.FM Pass 0 Installing the Printer Software After connecting the printer to your computer, you need to install the software included on the “Printer Software for EPSON Stylus Photo 2000P” CD-ROM shipped with your printer.
L R4C624Setup Guide Rev_C A5 size 6/15/00 SETUP.FM Pass 0 Proof Sign-off: M.Otsuka, CRE M.Moriyama_______ N.Nomoto _______ _______ 4. Choose Install Printer Driver/Utility, then click . Click OK in the dialog box that appears to start the printer software installation. . 5. Follow the on-screen instructions to turn on your printer. For Windows 98 users, the printer port configuration starts automatically.
Proof Sign-off: M.Otsuka, CRE M.Moriyama_______ N.Nomoto _______ _______ R4C624Setup Guide Rev_C A5 size 6/15/00 After the setup is complete, go to step SETUP.FM Pass 0 to print your first page. Ensuring that the USB driver is installed correctly in Windows Follow the directions below to confirm that the USB driver is installed correctly. 1. Click the Start button, point to Settings, and click Printers. Make sure that the icon for your printer appears in the Printers folder. 2.
L R4C624Setup Guide Rev_C A5 size 6/15/00 SETUP.FM Pass 0 Proof Sign-off: M.Otsuka, CRE M.Moriyama_______ N.Nomoto _______ _______ Installing in Macintosh c Caution: Turn off all virus protection programs before you install your printer software. Follow these steps to install your printer software. 1. Turn on your Macintosh and insert the software CD in the CD-ROM drive. The EPSON printer software disk opens automatically. 2. If a single Installer icon appears, double-click the icon.
Proof Sign-off: M.Otsuka, CRE M.Moriyama_______ N.Nomoto _______ _______ R4C624Setup Guide Rev_C A5 size 6/15/00 SETUP.FM Pass 0 Selecting your printer in the Chooser for Macintosh After you have installed the printer software on your Macintosh, you need to open the Chooser and select your printer. You must select a printer the first time you use it or whenever you want to switch to another printer. Your Macintosh will always print using the last printer selected. 1. Choose Chooser from the Apple menu.
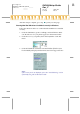
L R4C624Setup Guide Rev_C A5 size 6/15/00 SETUP.FM Pass 0 Proof Sign-off: M.Otsuka, CRE M.Moriyama_______ N.Nomoto _______ _______ Installing the Ink Cartridges This printer uses ink cartridges equipped with IC chips. The IC chip accurately monitors the amount of ink used by each cartridge, so even if a cartridge is removed and inserted again, all of its ink can be used.
Proof Sign-off: M.Otsuka, CRE M.Moriyama_______ N.Nomoto _______ _______ 2. R4C624Setup Guide Rev_C A5 size 6/15/00 SETUP.FM Pass 0 Turn on the printer by pressing the P power button. The print head moves left to the ink cartridge installation position. The P power light flashes and the B and A ink out lights come on. c Caution: Do not move the print head by hand. Doing so may damage the printer. 3. Push back the release tabs and lift up the ink cartridge clamps. 4. Open the ink cartridge packages.
L R4C624Setup Guide Rev_C A5 size 6/15/00 SETUP.FM Pass 0 c Proof Sign-off: M.Otsuka, CRE M.Moriyama_______ N.Nomoto _______ _______ Caution: ❏ You must remove the yellow tape seals from the cartridges before installing them; otherwise, the cartridges will become unusable and you will be unable to print. ❏ If you have installed an ink cartridge without removing the yellow tape seal, you must remove the cartridge and install a new one.
Proof Sign-off: M.Otsuka, CRE M.Moriyama_______ N.Nomoto _______ _______ c R4C624Setup Guide Rev_C A5 size 6/15/00 SETUP.FM Pass 0 Caution: Make sure the ink cartridge tabs are not under the tabs protruding from the base of the opened ink cartridge clamps, as this could damage the clamps. Note: Install both ink cartridges. If either of the cartridges is not installed, the printer will not work. 6. Press the ink cartridge clamps down until they lock in place. 7.
L R4C624Setup Guide Rev_C A5 size 6/15/00 SETUP.FM Pass 0 Proof Sign-off: M.Otsuka, CRE M.Moriyama_______ N.Nomoto _______ _______ Checking the Printer Before printing your first page, you need to make sure the printer is working correctly by printing a nozzle check page and, if necessary, cleaning the print head. Loading paper Follow these steps to load plain paper in the printer. 1. Lower the output tray and slide out the extension.
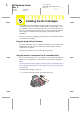
Proof Sign-off: M.Otsuka, CRE M.Moriyama_______ N.Nomoto _______ _______ R4C624Setup Guide Rev_C A5 size 6/15/00 SETUP.FM Pass 0 Checking the print head nozzles Make sure that the printer is turned off. Hold down the E load/eject button (➀ in the illustration below) and press the P power button (➁ in the illustration below) to turn on the printer. Then release both buttons. Here are sample printouts.
L R4C624Setup Guide Rev_C A5 size 6/15/00 SETUP.FM Pass 0 c Proof Sign-off: M.Otsuka, CRE M.Moriyama_______ N.Nomoto _______ _______ Caution: Never turn off the printer while the P power light is flashing. Doing so may damage the printer. 3. When the P power light stops flashing, print a nozzle check pattern to confirm that the head is clean and to reset the cleaning cycle.