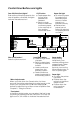
Control Panel Buttons and Lights Tear Off (Pitch/Font) lights** Flash when continuous paper is in the tear-off position; otherwise, the lights indicate the selected font. Pitch (Font) button** Selects a pitch and font. LF/FF button Feeds paper line by line when pressed and released. ● Ejects a single sheet or advances continuous paper to the next top-ofform position when held down. ● Load/Eject button ● Loads a single sheet of paper. ● Ejects a single sheet of paper if a sheet is loaded.
® 24-Pin Dot Matrix Printer All rights reserved. No part of this publication may be reproduced, stored in a retrieval system, or transmitted in any form or by any means, electronic, mechanical, photocopying, recording, or otherwise, without the prior written permission of SEIKO EPSON CORPORATION. The information contained herein is designed only for use with this EPSON printer. EPSON is not responsible for any use of this information as applied to other printers.
ii
Contents Getting to Know Your Printer Warnings, Cautions, and Notes. . . . . . . . . . . . . . . . . . . . . . . . . . . . 1 Important Safety Instructions . . . . . . . . . . . . . . . . . . . . . . . . . . . . . 2 Hot Parts Caution Symbol . . . . . . . . . . . . . . . . . . . . . . . . . . . . . . . . 3 ENERGY STAR ® Compliance . . . . . . . . . . . . . . . . . . . . . . . . . . . . . 4 Chapter 1 Setting Up the Printer Unpacking the Printer. . . . . . . . . . . . . . . . . . . . . . . . . . . . . . . . .
Removing a printed document from the push tractor. . . . Switching back to single sheets . . . . . . . . . . . . . . . . . . . . . . . Printing with the pull tractor. . . . . . . . . . . . . . . . . . . . . . . . . Adjusting the top-of-form position. . . . . . . . . . . . . . . . . . . . Advancing the paper to the tear-off edge . . . . . . . . . . . . . . Printing on Single Sheets. . . . . . . . . . . . . . . . . . . . . . . . . . . . . . . . . Loading single sheets . . . . . . . . . . . . . . . . . . . . .
Chapter 4 Troubleshooting Using the Error Indicators . . . . . . . . . . . . . . . . . . . . . . . . . . . . . . . . 4-2 Problems and Solutions . . . . . . . . . . . . . . . . . . . . . . . . . . . . . . . . . . 4-4 Power Supply. . . . . . . . . . . . . . . . . . . . . . . . . . . . . . . . . . . . . . . . . . . 4-4 Power is not being supplied . . . . . . . . . . . . . . . . . . . . . . . . . . 4-4 Printing . . . . . . . . . . . . . . . . . . . . . . . . . . . . . . . . . . . . . . . . . . . . . . . .
Contacting Customer Support . . . . . . . . . . . . . . . . . . . . . . . . . . . . A-18 Customer support in India. . . . . . . . . . . . . . . . . . . . . . . . . . .
Getting to Know Your Printer Your EPSON® LQ-1150 24-pin dot matrix printer provides highquality printing and superior performance in a compact design. Its features include: ❏ A variety of paper paths to suit your printing needs. ❏ The ability to handle a wide range of paper types, including continuous paper, multipart forms (with one original and up to three copies), labels, single sheets, cards, and envelopes.
Important Safety Instructions Read all of these safety instructions before using the printer. In addition, follow all warnings and instructions marked on the printer itself. ❏ Do not place the printer on an unstable surface or near a radiator or heat source. ❏ Place the printer on a flat surface. The printer will not operate properly if it is tilted or placed at an angle. ❏ Do not block or cover the slots and openings in the printer’s cabinet, and do not insert objects through the slots.
❏ Unplug the printer and refer servicing to qualified personnel under the following conditions: i. If the power cord or plug is damaged. ii. If liquid has entered the printer. iii. If the printer has been dropped or the cabinet damaged. iv. If the printer does not operate normally or exhibits a distinct change in performance. ❏ Adjust only those controls that are covered by the operating instructions.
ENERGY STAR ® Compliance As an ENERGY STAR® partner, EPSON has determined that this product meets the ENERGY STAR® guidelines for energy efficiency. The International ENERGY STAR® Office Equipment Program is a voluntary partnership with the computer and office equipment industry to promote the introduction of energy-efficient personal computers, monitors, printers, fax machines, copiers, and scanners in an effort to reduce air pollution caused by power generation.
Chapter 1 1 Setting Up the Printer Unpacking the Printer. . . . . . . . . . . . . . . . . . . . . . . . . . . . . . . . . . . . 1-2 Choosing a place for the printer. . . . . . . . . . . . . . . . . . . . . . . 1-3 Assembling the Printer . . . . . . . . . . . . . . . . . . . . . . . . . . . . . . . . . . . 1-5 Installing the paper-feed knob . . . . . . . . . . . . . . . . . . . . . . . . 1-5 Attaching the paper supports . . . . . . . . . . . . . . . . . . . . . . . . . 1-6 Plugging in the printer. . . . .
Unpacking the Printer Besides the items shown in the illustration below, the printer box should include an EPSON printer software CD-ROM and a Notice Sheet. Check that everything has been included in the package. printer paper supports paper-feed knob power cord ribbon cartridge Note: Depending on your printer model, the power cord may be permanently attached to the printer.
You must remove all protective materials packed around and inside your printer before you set it up and turn on the power. Follow the directions on the Notice Sheet (packed with the printer) to remove these materials. Save all packing and protective materials in case you need to ship the printer in the future. It should always be transported in its original packing materials. Choosing a place for the printer Follow the guidelines below when selecting a location for your printer.
❏ Keep the entire computer system away from potential sources of electromagnetic interference, such as loudspeakers or the base units of cordless telephones. ❏ Use a grounded power outlet; do not use an adapter plug. If you plan to use a printer stand, follow these guidelines: ❏ Use a stand that supports at least 20 kg (44 lb). ❏ Never use a stand that tilts the printer. The printer should always be kept level.
Assembling the Printer This section provides you with information on how to get your printer up and running. See “Printer Parts” on the last page of this manual for the names of the individual printer parts. Installing the paper-feed knob The first step in assembling the printer is installing the paper-feed knob. Follow these steps to install the paper-feed knob: 1. Insert the knob into the hole on the printer’s side and rotate it slowly until it slips onto the shaft. 2.
Attaching the paper supports You should install the paper supports before you begin using the printer. Follow these steps to attach the paper supports onto the printer: 1. Pull the paper guide backward. Raise it up, and then push it firmly until it fits in place. 2. Hold one of the paper supports and push the tips into the notches on the edge guide.
3. Hold another paper support and push the tips into the notches of the other side on the edge guide. 4. Hold another paper support and push the tips into the notches on the paper tension unit. 5. Repeat step 4 for the other paper support.
1. Make sure the power switch on the printer is turned off. It is off when the N side of the switch is pressed down. 2. Check the label on the back of the printer to make sure the voltage required by the printer matches that of your electrical outlet. c Caution: If the rated voltage on the printer and your outlet voltage do not match, contact your dealer for assistance. Do not plug in the power cord. 3. If the power cord is not attached to the printer, connect it to the AC inlet on the printer. 4.
2. Open the printer cover to the upright position, then pull it up to remove it. 3. Remove the paper tension unit by squeezing the tension unit’s lock tabs gently and pull the tension unit away from the printer.
4. Make sure that the print head is in position at 10 cm (4 inches) from the left side as shown below. If it is not, turn on the printer, and then, turn off the printer. 5. Turn the ribbon-tightening knob in the direction of the arrow to remove any slack from the ribbon so it is easier to install.
6. Insert the ribbon cartridge into the printer as shown; then press both sides of the cartridge firmly to fit the plastic hooks into the printer slots. 7. Use a pointed object, such as a ball point pen, to guide the ribbon between the print head and ribbon guide.
8. Turn the ribbon-tightning knob in the direction of the arrow to help feed the ribbon into place; it should not be twisted or creased. 9. Reinstall the paper tension unit. 10. Reinstall and close the printer cover. When printing becomes faint, you need to replace the ribbon cartridge. To remove the old ribbon cartridge, first make sure the print head is in position at 10 cm (4 inches) from the left side. Then remove the cartridge by lifting the both ends and taking it out of the printer.
Running the Self Test Use the built-in self test function to check that the printer is working properly. You can run the test with either continuous paper or single sheets. The procedure below describes the test using single sheets, which is the easier way. Follow these steps to run the self test: 1. Make sure the printer is turned off. Also make sure that the paper-release lever is pushed back to the single-sheet position and the paper guide is in the upright position, as shown below.
2. While holding down the LF/FF button, turn on the printer. 3. Slide the left edge guide until it locks in place at the guide mark. Next, adjust the right edge guide to match the width of your paper.
4. Slide a sheet of paper down firmly between the edge guides until it meets resistance. The printer loads the sheet automatically and begins printing the self test. 5. To stop printing temporarily, press the PAUSE button. 6. To end the self test, make sure the printer is not printing. Press LF/FF to eject the sheet; then turn off the printer. Here is part of a typical self-test printout: Note: If the self test did not print satisfactorily, see Chapter 4, “Troubleshooting.
Connecting the Printer to Your Computer Your printer includes both an IEEE-1284-compatible parallel interface and an EIA-232D serial interface. Before you begin, place the printer upright, as shown below. (This makes it easier to connect the cable.) Connect your computer to the desired interface as described below. Note: You can connect a cable to both interfaces; the printer switches automatically to the appropriate interface when it receives data.
2. Plug the parallel cable connector securely into the printer’s parallel interface port. Squeeze the wire clips together until they lock in place on both sides of the connector. Note: If there is a ground wire at the end of the cable, attach it to the ground connector located to the right of the parallel interface port. 3. Plug the other end of the cable into the computer’s parallel interface port.
Using the serial interface You need a serial cable that has a DB-25 male connector on the printer side to use the serial interface. Follow these steps to connect the printer to the computer using the serial interface: 1. Turn off both the computer and the printer. 2. Plug the serial cable connector securely into the printer’s serial interface port. Tighten the screws on both sides of the connector.
Note: If there is a ground wire at the end of the cable, attach it to the ground connector located to the right of the serial interface port. 3. Plug the other end of the cable into the computer’s serial interface port and then tighten the screws on both sides of the connector. (If there is a ground wire at the end of the cable, attach it to the ground connector at the back of the computer.) 4. Use the Default Setting mode to change the baud rate or parity bit, if necessary.
Installing the Printer Software After you connect the printer to your computer, you need to install the software included on the EPSON printer software CD-ROM shipped with your printer. Your printer software includes: ❏ Printer driver The printer driver is the software that runs, or “drives,” your printer. With it, you can make printer settings such as print quality, resolution, and paper size. ❏ EPSON Status Monitor 3 utility (Windows Me, 98, 95, 2000 or NT 4.
Installing the software in Windows Me, 98, 95, 2000, or NT 4.0 Follow these steps to install the printer software in Windows Me, 98, 95, 2000, or NT 4.0: Note: ❏ Installing the printer software for Windows 2000 or NT 4.0 may require administrator privileges. If you have problems, ask your administrator for more information. ❏ If you wish to make a floppy disk version of the printer software on your CD-ROM, insert the CD and run the SETUP.exe.
3. Double-click Install Printer Driver/Utility to start the printer software installation, then follow the instructions on the screen. When you install the printer driver on Windows Me, 98, 95, 2000 or NT 4.0, the EPSON Status Monitor 3 utility will also be installed. For information on launching and using the software, see Chapter 3, “Using the Printer Software.
Chapter 2 Using the Printer 2 Using the Control Panel . . . . . . . . . . . . . . . . . . . . . . . . . . . . . . . . . . 2-2 Selecting a built-in font . . . . . . . . . . . . . . . . . . . . . . . . . . . . . . 2-2 About Your Printer’s Default Settings . . . . . . . . . . . . . . . . . . . . . . 2-3 Changing default settings . . . . . . . . . . . . . . . . . . . . . . . . . . . . 2-9 Printing on Continuous Paper. . . . . . . . . . . . . . . . . . . . . . . . . . . . .
Using the Control Panel You can control simple printer operations—such as line feeding, form feeding, loading and ejecting paper, and selecting fonts— with the buttons on the control panel. The control panel lights show the printer’s status. For information on the buttons and the lights on the control panel, see “Control Panel Buttons and Lights” inside the front cover. Selecting a built-in font Follow these steps to select a built-in font using the buttons on the printer’s control panel: 1.
About Your Printer’s Default Settings The default settings control many printer functions. While you can often set these functions through your software or printer driver, you may sometimes need to change a default setting from the printer’s control panel using the Default Setting mode. The following table lists the default settings and the options you can select in the Default Setting mode. The settings are explained in detail after the table.
* Settings Options Packet mode Auto, Off Character table* Italic, PC 437, PC 850, PC 860, PC 863, PC 865, PC 861, BRASCII, Abicomp, Roman 8, ISO Latin 1, PC 858, ISO 8859-15 International character set for Italic table Italic U.S.A., Italic France, Italic Germany, Italic U.K., Italic Denmark 1, Italic Sweden, Italic Italy, Italic Spain 1 Font OCR-B, Orator, Orator-S, Script C, Roman T (PS), Sans Serif H (PS) Auto CR (IBM PPDS)** On, Off A.G.M.
Page length for tractor This setting allows you to set the page length (in inches) for continuous paper. 2 Skip over perforation This feature is available only when continuous paper is selected. When you select On, the printer provides a one-inch (25.4 mm) margin between the last line printed on one page and the first line printed on the next page.
When set to Auto, the printer analyzes the data and uses unidirectional printing only for lines which require vertical printing alignment. Software When you select ESC/P2, the printer operates in the EPSON ESC/P2 mode. When you select IBM PPDS, the printer emulates an IBM printer. 0 slash The zero character has a slash (0) when this feature is turned on. It has no slash (0) when this feature is turned off. The slash allows you to easily distinguish between the uppercase letter O and a zero.
Auto I/F (interface) wait time This setting takes effect only when I/F (interface) mode is set to Auto. This setting determines how long the printer waits when it no longer receives data from an interface before it checks whether a print job is being sent through the other interface. You can specify 10 seconds or 30 seconds for the auto interface wait time. Baud rate Use this option to set the data transfer rate (baud) for the serial interface. The baud rate is measured in bits per second (bps).
Packet mode Make sure to select AUTO to print from Windows applications using the printer driver included in the software CD-ROM that comes with the printer. Turn off this mode if you encounter connection problems when you are printing from applications based on other operating systems such as DOS. Character table You can select among various character tables. International character set for Italic table You can select among several international character sets for the Italic character table.
Manual feed wait time This sets the amount of wait time between the time paper is inserted into the paper guide and when it is fed. If the paper feeds before you can adjust its position to your satisfaction, you can increase the wait time. Buzzer (beeper) The printer beeps when an error occurs. (See “Using the Error Indicators” on page 4-2 for more information on printer errors.) If you do not want the printer to beep when an error occurs, turn this setting off.
c Caution: Whenever you turn off the printer, wait at least five seconds before turning it back on; otherwise, you may damage the printer. 2. While holding down the Pitch (Font) button, turn on the printer. The printer enters the Default Setting mode. 3. Load the next sheet of paper, if necessary. The printer prints the current settings list (one page). 4. Press down the Pitch (Font) button. The printer prints the Default Setting mode instructions (three or four pages) in the language you selected.
❏ Do you want to switch between printing on single sheets and continuous paper without removing the paper supply? Will you tear off continuous paper sheet-by-sheet? Use the tractor in the push tractor position. (The printer comes with the tractor installed in this position.) See the following section. ❏ Are you printing on labels, multipart forms, or other documents that require a precise print position? Use the tractor as a pull tractor. See “Printing with the pull tractor” on page 2-17 for instructions.
2. Release the sprocket units by pulling the sprocket locks forward. 3. Slide the left sprocket unit using the scale on the printer as a guide. The printer prints to the right of the position marked 0. Push the sprocket lock lever back to lock it in place. Then slide the right sprocket unit to match the width of your paper, but do not lock it. Move the paper support so it is midway between the sprocket units.
4. Make sure your paper has a clean, straight leading edge. Open the sprocket covers. Fit the first holes of the paper over the sprocket pins and then close the sprocket covers. Slide the right sprocket unit to remove any slack in the paper and lock it in place. Now the paper is in the paper-park position. c Caution: Use the paper-feed knob on the right side of the printer only to clear paper jams and only when the printer is turned off.
5. To separate the incoming paper from the printed paper, attach the paper guide by holding it horizontally and fitting its notches over the printer’s mounting posts as shown below. Then slide the paper guide toward the front of the printer until you feel it click. 6. Turn on the printer. 7. Make sure the printer cover is closed. Press the LF/FF button to feed the paper to the loading position. When the printer receives data, it begins printing automatically. 8.
Removing a printed document from the push tractor Follow these steps to remove the printed document: 2 1. Make sure the Tear Off (Pitch/Font) lights are flashing. Note: If they are not flashing, you may need to set the Tear Off setting on as a default. See “Changing default settings” on page 2-9 to change the default setting. 2. Open the paper guide cover, then tear off the printed document using the tear-off edge of the paper tension unit.
3. Close the paper guide cover. When you resume printing, the printer automatically feeds the paper back to the top-of-form position and starts printing. To feed continuous paper to the standby position where you can remove the paper, press the Load/Eject button. Then open the sprocket covers of the tractor and remove the paper. c Caution: Always tear off your printed document before you press the Load/Eject button. Reverse feeding several pages at a time may cause a paper jam.
Printing with the pull tractor To load continuous paper using the pull tractor, you must move the tractor to the pull tractor position, as described in steps 1 through 3 in this procedure. If your tractor is already installed in this position, make sure the printer is turned off and skip to step 6. c Caution: ❏ Use the paper-feed knob on the right side of the printer only to clear paper jams and only when the printer is off.
2. Squeeze the tractor’s lock tabs gently on both sides, and then rotate the tractor up to pull it away from the printer. 3. Move the tractor forward to the mounting slot at the top of the printer and tilt it into place as shown below. When you push the tractor onto the posts, you should feel the notches snap into place.
4. Release the sprocket units by pulling the sprocket locks forward. 2 5. Insert the paper into the bottom paper slot or into the rear paper slot as shown below, and pull it up. Position the paper using the scale on the printer as a guide. The printer prints to the right of the position marked 0.
6. Slide the left sprocket unit so that its sprockets match the position of the holes in the paper and lock the unit in place. Then slide the right sprocket unit to match the width of your paper, but do not lock it. Move the paper support midway between the two sprocket units. 7. Make sure your paper has a clean, straight leading edge. Open the sprocket covers. Fit the first holes of the paper over the sprocket pins and then close the sprocket covers.
8. To separate the incoming paper from the printed paper, attach the paper guide. Hold it horizontally and fit its notches over the printer’s mounting posts. Then slide the paper guide toward the back of the printer until you feel it click. 9. Attach the printer cover and adjust the paper position with the paper-feed knob. Turn the knob until the perforation between pages is just above the print head. Then turn on the printer. 10. Make sure the printer cover is closed, but with the paper guide cover open.
Adjusting the top-of-form position The top-of-form position is the position on the page where the printer starts printing. If your printing appears too high or low on the page, you can use the micro adjust feature to adjust the topof-form position. Follow these steps: c Caution: Never use the paper-feed knob to adjust the top-of-form position; this may damage the printer or cause it to lose the top-of-form position.
5. Press the LF/FF D button to move the top-of-form position up on the page, or press the Load/Eject U button to move the top-of-form position down on the page. 2 plastic ribbon cover Note: ❏ The printer has a minimum and a maximum top-of-form position. If you try to adjust it beyond these limits, the printer beeps and stops moving the paper. ❏ When the paper reaches the default top-of-form position, the printer also beeps and stops moving the paper briefly.
First mark a point 5.5 mm (0.22 inch) above the paper’s perforation; then position the paper so that the mark is even with the top edge of the plastic ribbon cover. This gives you an 8.5 mm (0.33 inch) margin on the next page, meaning the printer starts printing 8.5 mm (0.33 inch) below the perforation. If you mark a point 8.5 mm (0.33 inch) above the perforation, you get a 5.5 mm (0.22 inch) margin on the next page. 6.
Advancing the paper to the tear-off position automatically To automatically advance your printed documents to the tear-off position, you need to turn on the auto tear-off mode and select the appropriate page length for continuous paper in the Default Setting mode. For instructions, see “Changing default settings” on page 2-9.
4. Press the LF/FF D button to feed the paper backwards, or press the Load/Eject U button to feed the paper forwards, until the paper perforation is aligned with the tear-off edge. tear-off edge Note: The printer has a minimum and a maximum tear-off position. If you try to adjust the tear-off position beyond these limits, the printer beeps and stops moving the paper. 5. After you set the tear-off position, press the Pause button to exit the Micro Adjust mode. 6. Tear off the printed pages.
Printing on Single Sheets You can load single-sheet paper one sheet at a time using the paper guide of the printer. Your single-sheet paper may be from 148 to 420 mm (5.8 to 16.5 inches) wide. Before printing on single-sheet multipart forms, envelopes, or other special paper, be sure to the set the paper thickness lever to the appropriate position. See “Printing on Special Paper” on page 2-28 for details. Note: ❏ To load a stack of single-sheet paper, use the optional cut-sheet feeder.
Printing on Special Paper Your printer can also print on a wide variety of paper types, including multipart forms, labels, cards, and envelopes. For multipart forms and labels, you should not print any closer than 13 mm (0.5 inch) from either side of the paper. For information on the printable area of envelopes, see “Printer Specifications” on page A-4.
1. Turn the printer off and open the printer cover. The paperthickness lever is on the left side of the printer. The numbers next to the lever indicate the thickness setting. 2 2. Use the table below to select the appropriate paper thickness. Paper type Lever position Standard paper (single-sheet or continuous) 0 or 1 Multipart forms (single-sheet or continuous) 2-sheet 3-sheet 4-sheet 1 2 3 Labels 2 Envelopes 3 to 5 3. Close the printer cover.
Multipart forms You can use continuous or shingle-sheet carbonless multipart forms of up to four parts (one original plus three copies). Before you print on the forms, set the paper thickness lever as described in the previous section. The following tips will help you get good results: ❏ Use only continuous multipart forms that are joined by spot gluing or side-crimping. Never load continuous multipart forms joined by metal staples, tape, or continuous gluing.
❏ Load labels the same way as you would load ordinary continuous paper. See “Printing with the pull tractor” on page 2-17 for loading instructions. ❏ Because labels are especially sensitive to temperature and humidity, use them only under normal operating conditions. Make sure the printing stays entirely within the printable area. (See “Printer Specifications” on page A-4 for specifications.
Envelopes You can feed envelopes individually using the paper guide. Keep the following tips in mind: ❏ Before loading an envelope, set the paper thickness lever to the proper position. See “Adjusting the paper-thickness lever” on page 2-28. ❏ To load an envelope, follow the steps in “Running the Self Test” on page 1-13. Insert the wide edge of the envelope into the printer first, printable-side down.
Installing and Using Options Cut-sheet feeder The optional single-bin cut-sheet feeder (C80639✽ ) handles up to 50 sheets of standard bond paper (82 g/m² or 22 lb) without reloading. Follow these steps to install the cut-sheet feeder: 1. Make sure the printer is turned off. Remove the paper guide and open the paper guide cover. 2. If the tractor is installed in the pull-tractor position, remove it and reinstall it in the push-tractor position. 3.
4. Hold the cut-sheet feeder in both hands and press on the latch levers. Fit the notches in the cut-sheet feeder over the mounting posts on the printer. Releasing the latch levers locks the cut-sheet feeder in place.
5. Slide the left paper guide so it is aligned with the triangle mark. Next, slide the right paper guide to roughly match the width of your paper. Slide the paper support midway between the paper guides. 2 6. Pull the paper-set levers all the way forward until the paper guides retract and lock open to allow for paper loading.
7. Take a stack of paper and fan it. Next, tap the side and bottom of the paper on a flat surface to even up the stack. c Caution: Do not use envelopes, multipart forms, carbon paper, or labels in the cut-sheet feeder. 8. Insert up to 50 sheets of paper along the left paper guide. 9. Adjust the position of the right paper guide so that it matches your paper’s width. Make sure the position of the guide allows the paper to move up and down freely. 10.
13. Slide the left edge guide to the center until it stops at the guide mark. Then slide the right edge guide to fit the size of paper you will use. Note: ❏ To remove the paper guide from the cut-sheet feeder, press both release tabs and pull out the paper guide. ❏ Make sure the paper guide cover is open when you print. You can easily switch between continuous paper and cut-sheet feeder operation. See “Switching back to single sheets” on page 2-16 for details.
3. Turn on the printer. Hold down the LF/FF button to feed paper in one page. 4. Release the sprocket lock levers of the pull tractor and adjust the sprocket units to match the width of the paper. Be sure that the sprocket units on both tractors are aligned so that the paper is not crooked. 5. Open the sprocket covers. Fit the holes of the paper over the tractor pins of the sprocket units and adjust the sprocket units as necessary. (See “Printing on Continuous Paper” on page 2-10.
Roll paper holder The optional roll paper holder (#8310) allows you to use your printer with 8.5-inch roll paper like that used with telex machines. This option is not available in all countries. Follow these steps to install and use the roll paper holder: 1. Turn off the printer and remove the paper guide. 2. Position the roll paper holder beneath the printer as shown below. Fit the two holes in the base onto the two positioning pegs on the bottom of the printer.
4. Cut the leading edge of the roll paper straight across. Slide the roll paper holder shaft through the center of the paper roll. 5. Set the shaft and paper roll onto the roll paper holder. Orient the roll so that paper feeds from the bottom of the roll. Then turn on the printer. 6. Bring the leading edge of the paper up over the paper path guide for single sheets and insert it into the printer path for single sheets until you feel resistance. 7. Install the paper guide.
Print server You can use this printer as a network printer by installing the EpsonNet 10/100 BASE TX Ext. Print Server (C82378✽) in the printer’s parallel interface port. See the Administrator’s Manual packaged with this option for instructions on installation and use.
2-42 Using the Printer
Chapter 3 Using the Printer Software Using the Printer Driver with Windows Me, 98, and 95 . . . . . . . 3-2 Accessing the printer driver from Windows applications . 3-2 Accessing the printer driver from the Start menu. . . . . . . . 3-4 Changing the printer driver settings . . . . . . . . . . . . . . . . . . . 3-4 3 Using the Printer Driver with Windows 2000 and NT 4.0 . . . . . 3-5 Accessing the printer driver from Windows applications . 3-5 Accessing the printer driver from the Start menu. . . . . . .
Using the Printer Driver with Windows Me, 98, and 95 You can access the printer driver from your Windows applications or from the Start menu. When you access the printer driver from a Windows application, any settings you make apply only to the application you are using. See “Accessing the printer driver from Windows applications” below. When you access the printer driver from the Start menu, the printer driver settings you make apply to all your applications.
1. Select Print Setup or Print from the File menu of your application software. The Print or Print Setup dialog box appears. 3 2. Make sure that your printer is selected and then click Printer, Setup, Properties, or Options. (You may need to click a combination of these buttons.) The Properties window appears, and you see the Paper, Graphics, and Device Options menu. These menus contain the printer driver settings.
3. To view a menu, click the corresponding tab at the top of the window. See “Changing the printer driver settings” below to change the settings. Accessing the printer driver from the Start menu Follow these steps to access the printer driver from the Start menu: 1. Click the Start button, and then point to Settings. 2. Click Printers. 3. Right-click your printer icon, and click Properties. The screen displays the Properties window, which contains the Paper, Graphics, Device Options, and Utility menus.
Using the Printer Driver with Windows 2000 and NT 4.0 You can access the printer driver from your Windows applications or from the Start menu. When you access the printer driver from a Windows application, any settings you make apply only to the application you are using. See “Accessing the printer driver from Windows applications” below. When you access the printer driver from the Start menu, the printer driver settings you make apply to all your applications.
❏ The screen shots in the following section are from the Windows NT 4.0 operating system. They may vary in appearance from what actually appears on your screen; however, the instructions are the same. 1. Select Print Setup or Print from the File menu of your application software. The Print or Print Setup dialog box appears.
2. Make sure that your printer is selected and then click Printer, Setup, Properties, or Options. (You may need to click a combination of these buttons.) The Document Properties window appears, and you see the Page Setup and Advanced menus. These menus contain the printer driver settings.
3. To view a menu, click the corresponding tab at the top of the window. See “Changing the printer driver settings” below to change the settings. Accessing the printer driver from the Start menu Follow these steps to access the printer driver from the Start menu: Note: The screen shots used in this procedure are from the Windows NT 4.0 operating system. They may vary in appearance from what actually appears on your screen; however, the instructions are the same. 1.
3. Right-click your printer icon, and click Document Defaults. The screen displays the Default Document Properties window, which contains the Page Setup and Advanced menus. These menus display the printer driver settings. When you click Properties, the printer software window appears, which includes menus used to make the printer driver settings. 3 4. To view a menu, click the corresponding tab at the top of the window. See the next section to change the settings.
Changing the printer driver settings Your printer driver has two menus from which you can change the printer driver settings; Page Setup and Advanced. You can also change settings on the Utility menu in the printer driver. For an overview of the available settings, see “Printer Driver Settings Overview” on page 3-11. You can also view online help by rightclicking items in the driver and selecting What’s this?.
Printer Driver Settings Overview The following tables show the Windows printer driver settings. Note that not every setting is available in all versions of Windows. The printer settings are shown below. 3 Settings Explanations Paper size Select the size of the paper you want to use. If you do not see your paper size, use the scroll bar to scroll through the list. If your paper size is not included in the list, click Custom or User Defined Size and enter the paper size in the dialog box that appears.
Settings Explanations Paper/Output Check the Paper Size, Orientation, and Paper Source settings you made on the Page Setup menu and change them if necessary. Select the setting and then choose an option from the Change Setting list box. Halftone Click this button to set the brightness and contrast, input the RGB gamma, or make other settings. The Halftone Color Adjustment dialog box appears. For details, click the Help button in this dialog box. The monitoring settings are shown below.
About the EPSON Status Monitor 3 Utility The EPSON Status Monitor 3 utility that comes with your printer is available for Windows Me, 98, 95, 2000 or NT 4.0. It allows you to monitor your printer’s status, alerts you when printer errors occur, and provides troubleshooting instructions when needed. 3 The EPSON Status Monitor 3 utility is available only when: ❏ The printer is connected directly to the host computer via the parallel port [LPT1].
2. Click the Monitoring Preferences button. The Monitoring Preferences dialog box appears. 3. The following settings are available: Select Notification Displays the error item check box ON/OFF status. Turn on this check box to display the selected error notification. Select Shortcut icon The selected icon is displayed in the system tray on the taskbar on the PC screen. The setting’s example is shown on the right window.
Accessing EPSON Status Monitor 3 To access the EPSON Status Monitor 3 utility: ❏ Double-click the printer-shaped shortcut icon on the taskbar. To add a shortcut icon to the taskbar, go to the Utility menu and follow the instruction. ❏ Open the Utility menu, then click the EPSON Status Monitor 3 icon. To find out how to open the Utility menu, See “Using the Printer Driver with Windows Me, 98, and 95” on page 3-2 or “Using the Printer Driver with Windows 2000 and NT 4.0” on page 3-5.
3-16 Using the Printer Software
Chapter 4 Troubleshooting Using the Error Indicators . . . . . . . . . . . . . . . . . . . . . . . . . . . . . . . . 4-2 Problems and Solutions . . . . . . . . . . . . . . . . . . . . . . . . . . . . . . . . . . 4-4 Power Supply. . . . . . . . . . . . . . . . . . . . . . . . . . . . . . . . . . . . . . . . . . . 4-4 Power is not being supplied . . . . . . . . . . . . . . . . . . . . . . . . . . 4-4 4 Printing . . . . . . . . . . . . . . . . . . . . . . . . . . . . . . . . . . . . . . . . . . . . . . . .
Using the Error Indicators You can identify many common printer problems using the lights on the control panel. If your printer stops working and one or more control panel lights are on or flashing or the printer beeps, use the following table to diagnose and fix the problem. If you cannot fix your problem using this table, go to the next section. Panel light state Beep pattern Problem Solution n Pause – The printer is paused. Press the Pause button to resume printing.
Panel light state Beep pattern Problem Solution f Paper Out n Pause ••• Continuous paper is not fed back to the standby position. Tear off the printed document at the perforation; then press the Load/Eject button. The printer feeds the paper to the standby position. Press the Pause button to turn off the Pause light, if necessary. ••• A single sheet of paper is not fully ejected. Press the Load/Eject button to eject the sheet. Then press the Pause button to turn off the Pause light, if necessary.
Problems and Solutions Most problems you may encounter while operating your printer have simple solutions. You can check the operation of your printer using the self test. See “Running the Self Test” on page 1-13. If the self test works properly the problem probably lies in the computer, the application software, or the interface cable. If the self test does not work, contact your dealer or a qualified service person for assistance.
The lights come on briefly and then go off. The lights stay off even when the power is turned on again. The voltage ratings of the printer and electrical outlet may not match. Check that the printer’s voltage rating matches the voltage of your electrical outlet. If the voltages do not match, unplug the printer and contact your dealer immediately. Do not reconnect the power cord to an electrical outlet. 4 Printing The printer does not print The PAUSE light is off but nothing is printed.
The printer makes a strange noise, the beeper sounds five times, and the printer stops abruptly. The paper or ribbon may be jammed. Turn off the printer and check for a paper jam, a ribbon jam or other problems. The printer may have overheated. Let the printer cool. Then try to print again. If the printer still does not print correctly contact your dealer. The beeper sounds five times and the PAUSE light comes on. An error has occurred. Turn off the printer and turn it on again.
Dots are missing in printed characters or graphics A line of dots is missing in the printout. The print head is damaged. Stop printing and contact your dealer to have the print head replaced. Dots are missing in random positions. 4 Either there is too much slack in the ribbon or the ribbon has come loose. Reinstall the ribbon cartridge as described in “Installing or replacing the ribbon cartridge” on page 1-8.
The print position is not what you expected Printing starts too high or too low on the page, or the bottom part of one page is printed at the top of the next page. Your application software settings may be incorrect. Check the margin or top-of-form position setting in your application software. Page length does not match the length of the paper. The page length setting in your application may be incorrect. Check the page length set by your application software and adjust it if necessary.
Paper Handling Single sheets do not feed properly Paper does not feed. Continuous paper may be left in the printer. Remove the continuous paper. Set the paper-release lever to the single-sheet position. Insert a new sheet. Move the paper a little to the left. Paper feeding is crooked or the paper jams. The paper was not fed correctly or is of the wrong type. Turn off the printer and pull out the paper. Insert a new sheet straight into the paper guide. Make sure you’re using the right type of paper.
The paper may have come off the tractor. Reattach the paper to the tractor. Paper feeding is crooked or the paper jams. The position of your paper supply may be preventing it from feeding straight. Make sure that the paper supply is not obstructed. Make sure that your paper supply is positioned within 1 meter (3 feet) of the printer. Make sure the printer cover is closed. Make sure the edge guide positions are correct. Position the edge guides at the diamond-shaped guide marks.
Options When you use the cut-sheet feeder, the paper does not feed properly The paper does not feed. The cut-sheet feeder may be incorrectly installed on the printer. Reinstall it as described under “Cut-sheet feeder” on page 2-33. Make sure the paper-release lever is pushed back to the single-sheet position. You may have loaded too many sheets in the cut-sheet feeder’s bin. Paper may be jammed near the print head. Look for a paper jam. Make sure the edge guide positions are correct.
One page of printing has spread to two pages. Your application software settings may be incorrect. Check that the page-length setting and lines-per-page setting in your application software are correct. Switching between the cut-sheet feeder and the push tractor does not work properly The desired paper type does not load. The paper-release lever may not be in the proper position. Pull the lever forward to load continuous paper or push the lever back to load single sheets.
Appendix A Cleaning the Printer . . . . . . . . . . . . . . . . . . . . . . . . . . . . . . . . . . . . . A-2 Transporting the Printer . . . . . . . . . . . . . . . . . . . . . . . . . . . . . . . . . . A-3 Printer Specifications . . . . . . . . . . . . . . . . . . . . . . . . . . . . . . . . . . . . A-4 Mechanical. . . . . . . . . . . . . . . . . . . . . . . . . . . . . . . . . . . . . . . . . A-4 Electronic . . . . . . . . . . . . . . . . . . . . . . . . . . . . . . . . . . . . . . . . . A-6 Electrical.
Cleaning the Printer To keep your printer operating at its best, you should clean it thoroughly several times a year. Follow these steps to clean your printer: 1. Remove any paper loaded in the printer. Make sure the printer is turned off. 2. Remove the paper guide. If a pull tractor or an optional cutsheet feeder is installed, remove it. 3. Use a soft brush to carefully brush away all dust and dirt from the outer case and paper guide. 4.
Transporting the Printer If you need to transport your printer for some distance, carefully repack it using the original box and packing materials. Follow these steps to repack the printer in its original packing materials: w Warning: You need to move the print head by hand to remove the ribbon cartridge. If you have just used the printer, the print head may be hot; let it cool for a few minutes before touching it. A 1. Remove any paper loaded in the printer. Make sure the printer is turned off. 2.
Printer Specifications Mechanical Printing method: 24-pin impact dot matrix Printing speed : High speed draft Draft Draft condensed LQ LQ condensed 300 cps at 10 cpi 360 cps at 12 cpi 250 cps at 10 cpi 300 cps at 12 cpi 375 cps at 15 cpi 214 cps at 17 cpi 250 cps at 20 cpi 83 cps at 10 cpi 100 cps at 12 cpi 125 cps at 15 cpi 142 cps at 17 cpi 166 cps at 20 cpi Printing direction: Bidirectional logic seeking for text and graphics printing.
Paper feed speed: Continuous Intermittent Reliability: Total print volume Print head life Dimensions and weight: 92 mm/second (3.6 inches/second) 53 msec/line at 1/6-inch line spacing Height Width Depth Weight 12 million lines (except print head) MTBF 6,000 POH (25% duty) Black ribbon: 200 million strokes per wire 163.5 mm (6.4 inches) 546 mm (21.5 inches) 275 mm (10.8 inches) (excluding the knob, paper-release lever, etc.) approx. 6.6 kg (14.
Electronic Interfaces: One standard bidirectional, 8-bit, parallel interface with IEEE-1284 nibble mode support and One EIA-232D serial interface Buffer: 32KB Built-in fonts: Bitmap fonts EPSON Draft EPSON Roman EPSON Sans Serif EPSON Courier EPSON Prestige EPSON Script EPSON OCR-B EPSON Orator EPSON Orator-S EPSON Script C 10, 12, 15 cpi 10, 12, 15 cpi, proportional 10, 12, 15 cpi, proportional 10, 12, 15 cpi 10, 12 cpi 10 cpi 10 cpi 10 cpi 10 cpi proportional Scalable fonts EPSON Roman 10.
Character tables: One Italic and 12 graphical character tables: Italic table, PC 437 (US, Standard Europe), PC 850 (Multilingual), PC 860 (Portuguese), PC 861 (Icelandic), PC 865 (Nordic), PC 863 (French-Canadian), BRASCII, Abicomp, ISO Latin 1, Roman 8, PC 858, ISO 8859-15 Character sets: 14 international character sets and one legal character set: USA, France, Germany, UK, Denmark I, Sweden, Italy, Spain I Japan, Norway, Denmark II, Spain II, Latin America, Korea, Legal Latter 7 sets can be selected on
Environmental Temperature Humidity (without condensation) Operation 5 to 35 °C (41 to 95 °F) 10 to 80% RH Storage –30 to 60 °C (–22 to 140 °F) 0 to 85% RH Paper Note: ❏ Use recycled paper, envelopes, cards, labels and single-sheet multipart forms only under normal temperature and humidity conditions, as follows: Temperature 15 to 25 °C (59 to 77 °F) Humidity 30 to 60% RH ❏ Do not load paper that has been folded or is damaged, wrinkled, or curled.
Single-sheet multipart forms: paper guide entry Width 148 to 420 mm (5.8 to 16.5 inches) Length 100 to 364 mm (3.9 to 14.3 inches) Copies 1 original + up to 3 copies Thickness 0.12 to 0.32 mm (0.0047 to 0.013 inch) Weight 40 to 58 g/m² (14 to 15 lb) Binding Line glued at the top of form Envelopes: paper guide entry Size No.6: 165 × 92 mm (6.5 × 3.6 inches) A No.10: 241 × 105 mm (9.5 × 4.1 inches) Thickness 0.16 to 0.52 mm (0.0063 to 0.
Continuous paper (standard and multipart): rear and bottom entry Width 101.6 to 406.4 mm (4.0 to 16.0 inches) Length (one page) 101.6 to 558.8 mm (4.0 to 22.0 inches) Copies 1 original + up to 3 copies Thickness 0.065 to 0.32 mm (0.0025 to 0.013 inch) Weight (not multi part) 52 to 82 g/m² (14 to 22 lb) Weight 40 to 58 g/m² (12 to 15 lb) (one sheet of multipart) Binding Spot glued or crimp bound on both sides Labels: bottom entry 23.8 × 63.5 mm (15/16 × 2.5 inches) minimum Label size 2.5mm (0.
Printable area Single sheets, cards and envelopes: B A A B printable area printable area C B A C A The minimum top margin is 4.2 mm (0.17 inch) B The minimum left and right margins are 3.0 mm (0.12 inch) each. The maximum paper width is 420 mm (16.5 inches) and the maximum printable width is 345.44 mm (13.6 inches). For single sheets wider than 364 mm (14.3 inches) , the side margins increase proportionally to match the width of the paper. C The minimum bottom margin is 4.2 mm (0.17 inch).
Continuous paper: A A Printable area B B A The minimum top and bottom margins above and below the perforation are 4.2 mm (0.17 inch) each. B The minimum left and right margins are 13 mm (0.51 inch) each. The maximum paper width is 406.4 mm (16.0 inches) and the maximum printable width is 345.44 mm (13.6 inches). For continuous paper wider than 377.8 mm (14.9 inches), the side margins increase proportionally to match the width of the paper.
Roll paper: A B printable area A A The minimum top margin is 4.2 mm (0.17 inch). B The minimum left margin is 3.0 mm (0.12 inch). The minimum right margin is 3.0 mm (0.12 inch). The maximum printable width is 203.2 mm (8.0 inches).
Labels: C C B C C A A A The minimum left margin is 13.0 mm (0.51 inch). The minimum right margin is 13.0 mm (0.51 inch). B The minimum top margin is 1.2 mm (0.05 inch). C The minimum top/bottom/right/left margin on the label is 3.0 mm (0.12 inch). The minimum printable width is 63.5 mm (2.5 inches). The maximum base sheet width is 406.4 mm (16.0 inches).
Paper alignment Printing starts at “0” on the scale. The unprintable area is to the left of the “0.
Command Lists Your printer supports the EPSON ESC/P2 control codes and IBM PPDS emulation control codes listed below. EPSON ESC/P2 control codes Selecting an EPSON ESC/P2 printer in your software allows you to use advanced fonts and graphics.
Bar code: ESC (B IBM PPDS emulation control codes This printer emulates the IBM Proprinter using the commands below. For detailed information, see the IBM PPDS reference manual.
* Alternate Graphic Mode Bar code: ESC [f, ESC [p Download: Download command is not provided. Contacting Customer Support If your EPSON product is not operating properly and you cannot solve the problem using the troubleshooting information in your product documentation, contact customer support services for assistance. If customer support for your area is not listed below, contact the dealer where you purchased your product.
Customer support in India Contacts for information, support, and services are: World Wide Web (www.epson.co.in) Information on product specifications, drivers for download, Frequently Asked Questions (FAQ), Products Enquiry, and Technical Query are available.
A-20
Index Numerics D 0 slash, 2-6 Data length, 2-7 Default settings changing, 2-9 to 2-10 option list, 2-3 to 2-4 Driver. See Printer driver A A.G.M. (Alternate Graphic Mode), 2-8 Adjusting paper-thickness lever, 2-28 to 2-29 tear-off position, 2-25 to 2-26 top-of-form position, 2-22 to 2-24 Auto CR (carriage return), 2-8 Auto I/F (interface) wait time, 2-7 Auto line feed, 2-5 Auto tear-off, 2-5 B Baud rate, 2-7 Bidirectional (Bi-d) printing.
M R Manual feed wait time, 2-9 Micro adjust, 2-22 to 2-24, 2-25 to 2-26 Multipart forms printing, 2-30 Removing printed document from push tractor, 2-15 to 2-16 Ribbon cartridge, 1-8 to 1-12 Roll paper default setting, 2-9 printing, 2-39 to 2-40 Roll paper holder, 2-39 to 2-40 O Options Cut-sheet feeder, 2-33 to 2-37 Pull tractor unit, 2-37 to 2-38 Roll paper holder, 2-39 to 2-40 P Packet mode, 2-8 Page length for tractor, 2-5 Panel.
U Unidirectional (Uni-d) printing.
Printer Parts paper supports edge guides paper guide cover paper guide printer cover paper-release lever knob control panel ribbon cartridge paper thickness lever serial interface parallel interface paper tension unit tractor power cord power switch
EPSON OVERSEAS MARKETING LOCATIONS Epson America, Inc. EPSON UK LTD. 3840 Kilroy Airport Way Long Beach, CA 90806 Phone: (562) 981-3840 Fax: (562) 290-5220 Campus 100, Maylands Avenue, Hemel Hempstead, Herts, HP2 7TJ, U.K. Phone: (+44) 01442 261144 Fax: (+44) 01442 227227 EPSON DEUTSCHLAND GmbH EPSON FRANCE S.A. Zülpicher Straße 6, 40549 Düsseldorf Germany Phone: (0211) 56030 Fax: (0211) 5047787 68 bis, rue Marjolin 92300, Levallois-Perret, France Phone: 33.1.41.86.26.