Easy Interactive Tools Ver.3.
Easy Interactive Tools Ver.3.
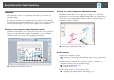
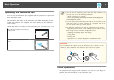
Easy Interactive Tools Summary Features Easy Interactive Tools is an application that allows you to draw on projected images. By using the interactive pen supplied with the projector, the following drawing functions become available. You can also use your finger to draw on the projected image if your projector supports touch operations. 3 Drawing on a plain background (Whiteboard mode) Whiteboard mode allows you to add text or images to a solid color background.
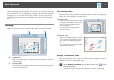
Easy Interactive Tools Summary 4 • Save the content you created as a PowerPoint slide s "Slideshow Drawing Tool" p.24 • Use for teleconferencing When you connect the projector to a computer over a network using EasyMP Network Projection or EasyMP Multi PC Projection, you can share the projected screen with a remote location. When used with Easy Interactive Tools, you can share annotations and drawings made on the projected screen with multiple locations.
Install Easy Interactive Tools a Installing a Uninstalling Windows XP Turn on your computer. Insert the EPSON Projector Software for Easy Interactive Function CD-ROM into your computer. The installer starts automatically. If the installer does not start automatically, double-click the EIN_TTWInst.exe file in the CDROM drive. c Follow the on-screen instructions to install.
Install Easy Interactive Tools OS X a b c Double-click Applications - Easy Interactive Tools Ver.X.XX. Run Easy Interactive Tools Uninstaller from the Tools folder. Follow the on-screen instructions to uninstall.
Basic Operation Starting Easy Interactive Tools Make the following preparations before starting Easy Interactive Tools. a The projector's setting method and items varies depending on the model being used. Also, models that do not support network connection cannot be connected to over a network. For more details, see the projector's User's Guide. 7 • Windows XP/Windows Vista/Windows 7: Select Start - Programs (or All Programs) - EPSON Projector - Easy Interactive Tools Ver.X.XX. • Windows 8/Windows 8.
Basic Operation Operating the Interactive Pen You can use the interactive pen supplied with the projector to operate the Easy Interactive Tools. The functions and shape of the interactive pen differ depending on the model with which it was supplied. For more details, see the projector's User's Guide. Check that there is a battery in the interactive pen, and then turn it on. Press the pen tip button to the screen to select an icon. 8 a • You can use two interactive pens at the same time.
Basic Operation When performing touch operations, you can also use two fingers for multitouch operations such as enlarging or reducing the image. The projector recognizes up to six multi-touch points. When a group of people are performing touch operations, all members must use the same drawing tool. Drawing Select a function from the Command Bar and the Drawing Toolbar. 9 Two drawing modes Easy Interactive Tools provides two drawing modes. When you change the mode, the screen changes as shown below.
Basic Operation a 10 To draw on images from a document camera, select Camera on ] from the Command Bar. The the Home screen, or [ image from the document camera is displayed on the Camera screen. s "Camera Screen" p.17 b c Select [ To save the content of your drawing, select [ ] from the Command Bar. You can save the displayed screen in JPG, BMP, PNG, PDF, or EIT format. You can set the save location, file name, and the file format on the Save Settings tab on the Settings screen.
Basic Operation 11 Drawing in Whiteboard mode • When you select [ ]: All of the current drawings are erased. This section explains how to draw on a plain page in Whiteboard mode. In Whiteboard mode, you can add pages from the Command Bar, as well as display the page list screen where you can perform page operations. e From the Command Bar you can add/delete, duplicate, or move pages. Displays thumbnail images of the available pages. a Bar. • Select a thumbnail image: Changes the displayed page.
Basic Operation 12 JPG/BMP/PNG Saves all pages by treating one page as one file. PDF/EIT Saves all pages in one file. • Windows: Click [ ] on the task tray, and then click Exit from the popup menu. You can set the save location, file name, and the file format on the Save Settings tab on the Settings screen. s "Save Settings tab" p.20 • OS X: Control-click [ Changing between full display and window display When you select [ ]/[ popup menu.
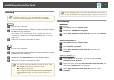
Home Screen Functions 13 You can perform the following functions on the Home screen. G A B C D Desktop annotation Annotation mode starts and the computer's screen is displayed. New Whiteboard mode starts and a new file is displayed. Open Whiteboard mode starts and you can open a file saved previously. You can select EIT files, or .avi files for Windows or .mov files for OS X. Recent Files Whiteboard mode starts and the most recently saved file is opened. You can select EIT files, or .
Command Bar Functions 14 You can perform the following functions from the Command Bar. D Page down During Annotation mode: Scrolls down in the selected document. During Whiteboard mode: Moves the page currently displayed down by one position. E Other tools Displays the tool panel. s "Tool Panel Functions" p.15 Camera Displays the image from a document camera connected to the computer. See the following for more information on using the Camera screen. s "Camera Screen" p.
Command Bar Functions L 15 Page list Displays the page list screen. When the interactive pen leaves the page list, the list is automatically minimized to the right or left of the screen. The page list is displayed again when the interactive pen moves to the minimized area. If you select [ ], it changes to [ Annotation mode Whiteboard mode ], and the page list is locked in place. Select [ M N O P ] to close the page list. New page Adds a new page after the page currently displayed.
Command Bar Functions F G (This is only available during mouse operations in Annotation mode.) Displays the Help. Settings 16 H Opens the Settings screen. s "Settings Screen" p.18 Input Panel Displays a virtual keyboard on the screen. You can enter characters and control the computer from the virtual keyboard by selecting the keys. Projector control Select the following buttons to control the projector.
Command Bar Functions 17 Emphasizes part of the projected image using a spotlight effect. You can drag the spotlight frame to change the emphasized area. Click [ ] to exit spotlight. You can change the shape of the spotlight from the General Settings tab on the Settings screen. The following functions are only available in Whiteboard mode. K Select background Allows you to select a background from the nine patterns provided.
Command Bar Functions •[ ]: Adjusts the brightness of the image. Move the slider to the right to increase the brightness, and to the left to decrease the brightness. •[ ]: Adjusts the contrast of the image. Move the slider to the right to increase the contrast, and to the left to decrease the con‐ trast. • Reset: Restores the brightness and contrast settings to their de‐ fault settings.
Command Bar Functions Right Click Settings Set the operation performed when you right-click in the drawing area. • Open Drawing Toolbar: Displays the Drawing Toolbar at the position you right-clicked. • Change to Mouse Mode: Changes from the drawing function to the mouse operation function (during Annotation mode only). • Change Between Pen and Eraser: Changes between the drawing function and the eraser function. • Off: No operations are performed even if you right-click.
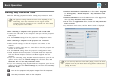
Command Bar Functions Save Settings tab 20 File name Sets the file name when saving the files. You can enter up to 32 characters. (The following symbols cannot be used: \/:*?”<>|) A number and extension are added at the end of the file name when saving the file. Example: AAA0001.jpg File type Sets the file format when saving the files. Camera Recording Settings tab Check when saving Select to display the screen where you can set the save location, file name, and file format when saving images.
Command Bar Functions Save location folder Sets the folder where you want to save the movie. The following are the default folders for saving movies. Windows XP :\Documents and Settings\ \My Documents\Easy Interactive Tools Windows Vista/Windows 7/Windows 8 :\users\\Documents\Easy Interactive Tools OS X :\Users\\Documents\Easy Interactive Tools File name Sets the file name when saving the files.
Drawing Toolbar Functions 22 You can select the following functions from the Drawing Toolbar. Annotation mode C Whiteboard mode D E Shapes Select the shape you want from the shapes provided. You can also select the color and line width of the shape. Select Select the drawn content or inserted image, and then perform operations such as moving the item or adjusting the size. Pen Switches to a pen to draw freely. Click [ F change the color and width of the pen line.
Drawing Toolbar Functions M Close (This is unavailable on a window displayed in Whiteboard mode.) Closes the Drawing Toolbar. The Command Bar is also closed during Annotation mode. You can display the Drawing Toolbar again by selecting the Drawing Toolbar tab [ ] on the right or left side of the screen. N Add Text Changes to text entry. Select the drawing area to display the text box. O Redo Cancels an undo operation and restores the previous status. 23 • Rotate the points.
Drawing Toolbar Functions Bring to Front Send to Back Bring Forward Send Backward Changes the overlapping order for the selected object. You can select multiple objects. Delete Deletes the selected object. You can select multiple objects. a Shortcut operations, such as pressing the [ctrl] + [A] key on the computer's keyboard, are not supported. Slideshow Drawing Tool When a PowerPoint slideshow is started, the Drawing Toolbar changes as shown below allowing you to use PowerPoint drawing tools.
Troubleshooting 25 Problem Characters become garbled after changing the language. Solution Characters become garbled if fonts for the language you are using are not available on your operating system. Select Restore defaults on the Settings screen to restore the default settings. s "Settings Screen" p.18 The movie display area shows a black box after saving a screen that Change the video accelerator settings manually. contains a movie.
General Notes All rights reserved. No part of this publication may be reproduced, stored in a retrieval system, or transmitted in any form or by any means, electronic, mechanical, photocopying, recording, or otherwise, without the prior written permission of Seiko Epson Corporation. No patent liability is assumed with respect to the use of the information contained herein. Neither is any liability assumed for damages resulting from the use of the information contained herein.
General Notes 27 This software is provided 'as-is', without any express or implied warranty. In no event will the authors be held liable for any damages arising from the use of this software. Permission is granted to anyone to use this software for any purpose, including commercial applications, and to alter it and redistribute it freely, subject to the following restrictions: 1. The origin of this software must not be misrepresented; you must not claim that you wrote the original software.