
Personal Computer User Manual


Starting System Diagnostics
To run the System diagnostics program, you must turn on your
computer with the Reference diskette in drive A. If you start
this program in any other way, some tests may produce strange
results.
To start the System diagnostics program, follow these steps:
1.
Insert the Reference diskette in drive A.
2.
Turn on or reset the computer. The Operation Menu
appears.
3.
If the
Num Lock
indicator is illuminated, press
Num Lock
to turn off the function.
4. Press 3 or use
J
to select System diagnostics and
then press
Enter.
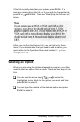
When you start the System diagnostics program, the computer
checks any peripheral devices that are connected to the system.
Then you see a list of the devices available for testing. This list
includes only the devices that are part of your system, such as
the following, for example:
DEVICE LIST
1 - System board
2 - Memory
3 - Keyboard
5 - Color graphics adapter and CRT
6 - Diskette drives and controller
9 - Parallel port (printer interface)
11 - Serial port (RS-232C port)
14 - Dot-matrix printer
17 - Hard disk drives and controller
C-2
Performing System Diagnostics