
Photo Printer User Manual


Table Of Contents
- Front Matter
- Contents
- Printing with Mac OS X
- Printing with Windows
- Basic Settings
- Selecting Settings on the Main Tab
- Selecting the Media Type setting
- Selecting the Color setting
- Selecting the Print Quality setting
- Selecting the Mode setting
- Selecting the Advanced settings
- Paper Configuration
- Saving settings
- Deleting settings
- Exporting and importing settings
- Selecting the Paper Source setting
- Selecting the Borderless setting
- Selecting the Paper Size setting
- Selecting the Printable Area setting
- Selecting the Roll Paper Option settings
- Selecting the Save Roll Paper setting
- Checking Ink Levels
- Previewing your printout
- Using the Manual function
- Selecting Settings on the Page Layout Tab
- Using the Printer Utilities
- Getting Information Through On-screen Help
- Checking Printer Status and Managing Print Jobs
- Increasing the Print Speed
- Sharing Your Printer
- Updating and Uninstalling the Printer Software
- The Control Panel
- Paper Handling
- Maintenance and Transportation
- Problem Solver
- Troubleshooting
- Printer stops printing unexpectedly
- The printer does not turn on or stay on
- The printer prints nothing
- Printouts are not what you expected
- Print quality could be better
- Color documents print in black ink only
- Printing could be faster
- Roll paper cannot be cut
- Paper feed or paper jam problems occur frequently
- Roll paper does not eject properly
- Clearing paper jams
- Managing Color with Profiles
- Paper Information
- Where To Get Help
- Troubleshooting
- Product Information
- Options and Consumable Products
- Safety Instructions
- Index
66 Printing with Windows
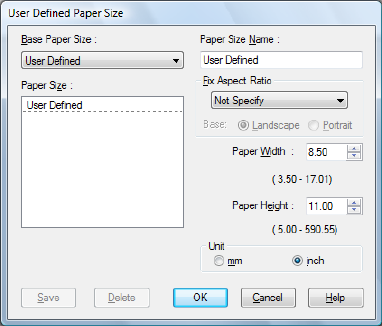
Selecting the Paper Size setting
Select the paper size that matches the paper you loaded in the printer from the
Size drop-down list.
You can also add a custom paper size. Follow the steps below.
1. Click User Defined. You see a window like this one.
Note:
You cannot click User Defined when Borderless is selected if you’ve selected
Paper Tray or Manual Feed as your Source setting.
2. Select a Unit setting, then enter a Paper Size Name, Paper Width, and
Paper Height.
3. Click OK to save the custom paper size.
Note:
❏ You can save up to 100 custom paper sizes.
❏ To delete a custom paper size, select the name of the paper size you want to
delete and then click Delete.
❏ You can enter up to 24 characters for the Paper Size Name.