
User`s guide


Specifications
A-8
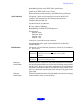
Default Settings
The table below shows the default settings that take effect when the
printer is initialized. To change these settings, follow the
instructions in “Built-in Fonts and Character Tables.”
Built-in Fonts and Character Tables
Your printer has eight built-in fonts and eleven character tables that
you can select using the printer’s default setting mode as described
below. The setting you choose takes effect each time you turn on
the printer. Available fonts and character tables are listed on
page A-2.
Note
:
The font and character table selections you make with your software override the settings you make using the
default setting mode. For best results, use your software to make these settings.
To change the default font or character table, follow these steps:
1. Make sure the printer is turned off and paper is loaded in the
sheet feeder. (Use paper at least 8.3 inches wide. Otherwise the
print heads will spray ink directly onto the platen.)
2. Hold down the
cleaning button and turn on the printer.
The printer loads a sheet of paper and prints a brief summary
and instructions.
3. Follow the instructions on the sheet and press the
cleaning
button until the control panel lights indicate the language of
your choice.
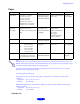
Item Default setting
Top-of-form position Current paper position
Page length Single sheets: 22 inches
Left and right margins Cancelled
Line spacing 1/6-inch line spacing
Character pitch Last font selected using default setting mode
Vertical tab position Cleared
Horizontal tab positions Every eight characters
Font selection Last font selected using default setting mode
Special printing effects Cancelled (except condensed and economy
printing)
User-defined character set Hardware/control panel initialization: cleared
Software initialization: deselected only