
User`s guide


Fine-tuning the Projector 39
Changing Menu Settings
Use the buttons on the remote control to access the menus and change
settings. Follow these steps:
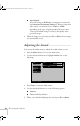
1. To display the menu screen, press the
Menu button on the
remote control. You see the menu screen:
The seven menus are listed on the left, and the options available
for the highlighted menu are shown on the right.
2. Press up or down on the directional buttons to scroll through the
menu list.
3. When the menu you want is highlighted, press the
Enter button
to select it. The highlight moves to the first option for that menu.
4. Use the directional buttons to scroll through the list of options.
(If a computer or video source isn’t connected, certain options
may be unavailable.)
5. Use the directional buttons and
Enter button to change the
setting for the selected option. Enabled settings have a green
highlight.
6. Press the
Esc button to return to the main menu. Your changes
are saved automatically.
7. Press
Esc again (or the Menu button) to exit the menu system.
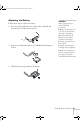
Menu
A/V Mute
E-Zoom
Freeze
S-Video/Video
Color Mode
Computer
Page upPage down
Power
ESCAuto
Enter
Menu directional buttons
: Select
: Enter
Video
Audio
Setting
User's Logo
Advanced
About
Reset All
Input Signal
Color Mode
Position
Tracking
Sync .
Brightness
Contrast
Sharpness
Auto Set up
Reset
:
:
:
:
:
:
:
Select
Adjust
0000
0
0
0
RGB
YUV( YCbCr YPbPr)
Execute
+
-
+
-
0
+
-
ON OFF
[Meeting ]
menus
menu options
note
If you want to go back to the
default settings on any
menu, select Reset, press
Enter, select Yes, and then
press Enter.
720-730.book Page 39 Thursday, October 30, 2003 11:32 AM