
User`s guide


44 Fine-tuning the Projector
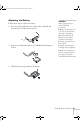
6. When you see the message “Do you use this image?” select
YES
and press
Enter. If you want to change the area selected, select
NO, press Enter and repeat steps 4 through 6.
7. Use the directional buttons on the remote control to select a zoom
rate (display size), and then press
Enter.
8. When you see the message “Do you save the user logo?,” select
YES and press Enter. Saving the logo may take a few minutes. Do
not use the projector or other sources (computer, video, speaker,
etc.) while the logo is being saved.
9. When you see the message “Saving the user’s logo is completed,”
press
Esc or Menu.
Selecting When the Image Displays
After your image is saved, you can set it up as the no-signal message
and/or the screen that’s displayed when you press the
A/V Mute
button.
1. Press the
Menu button to display the main menu (if not already
displayed).
2. Use the directional buttons to highlight
Setting.
3. Press
Enter to select the Setting menu.
4. Use the directional buttons to highlight
No-Signal Msg.
5. Use the directional buttons to select
Logo; then press the Enter
button. This sets your image as the screen displayed when the
projector is not receiving a signal.
6. If you want to set up your image as the A/V Mute display, use the
directional
buttons to move down to A/V Mute.
7. Use the directional buttons to select
Logo; then press the Enter
button. This sets your image as the screen displayed when you
press the
A/V Mute button.
8. When you’re finished, press
Esc or Menu.
To test your setting, press the
A/V Mute button to display your image.
Press it again to turn off the image.
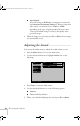
Do you use this image?
YES
NO
User's Logo
: Select: Return : Execute
note
You can also set up your
image as a startup screen.
Use the Advanced menu to
enable the startup screen; see
p
age 46.
720-730.book Page 44 Thursday, October 30, 2003 11:32 AM