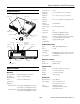
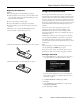
Epson PowerLite 755c/765c Projector Projector Parts Focus ring Zoom ring Card slot Control panel Exhaust air vent Contrast ratio 400:1 Image size (diagonal) 30 to 300 inches (0.8 to 7.6 meters) Projection distance 3.2 to 39.7 feet (1.0 to 12.1 meters) Projection methods Front, rear, upside-down (ceiling mount) Internal sound system 1 W monaural Optical aspect ratio 4:3 (horizontal:vertical) Zoom ratio 1:1.
Epson PowerLite 755c/765c Projector Environmental Compatible Computer Display Formats Temperature Operating: 41 to 95 °F (5 to 35 °C) Storage: 14 to 140 °F (–10 to 60 °C) Humidity (non-condensing) Operating: 20 to 80% RH, Storage: 10 to 90% RH To project images from a computer, set the computer’s video card at a refresh rate (vertical frequency) compatible with the projector; see the following table for compatible formats.
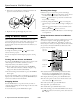
Epson PowerLite 755c/765c Projector If you place the projector below the level of the screen, you’ll have to tilt it up by extending the adjustable front foot, as shown below. This may cause the image to lose its rectangular shape, but you can correct the distortion. (See page 6 for detailed information about correcting the image shape.) Positioning the Projector Before connecting the projector, you need to decide where to place it.
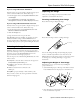
Epson PowerLite 755c/765c Projector You Can’t Project an Image 3. Press the P Power button on top of the projector or on the remote control. If you don’t see the image you are trying to project, try the following: Power button ❏ Make sure the cables are connected correctly. ❏ Make sure the Power light is green and not flashing and the lens cap is off.
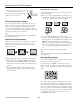
Epson PowerLite 755c/765c Projector If you’re using a Macintosh® with OS X: Adjusting the Image You may need to set up your system to display on the projector screen as well as the LCD screen. Follow these steps: Once you see your image, you may need to make certain adjustments, as described in this section. 1. From the Apple® menu, select System Preferences, then click Displays. Focusing and Zooming Your Image 2.
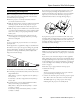
Epson PowerLite 755c/765c Projector 3. If the projector is not level, rotate the foot at the back of the projector. Using Keystone Correction To adjust your image when it is wider on the top or bottom, do one of the following: If the image is no longer rectangular after raising it, see the next section. ❏ Press one of the two triangular buttons on the projector’s control panel, as shown below. Continue pressing the button until you are satisfied with the shape of the image.
Epson PowerLite 755c/765c Projector Adjusting the Brightness Using Direct Power On The brightness of an image depends on the source you are projecting and the amount of light in the room. If the image is too bright or not bright enough, do one of the following: The Direct Power On function enables faster setup. The projector starts up automatically when you plug it in; you won’t have to press the P Power button. ❏ Change the Brightness setting in the Image menu.
Epson PowerLite 755c/765c Projector Zooming Your Image 4. If necessary, press the blue foot release lever and lower the projector to retract the front foot, as shown. Follow these steps to zoom in on a portion of the image: 1. Press the E-Zoom button on the remote control. You see a crosshair indicating the center of the zoom-in area. 2. Use the pointer button to position the crosshair in the area you want to enlarge. 3. Continue pressing the E-Zoom button to enlarge the selected area up to 4 times.
Epson PowerLite 755c/765c Projector Replacing the Batteries Using Password Protection Caution: When replacing batteries, take the following precautions: If you assign a password for the projector, a screen appears requesting the password whenever you plug in and turn on the projector. If you enter the password incorrectly three times in succession, the projector’s operation is locked. Disconnect the projector from the power source and reconnect it.
Epson PowerLite 755c/765c Projector 6. Hold down the Num button on the remote control and use the numeric keypad to enter a 4-digit password. 5. To enable your User’s Logo, select User’s Logo Protect and press Enter. Then select ON and press Enter. The password will be displayed as ****. After you enter the last digit, a confirmation screen appears. Enter the password again.
Epson PowerLite 755c/765c Projector 4. Once the card is inserted, you see one of these screens, depending on the currently selected mode: Disabling the Projector’s Buttons Ad Hoc mode When you enable the Operation Lock function, all the projector’s buttons are disabled except the P Power button. This is useful, for example, if you want to prevent students in a classroom from playing with the projector. 1. Press the Menu button. 2. Select the Setting menu and press Enter. 3.
Epson PowerLite 755c/765c Projector 4. Select either Easy connect mode (for ad hoc) or Access point mode. 6. Select the appropriate settings for your mode, described in the following table. You see one of these screens: ESSID Ad hoc: Enter an ESSID in the ESSID textbox. Access point: Enter an ESSID, which is the SSID name of your access point or the name of your AirPort network.
Epson PowerLite 755c/765c Projector 3. Click the Configure button. Then click the Advanced tab on the screen that appears. You see a screen like this: Configuring the Network Settings for Windows Before connecting to the projector wirelessly, make sure your computer is configured correctly. Also, make sure that the Internet Connection Firewall is disabled. (See your Windows online help system for details.
Epson PowerLite 755c/765c Projector Note: If you don’t see this tab, you may need to enable your wireless card or network device by clicking Configure to access the device settings; then follow any instructions on the screen to enable the device. Access point mode: On the General tab, select Internet Protocol, then click the Properties button. You see this screen: 12.Verify that you’ve enabled your computer’s connection to the access point.
Epson PowerLite 755c/765c Projector 8. Click the AirPort icon on the menu bar at the top of the Macintosh desktop. You see the AirPort status menu: Configuring the Network Settings for Macintosh Your AirPort software is automatically configured to allow your Macintosh to detect both computer-to-computer (ad hoc) and access point networks. Typically you only need to select your projector’s ESSID (ad hoc) or your AirPort network name (access point) on the Macintosh menu bar.
Epson PowerLite 755c/765c Projector ❏ Make sure you’re trying to connect to the right network. In Windows, verify that you’ve enabled your computer’s connection to the access point or that your wireless card or adapter is enabled, and that its SSID matches the projector’s ESSID. In Macintosh, check the AirPort status menu (click the AirPort icon on your menu bar) to make sure AirPort is turned on and the projector’s ESSID or your AirPort network is selected. Remember that the ESSID is case-sensitive.
Epson PowerLite 755c/765c Projector 8. When you’re done with your presentation, click Disconnect on the control bar. 6. Once the connection is established, you see your computer’s image transmitted to the projection screen, and a floating control bar on your screen: Connecting in IP Connect Mode Windows Even if your projector and computer are on different subnets (access point mode only) or connecting over different routers, you can establish a connection manually using IP Connect Mode. Macintosh 1.
Epson PowerLite 755c/765c Projector 3. Click Use IP connect mode, then click OK. You see this screen: If the search fails to find a projector with the specified IP address, the searching icon turns into a question mark. If this happens, run EasyMP to check the projector’s IP address, then repeat this step. Click here Note: If you still don’t see the projector, make sure the Internet connection firewall is disabled. 6. Click the projector you want to connect to, then click the Connect button.
Epson PowerLite 755c/765c Projector Registering Projectors in EMP Monitor Managing Projectors from a Remote Computer Before you can monitor a projector, you have to register it. Follow these steps: 1. Open EMP Monitor. You see this screen: The software included with your projector lets you monitor and control projector(s) from a remote computer. These features are intended for use by network administrators.
Epson PowerLite 755c/765c Projector You see this screen listing all registered projectors: The following tables explain the status, video source, and error icons. (Additional unsupported icons also appear.) Status icons Note: To delete a projector from the list, highlight the projector name, and click Delete.
Epson PowerLite 755c/765c Projector Controlling Your Projectors Configuring the Monitoring Interval The control buttons in the upper-right of the EMP Monitor screen let you turn the projectors on and off and select video signals. (Hold the mouse pointer over a button to see a description of its meaning.) Select the projector you want to operate (with the mouse pointer) before clicking one of the buttons. You can select how often EMP Monitor checks the projector status: 1.
Epson PowerLite 755c/765c Projector Projector Status Lights The lights on top of the projector indicate the projector’s status and let you know when a problem occurs. Power light Lamp light Temp light Flashing red Off Flashing orange Rapid cooling is in progress. Although this is not an abnormal condition, projection will stop automatically if the temperature rises higher. Make sure there is plenty of space around and under the projector for ventilation, and that the air filters and vents are clear.
Epson PowerLite 755c/765c Projector Cleaning and Replacing the Air Filter Replacing the Lamp Clean the air filter and air vents on the bottom of the projector after every 100 hours of use. If not cleaned periodically, they can become clogged with dust, preventing proper ventilation. This can cause overheating and damage the projector. The projection lamp typically lasts for about 2000 hours of use (in High Brightness mode) or 3000 hours (in Low Brightness mode). It is time to replace the lamp when: 1.
Epson PowerLite 755c/765c Projector Resetting the Lamp Timer 4. Loosen the two screws holding the lamp in place (you don’t need to remove them). You must reset the lamp timer after replacing the lamp to clear the Replace the Lamp message. Note: Do not reset the lamp timer if you have not replaced the lamp. If you do, the Lamp Hours will not accurately reflect the number of hours that the lamp has been used. 1. Connect the power cable and turn on the projector. 2.
Epson PowerLite 755c/765c Projector Optional Accessories Epson provides the following optional accessories for the projectors: Product Part number Replacement lamp V13H010L32 Air filter set (includes 2 filters) V13H134A08 Samsonite® wheeled soft case ATA molded hard-shell carrying case Notebook/projector soft shoulder bag ELPKS35-S ELPKS42 ELPKS43 Component video cable (VGA-to-RCA) ELPKC19 S-Video cable ELPSV01 Macintosh adapter set ELPAP01 Distribution amplifier ELPDA01 50-inch portable s