
Owner's manual

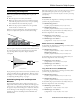
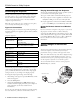
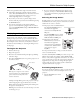

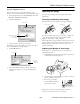
Table Of Contents
- Projector Specifications
- Positioning the Projector
- Connecting the Projector
- Viewing Images on an External Monitor
- Displaying an Image
- Troubleshooting Display Problems
- Adjusting the Image
- Projecting Images Without a Screen
- Enabling Password Protection
- Shutting Down the Projector
- Using the Remote Control
- Using the Control Panel Controlling Multiple Projectors
- Managing Projectors from a Remote Computer
- Using EMP NetworkManager
- Projector Status Lights
- Cleaning the Lens
- Cleaning the Projector
- Cleaning the Air Filters and Vents Replacing the Lamp and Air Filters
- Transporting the Projector
- Optional Accessories
- Related Documentation

EPSON PowerLite 7800p Projector
8 - EPSON PowerLite 7800p Projector 5/03
Adjusting the Image Shape
In most cases, you can maintain a rectangular image by
placing the projector directly in front of the center of the
screen with the base of the lens level with the bottom of the
screen.
Even if the projector is slightly tilted (within a range of 40° up
or down), the projector’s automatic keystone correction
function detects and corrects vertical keystone distortion.
It takes about one second after projection starts for the image
to be corrected. During this time, a vertical keystone
correction gauge appears on the screen.
If your image is still distorted, you can correct it using either
of these methods:
❏ If the image has two parallel
sides but is wider on the top,
bottom, left, or right, you
can correct it using the
Keystone keys on the
projector’s control panel or
the Keystone menu (see
“Using Keystone
Correction” below).
❏ If the image is trapezoid-
shaped (no two sides are
parallel), you can adjust its
shape using Quick Corner
™
as described below.
You cannot use both keystone correction and Quick Corner at
the same time.
Using Keystone Correction
To adjust your image when it is wider on one side, do one of
the following:
❏ Look at the shapes of the icons on the
projector’s four
Keystone buttons.
Press the button whose icon is the
opposite shape of your screen image.
Continue pressing the button until
you are satisfied with the shape of the
image.
Note: The image will be slightly shorter after adjusting. If it’s
important to maintain the correct aspect ratio, use the menu
system to perform keystone correction, as described below,
then adjust the Height setting as needed.
❏ Press the
Menu button on the remote control, select the
Setting menu, and press
Enter. From the Setting menu,
select
H/V-Keystone in the Keystone menu and press
Enter. Select V-Keystone (for vertical keystone distortion)
or
H-Keystone (for horizontal keystone distortion) and
press
Enter. Use the pointer button on the remote
control to adjust the keystone setting as needed.
Using Quick Corner
Use Quick Corner to correct the image shape when it’s
uneven on the top and bottom, or on all sides.
1. Press the
Menu button on the remote control (or on the
projector’s control panel).
2. Select the
Setting menu and press Enter.
3. From the Setting menu, select
Keystone and press Enter.
4. Select
Quick Corner and press Enter.
You see this screen:
5. Press the
Enter button to
select the corner you want to
adjust.
6. Use the pointer button on
the remote control (or the
arrow buttons on the
projector) to adjust the shape.
7. Repeat steps 5 and 6 as needed
to adjust any remaining corners.
8. When done, press the
ESC button on the remote control to
exit the menu system.
If
Quick Corner remains selected in the Keystone menu, the
Quick Corner screen appears whenever you press the
projector’s
Keystone buttons. You can then follow steps 5
through 8 above to correct the shape of your image, or press
ESC to exit Quick Corner.
Corrected imageProjector tilted up Projector tilted down
Quick Corner correction
Keystone correction
Keystone correction
[
]:Adjust
Adjust
[ ] :Move next
[ ] :Move next
[ESC]
[ESC]
:Return (Press 1 second to
:Return (Press 1 second to
reset)
reset)
/