ZLUHOHVVVHUYHU ERRN 3DJH L )ULGD\ 0D\ 30 User’s Guide
ZLUHOHVVVHUYHU ERRN 3DJH LL )ULGD\ 0D\ 30 Copyright Notice All rights reserved. No part of this publication may be reproduced, stored in a retrieval system, or transmitted in any form or by any means, electronic, mechanical, photocopying, recording, or otherwise, without the prior written permission of SEIKO EPSON CORPORATION. The information contained herein is designed only for use with this EPSON product.
ZLUHOHVVVHUYHU ERRN 3DJH LLL )ULGD\ 0D\ 30 Contents INTRODUCTION . . . . . . . . . . . . . . . . . . . . . . . . . . . . . 1 Wireless Networking . . . . . . . . . . . . . . . . . . . . . . . . . . . . . . . . . . . . 2 Windows System Requirements . . . . . . . . . . . . . . . . . . . . . . . . . . . 4 Macintosh System Requirements . . . . . . . . . . . . . . . . . . . . . . . . . . . 5 Where To Get Information . . . . . . . . . . . . . . . . . . . . . . . . . . . . . . .
ZLUHOHVVVHUYHU ERRN 3DJH LY )ULGD\ 0D\ 30 CONFIGURING WIRELESS PRINTING FOR MACINTOSH . . . . . . . . . . . . . . . . . . . . . . . . . . . 29 Preparing to Install . . . . . . . . . . . . . . . . . . . . . . . . . . . . . . . . . . . . 30 If Your Macintosh Has an AirPort Wireless Adapter . . . . . . . . 31 If Your Macintosh Has a Non-AirPort Wireless Adapter . . . . . 32 Installing the EpsonNet Wireless Print Server . . . . . . . . . . . . . . . . 33 Configuring the Print Server . . . . .
ZLUHOHVVVHUYHU ERRN 3DJH )ULGD\ 0D\ 30 Introduction The EpsonNet 802.11b Wireless Print Server lets you print from any computer in your existing network without additional wiring. Even without a network, you can print from a wireless-equipped Windows® PC or laptop, Macintosh,® Apple® iBook,™ or PowerBook,® from distances up to 120 feet. The print server is compatible with most wireless adapters and access points that comply with the WiFi™ (Wireless Fidelity) standard.
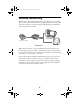
ZLUHOHVVVHUYHU ERRN 3DJH )ULGD\ 0D\ 30 Wireless Networking The EpsonNet 802.11b Wireless Print Server is designed for use in a small office, home, or school network. On a wired network like the one illustrated below, the computers and other equipment share information and Internet access through a series of cables.
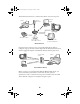
ZLUHOHVVVHUYHU ERRN 3DJH )ULGD\ 0D\ 30 The illustration below shows a wireless network that uses an access point. wireless print server printer wireless laptop cable/ DSL modem access point or AirPort Base Station computers on LAN (Local Area Network) Wireless Network If you don’t have an access point, you can still print from any desktop computer or laptop that has a wireless adapter.
ZLUHOHVVVHUYHU ERRN 3DJH )ULGD\ 0D\ 30 Windows System Requirements For printing with the EpsonNet 802.11b Wireless Print Server, make sure each computer meets the following requirements: ■ A Microsoft® Windows compatible PC or laptop with a Pentium® processor or later, 200 MHz or faster recommended ■ Windows 95, Windows 98, Windows Me, Windows NT® 4.
ZLUHOHVVVHUYHU ERRN 3DJH )ULGD\ 0D\ 30 Macintosh System Requirements For printing with the EpsonNet 802.11b Wireless Print Server, make sure each Macintosh meets the following requirements: ■ An Apple iBook, iMac,™ PowerBook G3 or G4, Power Mac G4 Cube, or Power Mac G3 or G4 ■ Mac® OS 8.6 through 9.2 (Mac OS 9.2 recommended) If you are using Mac OS X, check the EPSON web site for driver updates and support information. Connect to the Internet, then go to http://support.epson.com.
ZLUHOHVVVHUYHU ERRN 3DJH )ULGD\ 0D\ 30 Where To Get Information Use this booklet to set up and configure your EPSON printer and EpsonNet 802.11b Wireless Print Server. Please follow these guidelines: Cautions must be observed to avoid damage to your equipment. Notes contain important information about your print server. For additional information, check the following: ■ On-screen software help If you need assistance as you use the EpsonNet utilities, click the Help button.
ZLUHOHVVVHUYHU ERRN 3DJH )ULGD\ 0D\ 30 Setting Up Your Print Server This chapter describes how to unpack and set up your print server. You can locate the printer and print server anywhere in your home or office. However, keep in mind that walls and ceilings will weaken the signal between your print server, computer(s), and access point, and that the print server must be within 120 feet of your other equipment.
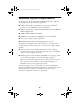
ZLUHOHVVVHUYHU ERRN 3DJH )ULGD\ 0D\ 30 Unpacking the Print Server Take everything out of the box and make sure you have the items shown below. You will also need a parallel cable to connect the print server to your printer. Make sure your cable follows the specifications listed on page 4. base power supply print server print server CD-ROM Checking the Printer Before you connect the print server, print a test page to make sure the printer is working properly.
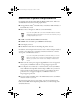
ZLUHOHVVVHUYHU ERRN 3DJH )ULGD\ 0D\ 30 Connecting the Print Server After you have verified that the printer is working correctly, you’re ready to connect the print server. 1. Press the P power button to turn off your printer. 2. Slide the print server into the base and press firmly to attach it. 3. Make sure you have a parallel cable (not included with the print server). Connect the larger end of the cable to the printer’s parallel port. Then secure it with the wire clips. 4.
ZLUHOHVVVHUYHU ERRN 3DJH )ULGD\ 0D\ 30 5. Connect the power supply to the print server. 6. Plug the AC adapter into an electrical outlet. Both the green and yellow lights come on for a moment and then go out. If the green light blinks continuously in a regular pattern, try unplugging the print server. If you still see the light blinking after you plug it in again, contact EPSON as described on page 47. 7. Press the P power button on the printer to turn it on. 8.
ZLUHOHVVVHUYHU ERRN 3DJH )ULGD\ 0D\ 30 Configuring Wireless Printing for Windows This chapter explains how to install the software and set up the EpsonNet 802.11b Wireless Print Server for printing with Windows. Once the print server is configured, you can set up the network port for wireless printing on other computers in your network. Before you start, make sure your printer is connected to the print server, as described on pages 9 to 10.
ZLUHOHVVVHUYHU ERRN 3DJH )ULGD\ 0D\ 30 Preparing to Install Configuring the print server is the process of setting it up to work with your network. This process begins immediately after you install the software, so it’s important to make sure your print server and printer are set up before you start installing. You also need to check that your wireless network adapter(s) and/or access point are installed and ready. Your EpsonNet 802.
ZLUHOHVVVHUYHU ERRN 3DJH )ULGD\ 0D\ 30 Checking Your Network Before you begin the installation process, do the following: ■ Follow the instructions starting on page 9 to set up the print server, connect it to your printer, and test the connection. ■ Make sure the wireless mode for your computer is set to Infrastructure if you are connecting to the printer through an access point, or 802.11b Ad Hoc if you are connecting without an access point.
ZLUHOHVVVHUYHU ERRN 3DJH )ULGD\ 0D\ 30 Installing the EpsonNet Wireless Utilities Before you install the utilities, make sure you check your network settings, as described on page 13. 1. Insert the print server CD-ROM in your drive. You see the EpsonNet Installation Program: Double-click here If the Installation Program doesn’t open automatically, go to My Computer and double-click the Epson CD-ROM icon. 2. Double-click Install EpsonNet Wireless Print Server Utilities. 3.
ZLUHOHVVVHUYHU ERRN 3DJH )ULGD\ 0D\ 30 4. Click Next. You see the license agreement. 5. Read the license agreement, and click Yes. 6. Follow the instructions on the screen and click Next. You see this window: Click Next 7. Check XAdmin32 if you want to install it. Then see the XAdmin32 onscreen help for configuration instructions. 8. Click Next to install the program files and WP Admin.
ZLUHOHVVVHUYHU ERRN 3DJH )ULGD\ 0D\ 30 Configuring the Print Server After the software is installed, you’re ready to establish a connection to the print server and configure it for your wireless network. Click START 1. When you see the Wireless Server Search window, click START.
ZLUHOHVVVHUYHU ERRN 3DJH )ULGD\ 0D\ 30 You see the following: Click OK If you see the message Wireless Communication Failed, click OK, then click CONFIGURE again. If you continue to see this message, move the print server closer to your computer and access point, if you have one. Also, move it away from large metal objects and devices such as cordless phones or microwave ovens. 4. Click OK on the Password window. (The default password is null, or blank.
ZLUHOHVVVHUYHU ERRN 3DJH )ULGD\ 0D\ 30 For descriptions of all the settings on the Wireless Server Configuration screen, see Appendix A. 5. For Boot Method, select STATIC. 6. Do one of the following: ■ If your network does not support DHCP (192.0.0.192 appears in the IP Address box), enter an IP address that conforms to the IP addressing scheme for your network. For example, if you have two computers on your network whose IP addresses are 192.189.207.3 and 192.189.207.
ZLUHOHVVVHUYHU ERRN 3DJH )ULGD\ 0D\ 30 8. Make any other changes you want and click OK. For example, you might want to change the Server Name to something that is easy to remember, or enter a password to limit access to the Configuration screen. 9. Continue with the instructions in the next section to complete the configuration and installation.
ZLUHOHVVVHUYHU ERRN 3DJH )ULGD\ 0D\ 30 You see the EpsonNet Installation Program again: 3. Do one of the following: ■ If you’re running Windows Me, 98, or 95, double-click Install EpsonNet Direct Print Utility and follow the instructions on the screen to install the software and restart your computer. ■ If you’re using a different version of Windows, click the to exit the installation program.
ZLUHOHVVVHUYHU ERRN 3DJH )ULGD\ 0D\ 30 Setting Up Additional Computers After you configure the print server, you need to set up a network port on all the computers that will print over the wireless network. First, do the following: 1. Make sure you have installed the printer driver and utility software. See the Start Here sheet that came with your printer for instructions. 2.
ZLUHOHVVVHUYHU ERRN 3DJH )ULGD\ 0D\ 30 Setting Up a Network Port on Windows XP or 2000 The process of setting up a network port is similar on Windows XP and Windows 2000. Although this section shows Windows XP, you’ll see similar screens in Windows 2000. Make sure you are logged in to the computer as an administrator. Before you begin, run WP-Admin and note the IP address of your print server.
ZLUHOHVVVHUYHU ERRN 3DJH )ULGD\ 0D\ 30 5. Click Next. You see a window like the following: Enter your print server’s IP address or server name Click Next 6. In the Printer Name or IP Address box, enter the print server’s name or IP address and click Next. 7. Follow the instructions on the screen to complete the wizard. 8. Click Close to close the Printer Ports window, then click Apply on the Properties window. 9.
ZLUHOHVVVHUYHU ERRN 3DJH )ULGD\ 0D\ 30 Setting Up a Network Port on Windows Me, 98, or 95 Before you begin, run WP-Admin and note the IP address of your print server. Make sure the printer driver is installed, and the wireless adapter (or network adapter) is configured and working correctly. You need to install the EpsonNet Direct Print Utility for wireless printing on any computer running Windows Me, 98, or 95. If you have already installed the utility, you can skip to step 3. 1.
ZLUHOHVVVHUYHU ERRN 3DJH )ULGD\ 0D\ 30 4. Right-click your printer icon, and then click Properties. You see the Properties window. Click the Details tab to display a window like the following: Click Add Port 5. Click Add Port on the Details tab. You see the Add Port window: Click Browse 6. Make sure Network is selected, then click Browse.
ZLUHOHVVVHUYHU ERRN 3DJH )ULGD\ 0D\ 30 You see the Browse for Printer window: . Click to expand the network path Select your network printer 7. Click the + next to Entire Network, then click the + next to Epson_lpr and select your printer. (Make sure the IP address matches your print server’s IP address.) 8. Click OK, then click OK again. Click Apply on the Details tab. 9. To test the connection, click the General tab and click Print Test Page. Wait for the page to print.
ZLUHOHVVVHUYHU ERRN 3DJH )ULGD\ 0D\ 30 Setting Up a Network Port on Windows NT 4.0 Make sure you have Microsoft TCP/IP Printing installed on the computer before you begin. Run WP-Admin and note the IP address and server name of your print server. Make sure the printer driver is installed, and the wireless adapter (or network adapter) in the computer is configured and working correctly. 1. From the Start menu, click Settings > Printers. 2.
ZLUHOHVVVHUYHU ERRN 3DJH )ULGD\ 0D\ 30 6. Click Close to close the Printer Ports window. 7. Click OK to close the Properties window. 8. Right-click your printer icon in the Printers window and click Properties. 9. To test the connection, select the General tab and click Print Test Page. If the test page prints, click OK to close the Properties window. If it fails to print, try the following: ■ Make sure that the printer and print server are connected and that both are on.
ZLUHOHVVVHUYHU ERRN 3DJH )ULGD\ 0D\ 30 Configuring Wireless Printing for Macintosh This chapter explains how to install the software and set up the EpsonNet 802.11b Wireless Print Server for printing on a Macintosh. Once the print server is configured, you select and use your EPSON printer from any Macintosh in your network. Before you start, make sure your printer is connected to the print server, as described on pages 9 to 10.
ZLUHOHVVVHUYHU ERRN 3DJH )ULGD\ 0D\ 30 Preparing to Install Configuring the print server is the process of setting it up to work with your network. This process begins immediately after you install the software, so it’s important to make sure your print server and printer are set up before you start installing. You also need to check that your AirPort or other wireless network adapter(s) and/or access point are installed and ready. Your EpsonNet 802.
ZLUHOHVVVHUYHU ERRN 3DJH )ULGD\ 0D\ 30 If Your Macintosh Has an AirPort Wireless Adapter ■ Make sure AirPort is enabled in the AppleTalk Control Panel. If your Macintosh and AirPort Base Station or access point are connected over an existing Ethernet network, select Ethernet in the AppleTalk Control Panel. ■ Make sure that both AppleTalk and TCP/IP are enabled in your AirPort utility.
ZLUHOHVVVHUYHU ERRN 3DJH )ULGD\ 0D\ 30 If Your Macintosh Has a Non-AirPort Wireless Adapter ■ Make sure your Macintosh computer’s wireless mode is set correctly. Set it to Infrastructure if you are connecting through an access point, or 802.11b Ad Hoc if you are connecting without an access point. If your adapter does not include an 802.11b Ad Hoc option, set the wireless mode to Ad Hoc, Computer-to-Computer, or the mode your adapter uses to communicate without an access point.
ZLUHOHVVVHUYHU ERRN 3DJH )ULGD\ 0D\ 30 Installing the EpsonNet Wireless Print Server 1. Insert the printer CD-ROM in your drive. 2. Double-click the Utility Installer icon. You may see a message that you have an older version of the Java Runtime Environment on your Macintosh. Click OK to install the newer version. When you’re done installing the Java Runtime Utility Environment, click Quit. Then double-click the Installer icon to restart the utility installation program. 3.
ZLUHOHVVVHUYHU ERRN 3DJH )ULGD\ 0D\ 30 Configuring the Print Server After the software is installed, you’re ready to establish a connection to the print server and configure it for your wireless network. Click START 1. When you see the Wireless Server Search window, click START.
ZLUHOHVVVHUYHU ERRN 3DJH )ULGD\ 0D\ 30 If you see the message Wireless Communication Failed, click OK, then click CONFIGURE again. If you continue to see this message, move the print server closer to your computer and access point, if you have one. Also, move it away from large metal objects and devices such as cordless phones or microwave ovens. 4. Click OK on the Password window. (The default password is null, or blank.
ZLUHOHVVVHUYHU ERRN 3DJH )ULGD\ 0D\ 30 This password does not affect access to your AirPort network. To enable password protection on your network, see page 44. 6. Make any other changes you want and click OK. You see the Wireless Server Search window again: Click QUIT 7. Click QUIT. 8. Open the Chooser from the Apple menu. 9. Click your printer icon, then click the EPSON printer port icon. Turn on background printing if you want, and close the Chooser.
ZLUHOHVVVHUYHU ERRN 3DJH )ULGD\ 0D\ 30 Setting Up Additional Macintosh Computers Once the print server is configured on your wireless network, you can install the driver and select the printer on each Macintosh. Then make sure all your computers are set up for your wireless network. 1. Make sure you have installed the printer driver and utility software. See the Start Here sheet that came with your printer for instructions. 2.
ZLUHOHVVVHUYHU ERRN 3DJH )ULGD\ 0D\ 30 If Your Macintosh Has a Non-AirPort Wireless Adapter ■ Make sure your Macintosh computer’s wireless mode is set correctly. Set it to Infrastructure if you are connecting through an access point, or 802.11b Ad Hoc if you are connecting without an access point. If your adapter does not include an 802.11b Ad Hoc option, set the wireless mode to Ad Hoc, Computer-to-Computer, or the mode your adapter uses to communicate without an access point.
ZLUHOHVVVHUYHU ERRN 3DJH )ULGD\ 0D\ 30 Solving Wireless Printing Problems This chapter gives you information on solving problems with print server setup and wireless printing. If you need to clean or align the print head, follow the instructions in Printer Basics to run the appropriate utilities. These programs work on your wireless network the same as they do when the printer is connected directly to a computer.
ZLUHOHVVVHUYHU ERRN 3DJH )ULGD\ 0D\ 30 Problems and Solutions Here are some troubleshooting tips if you are having trouble setting up your print server or printing over your wireless network. When you start WP-Admin, you see a message that Javaw.exe was not found. You must have the Java Runtime Environment installed on your computer to run WP-Admin. Uninstall the print server software, as described on page 46, then reinstall it as described in the instructions starting on page 14.
ZLUHOHVVVHUYHU ERRN 3DJH )ULGD\ 0D\ 30 ■ Hold down the test button on the back of the print server for at least five seconds to reset the print server to its factory defaults. The print server’s green and yellow lights come on briefly when it resets. If you’ve already configured the print server, you need to run WP-Admin again to reconfigure it. ■ Try restarting your computer.
ZLUHOHVVVHUYHU ERRN 3DJH )ULGD\ 0D\ 30 ■ If you’ve set the Boot Method in WP-Admin to AUTO or DHCP and unplugged the print server, DHCP may have assigned another IP address to the print server. To check the IP address, press the test button on the print server for one second to print a status sheet. Then make sure the IP address for your computer is on the same network segment. See “IP Address” on page 50 for instructions on accessing the computer’s IP address.
ZLUHOHVVVHUYHU ERRN 3DJH )ULGD\ 0D\ 30 ■ Make sure you’re connecting to the correct print server. Check the MAC address on the back of the print server against the MAC address that appears in the WP-Admin Wireless Server Search window. ■ Check the printer’s lights to see if there is a problem with the printer. See Printer Basics for details. You are using AirPort in computer-to-computer (ad hoc) mode, and you are unable to see the printer port in the Chooser.
ZLUHOHVVVHUYHU ERRN 3DJH )ULGD\ 0D\ 30 You want to use a password on your AirPort network. Because AirPort uses passwords that do not follow the standard for WEP encryption, you need to change your network password to a hexadecimal value. Follow these steps: 1. Create a computer-to-computer network without password protection on the Macintosh that you use to configure the print server. 2.
ZLUHOHVVVHUYHU ERRN 3DJH )ULGD\ 0D\ 30 6. To use the printer in computer-to-computer mode, do the following: ■ Create a computer-to-computer network. ■ When prompted, enter as your password the hexadecimal value you entered in the 64Bit Key 1 box on the Wireless Server Configuration screen. This value must be preceded by the number zero (0) and lowercase letter x. For example: 0x62B91F2A98. 7. Open the Chooser from the Apple menu.
ZLUHOHVVVHUYHU ERRN 3DJH )ULGD\ 0D\ 30 Uninstalling the Software You may need to uninstall and then reinstall the software for your printer. For example, this might be necessary if you upgrade your computer operating system. Windows 1. Click Start > Settings > Control Panel (for Windows XP, click Start > Control Panel). 2. Double-click Add/Remove Programs (or Add or Remove Programs). 3. Select EpsonNet 802.11b Wireless Print Server and click Add/ Remove (or Change/Remove).
ZLUHOHVVVHUYHU ERRN 3DJH )ULGD\ 0D\ 30 Where To Get Help If you need help with your print server, see the contact information below. EPSON provides technical assistance 24 hours a day through the Internet: ■ You can reach EPSON Support at http://support.epson.com. At this site, you can download drivers and other files, look at product documentation, access troubleshooting information, and receive technical advice through e-mail.
ZLUHOHVVVHUYHU ERRN 3DJH )ULGD\ 0D\ 30 48
ZLUHOHVVVHUYHU ERRN 3DJH )ULGD\ 0D\ 30 Appendix A: Configuration Settings The Wireless Server Configuration screen includes both fields that display information and fields that allow you to modify print server settings. Since most of the settings are configured automatically based on your existing network, you don’t need to change these settings for the typical wireless network. Some settings, such as the Server Name or Password, you may want to change for convenience or security.
ZLUHOHVVVHUYHU ERRN 3DJH )ULGD\ 0D\ 30 Firmware Revision Indicates the version of the software embedded in the print server. This field cannot be changed. IP Address Address used to identify a node on a network supporting the TCP/IP protocol. The format for IP (Internet Protocol) addresses is a set of four bytes or segments, separated by periods. Each byte can have any value from zero (0) to 254.
ZLUHOHVVVHUYHU ERRN 3DJH )ULGD\ 0D\ 30 Subnet Mask Set the subnet mask of your print server to the correct setting for your network. This setting will be 255.255.255.0 for most networks in the home or small office. Boot Method Method the print server uses to obtain an IP address. For most networks, change this setting to STATIC, which prevents the IP address from changing when you unplug the print server and plug it in again later.
ZLUHOHVVVHUYHU ERRN 3DJH )ULGD\ 0D\ 30 Data Rate Indicates the throughput speed in Mbps of the wireless Ethernet connection (1, 2, 5.5, or 11). The print server will automatically negotiate to the highest possible rate. SSID Name that identifies your wireless network. When you configure the print server in WP-Admin, it automatically detects the SSID (Service Set Identifier) for the wireless network. The SSID must match for all nodes on the network.
ZLUHOHVVVHUYHU ERRN 3DJH )ULGD\ 0D\ 30 WEP Key Disables or enables WEP (Wired Equivalent Privacy), which provides a level of security for your network. To communicate, all nodes on your network must be WEP-enabled and must use the same WEP key. See the documentation for your wireless adapter or access point for more information about WEP. If you have an AirPort network, see page 44. WEP Key Index Lets you choose between four WEP keys for either 64-bit or 128-bit WEP.
ZLUHOHVVVHUYHU ERRN 3DJH )ULGD\ 0D\ 30 54
ZLUHOHVVVHUYHU ERRN 3DJH )ULGD\ 0D\ 30 Appendix B: Specifications and Notices Print Server Specifications Printer Connection Parallel (IEEE-1284) Serial (9 pin; factory diagnostics only) Operating Systems Windows 95/98/Me/NT 4/2000/XP NetWare (2 through 5 with NDS) Mac OS 7 through 9.x Dimensions Width: 6 inches (15.2 cm) Depth: 1.25 inches (3.2 cm) Height: 4.25 inches (10.
ZLUHOHVVVHUYHU ERRN 3DJH )ULGD\ 0D\ 30 Sensitivity (typ, AWGN, 8E-2 PER): –91 dBm at 1 Mbps –88 dBm at 2 Mbps –87 dBm at 5.
ZLUHOHVVVHUYHU ERRN 3DJH )ULGD\ 0D\ 30 Epson America, Inc. Limited Warranty What Is Covered: Epson America, Inc. (“Epson”) warrants to the first retail purchaser that the print server (the “Product”) covered by this limited warranty statement, if purchased and used in the United States or Canada, conforms to the manufacturer’s specifications and will be free from defects in workmanship and materials for a period of one (1) year from the date of original purchase.
ZLUHOHVVVHUYHU ERRN 3DJH )ULGD\ 0D\ 30 products, or service other than by an Epson Authorized Servicer. If a claimed defect cannot be identified or reproduced, you will be held responsible for the costs incurred. THE WARRANTY AND REMEDY PROVIDED ABOVE ARE EXCLUSIVE AND IN LIEU OF ALL OTHER EXPRESS OR IMPLIED WARRANTIES INCLUDING, BUT NOT LIMITED TO, THE IMPLIED WARRANTIES OF MERCHANTABILITY OR FITNESS FOR A PARTICULAR PURPOSE. SOME LAWS DO NOT ALLOW THE EXCLUSION OF IMPLIED WARRANTIES.
ZLUHOHVVVHUYHU ERRN 3DJH )ULGD\ 0D\ 30 FCC Compliance Statement For United States Users This equipment has been tested and found to comply with the limits for a Class B digital device, pursuant to Part 15 of the FCC Rules. These limits are designed to provide reasonable protection against harmful interference in a residential installation.
ZLUHOHVVVHUYHU ERRN 3DJH )ULGD\ 0D\ 30 Declaration of Conformity According to 47CFR, Part 2 and 15 for Class B Personal Computers and Peripherals; and/or CPU Boards and Power Supplies used with Class B Personal Computers: We: EPSON AMERICA, INC.
ZLUHOHVVVHUYHU ERRN 3DJH )ULGD\ 0D\ 30 Index Numerics C 128 Bit/ 64 Bit WEP Key setting, 53 802.
ZLUHOHVVVHUYHU ERRN 3DJH )ULGD\ 0D\ 30 F M Firmware downloads, 56 Firmware Revision setting, 50 MAC Address setting, 51 Macintosh computer-to-computer mode, 31, 37 installing software and configuring, 33 to 38 OS X, 5 starting WP-Admin, 36 system requirements, 5 uninstalling software, 46 using a network password, 44 to 45 G Gateway setting, 51 H Help, EPSON, 47 N I NetWare, 6, 12, 56 Network port Windows Me, 98, or 95, 24 to 26 Windows NT, 27 to 28 Windows XP or 2000, 22 to 23
ZLUHOHVVVHUYHU ERRN 3DJH )ULGD\ 0D\ 30 Software installing, 14 to 20, 24, 33 uninstalling, 46 Specifications, 55 to 56 SSID setting, 18, 31, 52 Status lights, 10, 40, 43 Status sheet, printing, 10, 39 Subnet Mask setting, 51 Supplies, ordering, 47 Support, 6, 47 System requirements, 4 to 5 specifications, 55 to 56 status lights, 10, 40 test button, 10, 39 Printer connecting to print server, 9 to 10 lights, 8, 39 location, 7, 41, 43 maintenance, 39 ROM version, 8 supported models, 1 te
ZLUHOHVVVHUYHU ERRN 3DJH )ULGD\ 0D\ 30 Wireless Mode setting, 52 Workgroup setting, 50 WP-Admin configuration settings, 49 to 53 configuring, 17 to 19, 34 to 36 connecting with print server, 16 to 17, 33 to 34 installing, 14 to 15, 33 password, 17, 35, 49 starting, 20, 36 uninstalling, 46 X XAdmin32, 12, 56 64