Technical Manual for version 4.24 of the PosPRO Till Version 5.0.1 © 2012 Inepro B.V.
Technical Manual Introduction Thank you for your purchase the PosPRO till. We will try to treat every aspect of the PosPRO till in this manual . This first part will lead you through the installation and setup of our software on your system. After which we will introduce the different modules and explain all the options.
Introduction, Software Requirements 3 .NET Framework The .NET Framework is a software component that can be added to the Microsoft Windows operating system. It provides a great number of pre-defined code solutions for general application demands, and manages the execution of programs that especially written for framework. The .NET Framework is an important Microsoft component, and the intension is that most applications that are developed for the Windows platform will use it. You will need version 2.
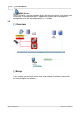
Technical Manual OPOS Drivers The OPOS drivers are the hardware drivers that drive the pinter, cash drawer and line display. A management tool is supplied that enables you to manage the configuration of all the connected devices in 1 window. 1.2 Overview Setup In this chapter you will find how the hard- and software should be installed. We will also configure the software. http://www.inepro.com Version 5.0.1 Inepro B.V.
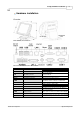
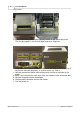
Setup, Hardware installation 5 2.1 Hardware installation Overview The PosPRO till, front and back The connectors on the bottom of the PosPRO till I/O Port Power Connector Type DC Power Connector USB USB LAN LAN RJ45 Connector Keyboard PS/2 Keyboard Connector Mouse COM1 COM2 PS/2 Mouse Connector EXT VGA 15 PIN VGA Connector DC 12V Out 2 PIN Socket PS2 port can be used for a mouse. The serial ports COM1/COM2 can be used to connect serial devices such as a mouse or a fax/modem.
Technical Manual The printer 1. Open the printer by pressing the light grey button on the side of the printer. The will spring open, insert a roll of paper and close the printer. 2. Attach the communication cable of the printer to the till on COM 5 if you use a PayCon for electronic payments, in all other cases use COM 2. 3. Connect the communication cable of the printer and the cash drawer to the printer. 4. Make sure to connect the earth wire of the cash drawer to the connection bolt. 5.
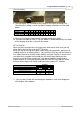
Setup, Hardware installation 7 The line display 8. The line display has a number of DIP switches that signify character sets. Check that this setting is set to the West-European character set. See table below: Setting 1 2 3 4 5 6 7 8 9 10 Standaard On On On Off On On On Off On On Inepro West Europe Off On On On Off On On Off On On Set the DIP switches to the West-European character set. 11 12 Off On Off On 9. Mount the line display foot and pull the cable trough the cylinder. 10.
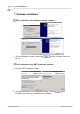
Technical Manual 2.2 Software installation The installation of the Windows Installer software 1. Run the Windows Installer setup, click 'Finish'. until the 'finished', then click The installation of the .NET Framework software 2. Run the .NET Framework setup. 3. Check the overview to if all setting are correct, if so click installation will now start. Complete the installation. http://www.inepro.com , the Version 5.0.1 Inepro B.V.
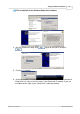
Setup, Software installation 9 The installation of the Windows Powershell software 4. Run the Powershell setup, click . , agree to the license and click 5. Finish the installation. 6. Check by clicking the Windows Start button and executing the 'Run' command 'Powershell' (as seen in the left screen) if the Powershell is working. If you see a window like the right screen, Powershell is working correctly. Version 5.0.1 Inepro B.V. http://www.inepro.
Technical Manual The installation of the Microsoft SQL Server software 7. Run the SQL setup. 8. Tick the box to show you accept the licence and click will now start installing. 9. Click http://www.inepro.com , check the configuration and click . The SQL setup to install the files. Version 5.0.1 Inepro B.V.
Setup, Software installation 10. Keep the default settings for the instance, click Account with Administrator credentials and click 11 , enter an Windows . 11. Important! Click on , choose the option 'Mixed Mode' and insert a strong password, after that click . Version 5.0.1 Inepro B.V. http://www.inepro.
Technical Manual 12. Click until you reach the 'Complete' window, check the overview to see if all setting are correct, if so click . 13. The Microsoft SQL Server is now installed. The installation of the OPOS software 14. Run the OPOS Setup, press http://www.inepro.com , press . Version 5.0.1 Inepro B.V.
Setup, Software installation 13 15. Run the OPOS Upgrade. 16. Agree to the License Agreement and press then click . 17. The installation is now finished. Version 5.0.1 Inepro B.V. until the final window, http://www.inepro.
Technical Manual The installation of the PosPRO software 18.Click on and edit the installation path if necessary. Then click on . 19.Agree to the license and click where necessary, check the paths and click on . If you are using a central database you should enter the Inepro Back Office Suite Database server name and the instance of the database at the field MS SQL Source. (In this format "YOURIBOSSERVER\SQLEXPRESS" the MS SQL server name is :'YOURIBOSSERVER' and your instance name is :'SQLEXPRESS'.
Setup, Software installation 20.Check the settings and click on to place a shortcut icon and click 15 , select the locations where you want . The Inepro Back Office Manager installation The installation of the Inepro Back Office Manager is only needed if you have a stand-alone till or if you do not want use the provided PosPRO Manager, but would like to use the Inepro Back Office Manager instead. First choose your language, in the language dialog: Version 5.0.1 Inepro B.V. http://www.inepro.
Technical Manual 1. Click on to continue with the installation of the <%SOFTWARESUITE%> on your computer. 2. Read the licence and if you choose to accept it, tick "I accept the licence agreement" and click on . 3. Browse to the path (or typ it in) of the location where you need the software to be installed, and click on again. 4. Select the components that you want to install. You can choose a pre-selection by clicking on the combobox. You can also make a selection by ticking or unticking the checkbox.
Setup, Software installation MS SQL Server The database server adres (. = the locale machine) Catalogus The database name (standard IBOS) User Name The database user name Password The database password SMTP Server The server that you will use to send email Sender The address that will appear in the 'from' field. Address The email address where the warning email is send to. Use authenticated SMTP 1. Click to continue. 2.
Technical Manual Create a shortcut to the desktop Places an icon on the desktop. (standard setting = off) Create a shortcut to the Quick launch bar Places an icon on the Quick Launch bar (next to the Start button on the task bar). (standard setting = off) Don't execute the database wizard Prevents the database wizard to be executed and creates an option to execute the wizard manually with more advanced options.
Configuration, 19 Configuration In this chapter we will configure your system. · The ELO touch screen display should be calibrated · The OPOS devices should be connected to the OPOS drivers · The Inepro Back Office Suite module CashPRO must be setup and the products should be created · The till itself must be configured via the *.ini files · The receipt layout must be set up 3.1 ELO Display ELO Control Panel This section explains the different options in the ELO control Panel. Version 5.0.1 Inepro B.V.
Technical Manual General tab The general tab allows you to: · Calibrate the touch screen with the Align button. Press the center of each of the four targets that appear on the screen with your finger, like you would when normally using the application. Please calibrate the touch screen right now to ensure a good working user interface. Mode tab The Buttons tab allows you to: · Adjust all mouse emulation controls.
Configuration, ELO Display 21 Sound tab The Sound tab allows you to: · To change sound properties for ELO touch tools. These setting do not need to be changed for using the PosPRO software Properties tab The Diagnostics tab allows you to: · View Controller Information. These setting do not need to be changed for using the PosPRO software Version 5.0.1 Inepro B.V. http://www.inepro.
Technical Manual About tab · The About tab displays Information about ELO Touchsystems http://www.inepro.com Version 5.0.1 Inepro B.V.
Configuration, OPOS 23 3.2 OPOS: OPOS, Object Linking and Embedding for Retail POS consists of an architecture for Win32-based POS device access. Point of sale (POS) or checkout is the location where a transaction occurs, it is sometimes falsely used to describe the POS terminal or till. OPOS also consists of a set of POS device interfaces sufficient to support a wide range of POS solutions. It provides a consistent interface to POS peripherals for use by application creators.
Technical Manual The cash drawer is connected to the printer, so the COM port should be the same is that of the printer. Health Check Printer Health Check Cash Drawer and Line Display Health Check http://www.inepro.com Version 5.0.1 Inepro B.V.
Configuration, OPOS 25 After this you should get a message informing you if the hardware test has succeeded or has failed: Security message 3.3 Configure IBOS - CashPRO Creating and linking a PosPRO till Before the PosPRO till can be managed, it must be linked to the Inepro Back Office Manager. To create a PosPRO open CashPRO devices and add a new device. Then go to the terminal tab and add a new terminal, this terminal is the PosPRO till. Version 5.0.1 Inepro B.V. http://www.inepro.
Technical Manual Creating an employee Now a PosPRO till has been linked to the terminal, employees should be created who may operate the till and or the CashPRO management module. To add an employee got to 'Advanced -> Authentication' and add a new employee. Fill out the values according to the table below and assign the rights.
Configuration, Configure IBOS - CashPRO 27 Creating a product The final thing the PosPRO till needs is products. Products can also be created in the Inepro Back Office Manager. Go to 'Products' and add a new product.
Technical Manual Creating special products Some product need to be linked to other products or are sold based on their content or weight. We will explain how to create these products. To create products with the content property set the content type to 'Pieces' if it consists of more then one item, to 'weight' of the price is based on the products mass, and to 'volume' if it is based on the volume the product contains.
Configuration, Configure IBOS - CashPRO 29 Creating a PosPRO product template Finally we will gather a number of products in a PosPRO product template. In the PosPRO product template we will be able to select the products that should be sold and link them to the PosPRO reports and the presentation layers (a layer with a selection of product buttons). One PosPRO template can be used for multiple PosPRO tills.
Technical Manual 1) Create Product Groups (these are used in reports created on the till) a) Create the product groups you need, mind that the 'Group Position' can never be '0'. 2) Create Presentation Layers (these are layers with product buttons) a) Create Presentation Layers, the normal layers should have a number from 1 to 24 (inclusive), it can not be '0' and layers with an ID higher then 24 are not visible.
Configuration, Configure IBOS - CashPRO 31 3) Assign the PosPRO Product groups in the Products tab, remember these are product groups, they are used for the reports created on the till. 4) Assign the Presentation Layers, remember, one product can be on more then one presentation layer, so then you would need to add the same product again. 5) Assign a Colour for the button, to make it easier to search for the right product. Available only in the Kiosk version. 6) Edit the PosPRO.
Technical Manual 3.4 ReplicationService.ini The PosPRO application will store everything in a local database (named PosPRO by default). When the Inepro Back Office Suite with the CashPRO module is used the transactions must be send to the Inepro Back Office Suite database (by default IBOS) and settings, new products, price adjustments etcetera need to be send from the IBOS database to the PosPRO database. The replicationService will handle these tasks.
Configuration, ReplicationService.ini 33 Configuration via the *.ini file In the ini directory in your PosPRO directory (by default:'C:\Program Files\Inepro\PosPRO\Ini') you will find the 'ReplicationService.ini' file: this file can be edited to change the advanced settings in your PosPRO application. Always create a backup before you make changes in the *.ini files, so you can always revert back to the original *.ini files. The *.
Technical Manual You could set certain replication values higher to lighten the network load at the cost of being a little less up-to-date in your reports or vice versa. [General] Synchronise DateTime with host=1 IBOS 4.8 or lower compatible=0 Debug=0 '0'=disabled, '1'=enabled '0'=disabled, '1'=enabled '0'=disabled, '1'=enabled 3.5 PosPRO.ini: Configuration via the *.ini file In the ini directory in your PosPRO directory (by default:'C:\Program Files\Inepro\PosPRO\Ini') you will find the 'PosPRO.
Configuration, PosPRO.ini [sales] Card-Revalue sell item=10000 Sales registration day offset in hours=0 Item offset stations=10000 Item offset subscription=8000 Card sell item=100001 [general] Max amount on card=15000 Number of digits after decimal=2 Use card-date validation=0 External management=PosPRO_Manager.
Technical Manual [general] (continued) Obligation of Customer Data=1 Card payment only for sunbed=0 Use Card-Credits=0 Card-Credits value=1 Sunbed discount on seperate row=0 Use cleaning status=0 Use skintype detection=0 Loader customer form=0 Extended loader reports=1 Tender overview=0 External loader application= External marketing application= Loader accept cash=1 Activate Subscription=0 Minimum hours between session=0 Minutes before reservation=0 Minutes to start reservation=0 Sunbed time in seconds
Configuration, PosPRO.
Technical Manual [screen] Use PayIn PayOut function=0 Info-messages timeout=15 GroupTab as default tab=1 Always Return to main tab=1 Initialise tabs by new transaction=1 Main tab= Tabsheet Period 1= Time start Period 1=00:00 Tabsheet Period 2=0 Time start Period 2= Tabsheet Period 3=0 Time start Period 3= Tabsheet Period 4=0 Time start Period 4= Use only one product tab=0 Cummulate linked items=0 Direct product search on productInfo=1 Use the Intuitive keyboard=1 Use Keyboard sound=0 Hide mouse pointer=
Configuration, PosPRO.
Technical Manual Receipt Type 2 Receipt Type 3 ** INEPRO POSPRO ** ** INEPRO POSPRO ** ------- ----------------------DATE 15-03-2010 ------- ----------------------Hamburger 1x --------------------TIME 14:10:01 --------------------- 1,30 Euro Pizza Wedge 1x 2,25 Euro 1,40 Euro 1x 2,25 Euro 1x 1,40 Euro Homemade Cake 0,85 Euro Bread Roll 1x 1,30 Euro Tuna Sandwich Homemade Cake 1x 1x --------------------TIME 14:10:01 --------------------- Pizza Wedge Tuna Sandwich 1x ------- -
Configuration, Receipt Layout QTY Receipt Type 4 Receipt Overview ** INEPRO POSPRO ** DESCRIPTION ------- ----------------------- PRICE AMOUN T ----------------------- Hamburger 1x 1,30 Euro Pizza Wedge 1x 2,25 Euro Tuna Sandwich 1x 1,40 Euro Homemade Cake 1x 0,85 Euro Bread Roll 1x 41 <-- PosProLogo.
Technical Manual Logo The logo is an image printed on the top of the receipt, aligned in the center. If no image is present in the directory, no image is printed on the receipt. To change the logo go to C:\Program Files\Inepro\PosPRO\Pictures and create or change the PosPROlogo.bmp file. The file should be monochrome and should be less then 4 Kilobyte in size. If these restrictions are not adhered the image will not be printed.
User Interface, 43 User Interface In 'User Interface' we will deal with all the different modules of the PosPRO software. Below you will find a short description of each button (module) in the main menu: Module Start 45 Pause 50 Logoff 51 Reports 63 End of Day 51 Cash Count 52 Stock Control 70 Close 69 Version 5.0.1 Inepro B.V. Purpose Sales, the selling of products and operation of the cash drawer. You log off , your username is remembered, and only you can log in again.
Technical Manual 4.1 Log In If PosPRO is started, you will be asked to log in. Enter your username and password. (To add or edit a username and password use the Inepro Back Office Manager. In the Authorisation menu you are able to grant an employee the rights for the Inepro Back Office manager and give him a username and Password for the PosPRO tills. For more information look at page 26 ). After logging in you will enter the main menu.
User Interface, Sales 45 4.2 Sales The sales window is one of the most important windows in the PosPRO application. In this windows the products are being sold. Let's take you trough the different buttons that can appear on the screen. Note: Most of these buttons you will not see, because of the intuitive keyboard function, which will hide all the buttons that the employee will not need at that moment.
Technical Manual VAT description This will show the description of the current VAT applied. Card Number Card Number shows you the card number of the current customer (provided he is paying with his card). System announcements System announcements will give the employee a hint what should happen next. Product Multiplier Product Multiplier will tell you how many times the product will be charged.
User Interface, Sales 47 Product Info To find more information about a product, find a product, or to look up the article number you can click the button 'Info'. In the information screen that will open you can enter a description, an article number or pick a department and click 'Search' to see all the information about the product. Return to Main screen The 'Close' button will take you back to the main screen, where you can chose one of the other modules, log off, take a break or close the application.
Technical Manual Correction Functions Where people are working errors will be made, this is unavoidable. Input mistakes But mistakes can not be overlooked, so the PosPRO till will block it's functions when an input error has been detected. The following message will be shown: You need to click on 'OK' to return to the till and then retry the action you needed to perform. Input errors can not occur when you are using the intuitive keyboard.
User Interface, Sales 49 Void Use 'Void' to handle a sale return. Correction Use 'Correction' to delete the last transaction line. Clear Use 'Clear' to empty the entry field or when you made a mistake and click to wrong payment type (the payment type buttons, will reappear on the screen). Special functions The special function will handle printing, VAT functions and revaluing Inepro cards. Open Group High Open Group High will add VAT to the product at the high VAT rate.
Technical Manual Price Change Price Change will overwrite the base price of the article! The employee can set the price as if the product had an open price. There are few circumstances in which you will need this function, if possible either use discounts or 'open price'. Discounts You can give a discount by selecting the product, typ in the hight of the discount and press '%' to apply a percentual discount or 'Discount' to apply a absolute discount.
User Interface, Log Off 51 4.4 Log Off Log off will be used when an employee ends his shift and another employee must be able to log in again. 4.5 End Of Day The End of Day report is a compound report of the current day. Line in PosPRO.ini Description Header, you wil find the values below in this section of the [end of day] PosPRO.
Technical Manual 4.6 Cash Count In the Cash Count module you are able to digitally perform the cash count procedure. It will show you in the first column the total amount of money received per payment type. In the second column you can declare what the amount counted is per payment type, the difference will be shown in the third column. You are able to accept the differences (to a certain level or even zero-tolerance, specified in the PosPRO.ini) by clicking the booking button.
User Interface, PosPRO Manager 53 4.7 **** This chapter is not complete, awaiting decision on PosPRO manager continuation *** **** This chapter is therefore temporarily excluded from printing or compiling *** PosPRO Manager The manager is has two sub options, the Manager and Configuration. Version 5.0.1 Inepro B.V. http://www.inepro.
Technical Manual Manager Budgets http://www.inepro.com Version 5.0.1 Inepro B.V.
User Interface, PosPRO Manager 55 Ledgers Departments Version 5.0.1 Inepro B.V. http://www.inepro.
Technical Manual Products Promotions http://www.inepro.com Version 5.0.1 Inepro B.V.
User Interface, PosPRO Manager 57 Card Revalues Suppliers Version 5.0.1 Inepro B.V. http://www.inepro.
Technical Manual Jobs Configuration http://www.inepro.com Version 5.0.1 Inepro B.V.
User Interface, PosPRO Manager 59 Employees VAT Version 5.0.1 Inepro B.V. http://www.inepro.
Technical Manual Stores Authorisation http://www.inepro.com Version 5.0.1 Inepro B.V.
User Interface, PosPRO Manager 61 Open Close Procedures Key Action Version 5.0.1 Inepro B.V. http://www.inepro.
Technical Manual Payment Types Item Hardware Code http://www.inepro.com Version 5.0.1 Inepro B.V.
User Interface, PosPRO Manager 63 Presentation Layer 4.8 Reports The PosPRO till has the ability to print a number of reports, for each report you select a start and end date and click 'Print' to print out the report. The reports are described below with an example receipt as reference. Almost all reports will have the VAT, gross and net price, in all ther cases the net price is used. Version 5.0.1 Inepro B.V. http://www.inepro.
Technical Manual Terminal Report ** INEPRO POSPRO ** TERMINAL REPORT FROM DATE TO DATE 31-03-2010 31-03-2010 Computer IP Store Inepro PosPRO Database -+- -+- -+- MyComputerName 127.0.0.1 MyCompany v4.18.0.0 v4.18.
User Interface, Reports 65 Tender Report ** INEPRO POSPRO ** TENDER REPORT FROM DATE TO DATE TENDER ---------------Cash 31-03-2010 31-03-2010 QUANTITY TOTAL -------------- --------13 75,50 The Tender report will tell you how many products are sold, at which total amount per Tender Type (Cash, Bank, Card, Cost Centre, etcetera). It will also show the Pay In and Pay Out amounts.
Technical Manual Overview Mutations ** INEPRO POSPRO ** OVERVIEW MUTATIONS FROM DATE TO DATE 31-03-2010 31-03-2010 ------------------------------------------------[REMOVE] 101 7-up 0,80 [MUTATION] Milk 109 [REMOVE] Coca Cola 18 OPER:0001 Overview Mutations is not so much a report as it is a log of which products have undergone changes in the specified period. Warning: This can be a long report! 0,90 0,90 2010-03-31 12:22:13 VAT Report ** INEPRO POSPRO ** V.A.T.
User Interface, Reports 67 Hour Report The Hour report will show you per hour the number of customers, number of products sold, the total amount of product sold and the average amount spend per customer.
Technical Manual Cost Centre Report ** INEPRO POSPRO ** COST CENTER REPORT FROM DATE TO DATE 31-03-2010 31-03-2010 The total number of products and the total amount is shown per cost centre.
User Interface, Reports 69 Cost Center Details Report ** INEPRO POSPRO ** COST CENTER REPORT FROM DATE TO DATE 31-03-2010 31-03-2010 COST CENTRE QTY AMOUNT ------------------------------------------------[4] test - 2010-03-31 13:23:49 4,95 (Cost Centre [4]) - 2010-03-31 13:27:46 (Cost Centre [4]) 10,15 - 2010-03-31 13:28:01 (Cost Centre [4]) 5,41 - 2010-03-31 13:28:12 (Cost Centre [4]) 3,55 - 2010-03-31 13:28:33 (Cost Centre [4]) 1,53 - 2010-03-31 13:28:59 (Cost Centre [4]) 3,90 Warning: Thi
Technical Manual 4.10 Stock Control Configure the PosPRO.ini. To use stock control you need to set the 'Use stock control' option under [general] in the PosPRO.ini to '1'. To learn how to change the PosPRO.ini file, go to the chapter PosPRO.ini on page 34 . Stock Control module The Stock Control module will give you the option to manage your stock. You can manage your orders, the back-orders and actual stock.
User Interface, Stock Control 71 Order Size The quantity in which this product must be ordered. Minimum Stock The minimum amount of stock you want to have present at the shelf. Order 'Order' will register the number of products that is present in the field 'order quantity' as ordered. Incoming 'Incoming' will register that you have received the number of products that is present in the field 'order quantity' and add them to the stock.
Technical Manual You can start the on-screen keyboard by clicking 'Start' -> 'On-Screen keyboard'. 5.2 Reports The Inepro Back Office Manager offers you a great number of reports. These reports can be found in the 'Report' menu. It is wise to always fill out the date fields and to specify the device or device group. Reports can be printed at the printers connected to the network. http://www.inepro.com Version 5.0.1 Inepro B.V.
IBOM - CashPRO, Device Log 73 5.3 Device Log In the device log you are able to look at all the transactions. Pick the PosPRO till in the Device field and set a period. The list will be created when you click on the 'Run' button. Is the user unknown, it will usually concerns a cash payment. In the transaction log you will always see the product(s) first, then the subtotal and total, followed by the payment. If there is also a negative payment, then the customer has received change. 5.
Technical Manual the printer has already printed the (last) logo on the first part of the receipt that will be printed after the next transaction. b) Reprint the receipt, the logo should be on there now. 2) Is the logo bigger than 4 K(kilobyte) or is the image not saved as a monochrome image? a) Our system supports only images that are smaller than 4 K and are saved as a monochrome image.
Solving challenges, 75 (3)The connection between the LVDS connector on motherboard J38 and the LCD panel is not connected properly or LCD cable could be defective. (4)The Inverter cannot produce backlight. (5)The LCD panel could be defective. (a)To check where the problem could be: Please connect a VGA monitor to the VGA port. (b)If the VGA monitor is display normally, one of the problems above is occurring, otherwise it could be the mainboard is not functioning properly.
Technical Manual 2) If this does not have any positive effect, please call the Inepro Helpdesk, it could be one of these problems: a) Please replace the ELO controller, and re-calibrate. If this works, change back to the original ELO controller, and re-calibrate. b) The ELO touch panel still cannot calibrate correctly after changing to a new ELO. i) The touch panel may be not installed properly or it could be defective.
Solving challenges, 77 c) The on-board COM4 I/O chips could be defective. d) Ensure that COM4 is enabled in the CMOS setup, and data is written to COM4 in the application. Q I tested my network, it works OK, so why is the LAN on the till not functioning properly? A 1) Really make sure, your network functions fine from the network outlet of the PosPRO till. 2) If it does, call the Inepro Helpdesk, it could be one of these problems: a) Check if the LAN driver is installed properly.
Technical Manual A 1) Make sure the USB device does work on another till, if so call the Inepro Helpdesk, it could be one of these problems: a) Ensure that the USB controller is “enabled” in the CMOS setup. b) Check if the 4pin USB cable is properly connected between 9000PB0710 secondary I/O CN9 and mainboard J8. c) The mainboard or 9000PB0710 secondary I/O board could be defective. http://www.inepro.com Version 5.0.1 Inepro B.V.
Solving challenges, 79 Version 5.0.1 Inepro B.V. http://www.inepro.