How to use the Epson A4 scanner User guide
Contents 1. Scanning images and documents……… page 3-7 2. Scanning direct to PDF……………………. page 8-14 3. Scanning and editing text………………… page 15-19 4. Troubleshooting…………………………..….
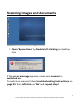
Scanning images and documents 1. Open ‘Epson Scan’ by Double left clicking on desktop icon If this error message appears, make sure scanner is switched on.
Check that you are in ‘Professional Mode’ by using the ‘Mode’ drop down window 2.
3. Choose your ‘File Save Settings’ by: a.) Selecting ‘Location’ of scanned files (you can scan direct to a USB device by clicking on ‘Browse’) b.) Creating a ‘File Name’ c.) Selecting an ‘Image Format’ (recommend JPEG) Note: You can save direct to PDF format. See ‘Scanning direct to PDF’ section on page 8 for more information 4.
A ‘Progress’ window will appear while your image/ document is being scanned 6 If you require technical assistance, please ask a member of staff on Level 1 counter
Once scanning is complete the file save location folder will automatically appear Note: If you already have this window open you may need to refresh it to see your saved files by pressing F5 on keyboard To scan more images/ documents, repeat steps 2-4 5.
Scanning images and documents direct to PDF 1. Follow ‘Scanning images/ documents’ section steps 1 – 2 on pages 3 - 4 2. Choose your ‘File Save Settings’ by: d.) Selecting ‘Location’ of scanned files (you can scan direct to a USB device by clicking on ‘Browse’) e.
3. Select PDF (*.pdf) ‘Image Format’ using the drop down tab 4.
6. Make sure ‘Paper Size’ is set to A4 (you can change paper size using drop down tab) 7. Select desired ‘Orientation’ 8. Left click on ‘OK’ 9.
A ‘Progress’ window will appear while your image/ document is being scanned 11 If you require technical assistance, please ask a member of staff on Level 1 counter
Once scanning is complete an ‘Epson Scan’ window will appear giving you three options Option 1: Saving your file a) Left click on ‘Save File’ Option 2: Adding more scanned pages a) Left click on ‘Add Page’ b)Left click on ‘Scan’ To add more pages, repeat steps a) and b) c) Left click on ‘Save File’ 12 If you require technical assistance, please ask a member of staff on Level 1 counter
Option 3: Editing your scanned page/s In this edit mode, you can either rotate or delete pages To rotate a page: a) Highlight page you want to edit by left clicking on it b)Left click on green arrow icons To delete a page: a) Highlight page you want to edit by left clicking on it b)Left click on rubbish bin icon To save your edited pages, left click on ‘OK’ 13 If you require technical assistance, please ask a member of staff on Level 1 counter
Once you have saved your scanned pages the file save location folder will automatically appear Note: If you already have this window open you may need to refresh it to see your saved files by pressing F5 on keyboard 1.
Scanning and editing text 1. Open Abbyy FineReader by left clicking on ‘Start’ – ‘Programs’ – ‘Abbyy FineReader’ – Abbyy FineReader’ If this error message appears, make sure scanner is switched on.
If ‘Abbyy FineReader’ ‘Improved recognition accuracy’ window appears, close it by left clicking on ‘Cancel’ 2. Left Click on ‘Scan & Read’ Check that you are in ‘Professional Mode’ by using the ‘Mode’ drop down window 3.
A ‘Progress’ window will appear while your text is being scanned 17 If you require technical assistance, please ask a member of staff on Level 1 counter
Once progress is complete you will see your text displayed in both Image (left) and text (right) format 4. Left click on ‘Save’ and select ‘Send to Microsoft Word’ 5.
Microsoft Word will automatically launch (Note: There will be varying degrees of success with regard to formatting) 6. Use Microsoft Word to edit text and adjust formatting 7. Once you have finished editing your scanned text, Save your file 8.
Troubleshooting If this error message appears, make sure scanner is switched on by: 1.
2. Waiting for scanner power (green) light to change from flashing to steady 3.