
User`s guide


4.
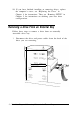
Position the IDE device cable so the side with the red wire
aligns with pin 1 on the drive. Make sure the holes in the
connector fit over all the pins; then push in the connector.
5.
Locate one of the power supply cables that lead from the
power supply. (They have multi-colored wires and a plastic
connector on the end.) Align the notched comers of the
power supply connector
and the
drive’s power connector;
then push in the connector, as shown above.
Note
Your system has five power supply cables; three with
large connectors and two with small connectors. If you
need more than five cables, you can purchase Y-adapters
at most computer accessory stores. Y-adapters let you
use one power supply cable for two devices.
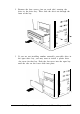
6.
If you have finished installing or removing drives, replace
the computer’s cover; see “Replacing the Cover” in Chapter
4
for instructions. Then see “Running SETUP” in Chapter 2
for instructions on defining your new drive configuration.
Installing and Removing Drives in the Tower Computer
6-7