
User`s guide


Installing a Drive in an External Bay
Follow these steps to install an internal or externally accessible
drive in an externally accessible drive bay:
1.
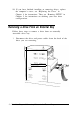
Using a screwdriver, reach inside the back of the drive bay
you are going to use and insert the screwdriver into one of
the holes in the metal plate covering the drive bay slot. Use
the screwdriver to bend the plate up and down until it
loosens; then grasp the plate with your hands and pull it
out of the drive bay. Discard the plate; you do not need to
reinstall it.
2.
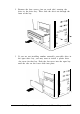
Remove the plastic faceplate from the bay by pushing it out
from the inside of the computer.
plastic faceplate
You need to reinstall the faceplate in later steps if you are
installing a hard disk drive. If you are installing an
externally accessible drive, keep the faceplate in a safe place
in case you remove a drive later.
3.
Position the drive so its drive and power connectors face the
back of the computer.
6-10 Installing and Removing Drives in the Tower Computer