
User`s guide


Some of the steps in this chapter may not apply for the drive
you are installing. See the documentation that came with your
drive for more information.
Your computer can hold up to four mass storage devices,
including the diskette drive (and possibly other drives) that
came with your system. You can replace the existing hard disk
drive in the internal mounting bracket. In the externally
accessible bays, you can install a CD-ROM drive or another
type of drive.
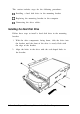
To install or remove a drive, first remove the computer’s cover
as described under “Removing the Cover” in Chapter 4. Then
remove any option cards that may be in your way. Once you
have installed the drive, replace any option cards you removed.
See “Installing an Option Card” in Chapter 4 for instructions.
Setting the IDE Device Jumpers and Locating Pin 1
Before you install any IDE devices, be sure to check the device’s
jumper settings. The jumpers indicate the master and slave
configuration of devices connected to both of the IDE
interfaces.
A table in the “Hard Disk Drive Information” section of the
Appendix lists the master and slave jumper settings for the IDE
hard disk drives that are qualified for use in your computer. If
your drive is not listed or you need more information, see the
documentation that came with your drive or contact the
manufacturer.
If you are installing another type of IDE device, such as an IDE
CD-ROM drive, check the documentation that came with the
device for the master and slave jumper settings.
5-2 Installing and Removing Drives in the Slimline Computer