Color Laser Printer Color Laser Printer Setup Guide Setup Guide 4021253-00 EUL
Where to Find Information Setup Guide (this manual) Contains information on placing and assembling the printer, and installing the printer driver. User Guides The CD-ROM shipped with your printer includes the following guides as well as the printer driver. Note: Microsoft® Internet Explorer 4.0 or later, or Netscape Navigator® 4.0 or later, must be installed on your computer to view the Reference Guide and the Administrator’s Guide. Adobe® Acrobat® Reader™ 4.
Color Laser Printer Setup Guide 1 Safety Instructions . . . . . . . . . . . . . . . . . . . . 1 2 Assembling the Printer . . . . . . . . . . . . . . . 10 3 Installing Options . . . . . . . . . . . . . . . . . . . . 18 4 Testing and Connecting the Printer . . . . 28 5 Installing the Printer Software. . . . . . . . . . 32 6 Printing the Quick Reference Guide. . . .
All rights reserved. No part of this publication may be reproduced, stored in a retrieval system, or transmitted in any form or by any means, mechanical, photocopying, recording, or otherwise, without the prior written permission of SEIKO EPSON CORPORATION. No patent liability is assumed with respect to the use of the information contained herein. Neither is any liability assumed for damages resulting from the use of the information contained herein.
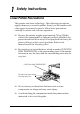
1 Safety Instructions Laser Printer Precautions This printer uses laser technology. The following precautions apply whenever you use the printer. Even if you are familiar with other types of printers, be sure to follow these precautions carefully to ensure safe, efficient operation. ❏ Because the printer weighs approximately 70 kg (154 lbs) without the consumable or optional products installed, one person should not lift or carry it.
❏ Never force the printer’s components into place. Although the printer is designed to be sturdy, rough handling can damage it. ❏ When handling toner cartridges, always place them on a clean, smooth surface. ❏ Do not attempt to modify toner cartridges or take them apart. They cannot be refilled. ❏ Do not touch the toner. Keep the toner away from your eyes. ❏ Do not dispose of used toner cartridges, waste toner collectors, or photoconductor units in fire, as they can explode and cause injury.
❏ Be sure not to scratch the surface of the photoconductor unit’s drum. When you remove the photoconductor unit from the printer, always set the unit on a clean, smooth surface. Also, avoid touching the drum, since oil from your skin can permanently damage its surface and may affect print quality. ❏ To get the best print quality, do not store the photoconductor unit in an area subject to direct sunlight, dust, salty air, or corrosive gases (such as ammonia).
❏ Connect your printer to an electrical outlet that meets the power requirements of this printer. Your printer’s power requirements are indicated on a label attached to the printer. If you are not sure of the power supply specifications in your area, contact your local power company or consult your dealer. ❏ The interface connector for this printer is Non-LPS (non-limited power source). ❏ If you are unable to insert the AC plug into the electrical outlet, contact an electrician.
❏ Unplug the printer and contact a qualified service representative under the following conditions: A. If liquid has entered the printer B. If the printer has been exposed to rain or water C. If the printer does not operate normally or exhibits a distinct change in performance D. If the printer has been dropped or the cabinet damaged E. If the power cord or plug is damaged or frayed ❏ Adjust only those controls that are covered by the operating instructions.
Laser safety labels Your printer is a Class 1 laser product as defined in the IEC 60825 specifications. The label shown is attached in countries where required. w Warning: The use of controls, or the performance of procedures and adjustments other than those specified in this guide may result in hazardous radiation exposure. Internal laser radiation Max. Radiation Power 5 mW Wave Length 780 nm This is a Class IIIb Laser Diode Assembly that has an invisible laser beam.
Ozone safety Ozone emission Ozone gas is generated by laser printers as a by-product of the printing process. Ozone is produced only when the printer is printing. Ozone exposure limit The recommended exposure limit for ozone is 0.1 parts per million (ppm) expressed as an average time-weighted concentration over an eight (8) hour period. The EPSON AcuLaser C8600 laser printer generates less than 0.1 ppm for 8 hours of continuous printing.
For United Kingdom Users The EPSON AcuLaser C8600 is a page printer which utilizes a semiconductor laser. There is no possibility of danger from the laser, provided that the printer is operated according to the instructions in the guides provided. Since radiation emitted by the laser is completely confined within protective housings and external covers, the laser beam cannot escape from the machine during any phase of user operation.
Green and yellow—Earth Blue—Neutral Brown—Live If you need to fit a plug: As the colours of the mains lead of this appliance may not match any coloured markings used to identify the terminals in a plug, please proceed as follows: ❏ The green and yellow wire must be connected to the terminal in the plug which is marked with the letter E or the Earth symbol (G). ❏ The blue wire must be connected to the terminal in the plug marked with the letter N.
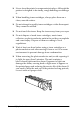
2 Assembling the Printer Before assembling the printer, follow the instructions on the Unpacking Sheet to remove all protective materials packed around and inside your printer. Note: Keep all packing materials as you will need them when transporting the printer. Installing the Face-Up Tray Follow these steps to install the face-up tray onto the left side of the printer. 1. Locate the output slot on the left side of the printer. 2. Install the face-up tray as shown below.
Installing the Toner Cartridges Before installing the toner cartridges, read the following handling precautions: ❏ Do not install used toner cartridges into the printer. ❏ If toner gets onto your skin or clothes, wash it off with soap and water immediately. ❏ Wait for at least 1 hour before installing a toner cartridge after moving it from a cool to a warm environment to prevent damage from condensation. You need to install four toner cartridges into the printer.
1. Open the front cover. 2. Check the color in the cartridge installment window and prepare the cartridge of the same color. Black Cyan Yellow Magenta This color indicator represents the toner cartridge color.
3. Take the cartridge out of its package, and gently shake it. 4. Insert the toner cartridge all the way until it stops. 5. Turn the cartridge knob as shown below. c Caution: Be sure to turn the knob all the way to the locked position. Otherwise, you may have toner problems or leakage.
6. Push up the switch located at the upper left, then release it. 7. Turn the upper knob clockwise until it stops. The switch automatically drops down and the next empty cartridge slot appears. Note: If the knob cannot be moved, first check that the switch is in the upper position. Do not force the knob. 8. Install the other cartridges as described in steps 2 to 7 (skip steps 6 and 7 for the last cartridge). 9. Next, install the photoconductor unit as described in the following section.
Installing the Photoconductor Unit Handling precautions ❏ When installing the photoconductor unit, avoid exposing it to room light any longer than necessary. ❏ Keep the photoconductor unit out of the reach of children. Follow these steps to install the photoconductor unit. 1. Take the photoconductor unit out of its package and unwrap the protective sheet while holding the handle. c Caution: ❏ Be sure not to touch or scratch the surface of the drum.
2. Turn the lever as shown below. 3. Insert the photoconductor unit as shown below. Note: Make sure that the unit is completely inserted into the slot.
4. Turn the two levers as shown below. 5. Close the front cover. w Warning: Do not dispose of used photoconductor units in fire, as they can explode and cause injury. Dispose of them according to local regulations.
3 Installing Options If you purchased any options with the printer, install them before plugging in the printer. To install an optional paper cassette or optional Duplex Unit, follow the instructions on the product package. Installing the Hard Disk Drive The optional Hard Disk Drive allows you to expand the printer’s receive buffer when using a network, and gives you additional memory for graphics and faster multi-page, multi-output sorting. Follow these steps to install the optional Hard Disk Drive.
2. Prepare the printer as shown below to access the Hard Disk Drive socket.
3. Identify the Hard Disk Drive socket. socket 4. Install the Hard Disk Drive securely with the screws. c Caution: You should not remove any modules from the circuit board. Otherwise, the printer will not work. 5. Connect the two connectors of the cable as shown below.
6. Lower the two clamps to insert the cable, then raise the clamps. 7. Return the printer to its original state, as shown below.
8. Plug the printer’s power cord into an electrical outlet. 9. Turn on the printer. 10. To confirm that the Hard Disk Drive is installed correctly, print a status sheet. See “Printing a status sheet” on page 29. Installing a Memory Module Increasing the printer’s memory allows you to print complex or graphics-intensive documents. You can increase printer memory up to 1 GB by installing optional Dual In-line Memory Modules (DIMMs).
Follow these steps to install an optional memory module. c Caution: Before you install a memory module, be sure to discharge any static electricity by touching a grounded piece of metal. Otherwise, you may damage static-sensitive components. w Warning: Be careful when working inside the printer as some components are sharp and may cause injury. 1. Make sure the printer is not turned on, and that the power cord is unplugged. 2. Prepare the printer as shown on page 19 to access the slot. 3.
c Caution: ❏ Do not force the DIMM into the slot. ❏ Be sure to insert the DIMM facing the correct way. ❏ You should not remove any modules from the circuit board. Otherwise, the printer will not work. 5. Return the printer to its original state, as shown on page 21. 6. Plug the printer’s power cord into an electrical outlet. 7. Turn on the printer. 8. To confirm that the memory module is installed correctly, print a status sheet. See “Printing a status sheet” on page 29.
3. Identify the ROM slots. ROM slots 4. Insert the module firmly into slot A or B, as shown below. c Caution: ❏ Do not force the ROM module into the slot. ❏ Be sure to insert the module facing the correct way. ❏ You should not remove any modules from the circuit board. Otherwise, the printer will not work. 5. Return the printer to its original state, as shown on page 21. 6. Plug the printer’s power cord into an electrical outlet. 7. Turn on the printer. 8.
Installing an Interface Card Your printer comes with a Type B interface slot. Various optional interface cards are available to expand your printer’s interface options. Note: Mac OS 8.5.1 to 9.X supports the Type B IEEE 1394 Interface Card (C12C82372✽). It can be connected to a Macintosh® FireWire® port. Follow these steps to install an optional interface card. c Caution: Before you install the interface card, be sure to discharge any static electricity by touching a grounded piece of metal.
4. Slide and push the interface card into the slot firmly, then fasten the screw as shown below. 5. Plug the printer’s power cord into an electrical outlet. 6. Turn on the printer. 7. To confirm that the interface card is installed correctly, print a status sheet. See “Printing a status sheet” on page 29.
4 Testing and Connecting the Printer This chapter provides you with the necessary instructions on how to connect the printer to your computer. Plugging in the Printer Follow these steps to connect the printer to an electrical outlet. 1. Check the label on the printer to make sure that the voltage required by the printer matches the electrical outlet. Also, make sure that you have the correct power cord for your power source. c Caution: It is not possible to change the printer’s voltage.
Testing the Printer To test whether the printer is set up correctly, print a status sheet, following the procedures below. You will have to first load the MP tray with paper. Loading paper Follow these steps to load paper into the MP tray. 1. Fan a stack of A4 or Letter size paper, then tap it on a flat surface to even the edges. 2. Load the paper long edge first with the printable surface facing up, then set the paper guide as shown below.
3. Press the Enter button again. The message on the LCD panel starts flashing and the printer starts printing a status sheet. 4. Check that the printer has printed the status sheet clearly and that the information on the options installed in the printer is correct. If the printer properly recognizes an installed option, the option’s name appears under Hardware Configurations. ❏ If the drive, module, or interface card is not listed on the status sheet, try reinstalling it.
2. Attach the parallel or USB interface cable to the printer as shown below. N Note: ❏ Use a shielded, twisted-pair parallel cable, or a USB Revision 1.1 compliant cable. ❏ When the cable has a grounding wire, secure the wire with the screw below the connector. 3. Plug the other end of the cable into the computer’s parallel or USB interface connector. See your computer’s instruction manual for more information. To connect to a network environment, have your administrator refer to the Administrator’s Guide.
5 Installing the Printer Software When you install the printer software, the following components are installed. ❏ Printer driver A printer driver for Microsoft® Windows® XP, Me, 98, 95, 2000, and Windows NT® 4.0, and for the Macintosh is provided. This software lets you make a variety of settings, such as print quality and paper size.
2. Insert the CD-ROM that comes with your printer in your CD-ROM drive. The following screen appears. Note: If the EPSON Installation Program screen does not appear automatically, double-click the My Computer icon, right-click the CD-ROM icon, and click Open in the menu that appears. Then double-click Setup.exe. 3. Double-click Install driver utility. 4. Follow the on-screen instructions.
Note for Windows XP users: While you install the printer driver, the following dialog box may appear. If this happens, click Continue Anyway to continue the installation. About an Additional Driver When the printer is shared with some computers (clients) in a network and the print server's OS is Windows NT 4.0 or Windows 2000, you can install the printer driver for the client’s OS in the server as an additional driver.
c Caution: Turn off any anti-virus software before installing the printer driver. 1. Make sure that the printer is turned off. Insert the CD-ROM that comes with your printer into your CD-ROM drive. 2. Double-click the Install Software folder. 3. Double-click the Installer icon 4. Click Continue. When the software license agreement screen appears, read the statement and then click Accept. 5. Click Install and follow the on-screen instructions.
Selecting your printer in the Chooser After you have installed the printer driver, you need to open the Chooser to select your printer. This procedure is necessary the first time you use a printer and when you want to switch to another printer. Your Macintosh will always print using the last printer selected.
6 Printing the Quick Reference Guide After you install the printer driver, print the Quick Reference guide included on the printer software CD-ROM. The Quick Reference guide describes how to clear paper jams and other common problems. Note: Acrobat Reader 4.0 or later must be installed on your computer to open and read the Quick Reference guide. For Windows users 1. Insert the CD-ROM that comes with your printer in the CD-ROM drive. 2. Double-click User Guides in the EPSON Installation Program screen. 3.
For Macintosh users 1. Insert the CD-ROM that comes with your printer in the CD-ROM drive. 2. Double-click the User Guides folder in the EPSON folder. 3. Double-click the View Quick Reference icon in the User Guides folder. The Quick Reference guide opens. 4. Select Print from the File menu. 5. Click Print. The Quick Reference guide will be printed. Store the printed Quick Reference guide near the printer.
EPSON OVERSEAS MARKETING LOCATIONS EPSON AMERICA, INC. 3840 Kilroy Airport Way Long Beach, CA 90806 Phone: (562) 981-3840 Fax: (562) 290-5220 EPSON UK LTD. Campus 100, Maylands Avenue, Hemel Hempstead, Herts, HP2 7TJ, U.K. Phone: (+44) 01442 261144 Fax: (+44) 01442 227227 EPSON DEUTSCHLAND GmbH Zülpicher Straße 6, 40549 Düsseldorf Germany Phone: (0211) 56030 Fax: (0211) 5047787 EPSON FRANCE S.A. 68 bis, rue Marjolin 92300, Levallois-Perret, France Phone: 33.1.41.86.26.
Color Laser Printer Color Laser Printer Setup Guide Setup Guide 4021253-00 EUL