
user manual
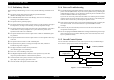

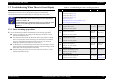
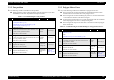
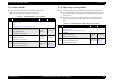
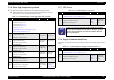
Table Of Contents
- EPSON EPL-6200/EPL-6200L
- Contents
- Product Description
- 1.1 Outline
- 1.2 Basic Specifications
- 1.2.1 Process Specifications
- 1.2.2 Printer Basic Specifications
- 1.2.3 Paper Specification
- 1.2.4 Reliability, Durability, Serviceability
- 1.2.5 Operating Conditions (Including Consumables)
- 1.2.6 Storage and Transport of the Printer Main Unit and Optional Products (Consumables Packaged)
- 1.2.7 Electrical Features
- 1.2.8 Compliance with Standards and Regulations
- 1.2.9 Consumable Components
- 1.3 External Appearance and Parts Name
- 1.4 Controller Specification
- 1.5 Control Panel (EPL-6200)
- 1.6 Control Panel (EPL-6200L)
- 1.7 RAM Expansion
- 1.8 System Requirements (Only for EPL-6200L)
- 1.9 Paper Feed Specifications (Only for EPL-6200L)
- 1.10 Notes on Operation
- 1.11 Status Sheet
- 1.12 Ambient Conditions
- 1.13 Differences in Specifications between Intended Markets
- 1.14 Notes on Installation of Optional Units
- Operating Principles
- 2.1 Overview
- 2.2 Description of Mechanisms
- 2.3 Operating Principles of Electric Circuitry
- Troubleshooting
- 3.1 Overview
- 3.2 Troubleshooting When There is Error Display
- 3.2.1 Fuser warming up problem
- 3.2.2 Fan problem
- 3.2.3 Polygon Motor Error
- 3.2.4 Laser problem
- 3.2.5 High voltage circuit problem
- 3.2.6 Fuser high temperature problem
- 3.2.7 CPU Error
- 3.2.8 Engine Communication Error
- 3.2.9 Fuser low temperature problem
- 3.2.10 Standard RAM Error
- 3.2.11 RAM Error (Slot 0)
- 3.2.12 ROM Checksum Error (Font)
- 3.2.13 ROM Checksum Error (Program)
- 3.2.14 Option ROM Error
- 3.2.15 EEPROM Error
- 3.2.16 Engine Initialization Error
- 3.2.17 Other Hardware Error
- 3.2.18 Software Error
- 3.3 Troubleshooting for Paper Jam
- 3.4 Troubleshooting for Abnormal Operations
- 3.5 Troubleshooting for Electrical Parts
- 3.6 Troubleshooting for Print Quality Problems
- Disassembly and Assembly
- Adjustment
- Maintenance
- Appendix

EPSON EPL-6200/EPL-6200L Revision A
Troubleshooting Overview 101
3.1.3 Preliminary Checks
Before starting troubleshooting, be sure to verify that the following conditions are all
met:
The power supply voltage must be within the specification limits.
(Measure the voltage at the wall socket.)
The POWER CORD must be free from damage, short circuit or breakage, or
miswiring in the POWER CORD.
The printer must be grounded properly.
The printer should not be located in a place where it can be exposed to too high or
low temperature, too high or low humidity, or abrupt temperature change.
The printer should not be located near waterworks, near humidifiers, near heaters
or near flames, in a dusty atmosphere or in a place where the printer can be
exposed to blast from an air conditioner.
The printer should not be located in a place where volatile or inflammable gases
are produced.
The printer should not be located in a place where it can be exposed to direct rays
of the sun.
The printer must be located in a well-ventilated place.
The printer must be placed on a strong and steady level table (without an
inclination larger than 5 degrees).
The paper used must conform to the specification.
(The standard paper is recommended.)
There is no error in handling of the printer.
The Regular Replacement Parts must have been replaced every time their
respective specified numbers of sheets had been printed.
Check the inside of the printer, and remove foreign matters, if any, such as paper
clips, staples, bits of paper, paper dust or toner.
Clean the inside of the printer and the rubber rolls.
3.1.4 Notes on Troubleshooting
The troubleshooting method described here assumes there is no malfunction in the
printer controller (Main Board). If you can not fix a problem even by following the
troubleshooting procedure, you are advised to replace the printer controller with a
normal one and then follow the same procedure.
If you can not recover the printer from the trouble even with the printer controller
replaced, replace the “Parts that may be the source of this error” and related parts
with new ones in order one by one and repeat operation checks.
Some normal components may be required as troubleshooting tools to identify the
cause of the trouble. You are advised to have a spare HVPS/MCU and EP
Cartridge.
Check not only the “Parts that may be the source of this error” but also their
components and related parts.
Be sure to unplug the POWER CORD before starting troubleshooting work except
when turning power ON is needed. With the power cord connected, never touch
any live parts unnecessarily.
3.1.5 Overall Control System
You are advised to understand the overall control system for easy troubleshooting at
the occurrence of paper jams, troubles or image defects.
Figure 3-1. Overall Block Diagram
Control Panel
Control system line
Stabilized DC power
supply (PU1)
Optional Cassette
Main Board PH Assy
Duplex Unit
Main Unit Drive System