
user manual
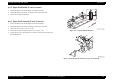
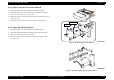
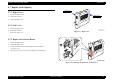
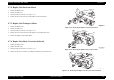


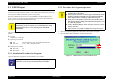
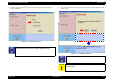
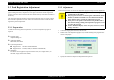
Table Of Contents
- EPSON EPL-6200/EPL-6200L
- Contents
- Product Description
- 1.1 Outline
- 1.2 Basic Specifications
- 1.2.1 Process Specifications
- 1.2.2 Printer Basic Specifications
- 1.2.3 Paper Specification
- 1.2.4 Reliability, Durability, Serviceability
- 1.2.5 Operating Conditions (Including Consumables)
- 1.2.6 Storage and Transport of the Printer Main Unit and Optional Products (Consumables Packaged)
- 1.2.7 Electrical Features
- 1.2.8 Compliance with Standards and Regulations
- 1.2.9 Consumable Components
- 1.3 External Appearance and Parts Name
- 1.4 Controller Specification
- 1.5 Control Panel (EPL-6200)
- 1.6 Control Panel (EPL-6200L)
- 1.7 RAM Expansion
- 1.8 System Requirements (Only for EPL-6200L)
- 1.9 Paper Feed Specifications (Only for EPL-6200L)
- 1.10 Notes on Operation
- 1.11 Status Sheet
- 1.12 Ambient Conditions
- 1.13 Differences in Specifications between Intended Markets
- 1.14 Notes on Installation of Optional Units
- Operating Principles
- 2.1 Overview
- 2.2 Description of Mechanisms
- 2.3 Operating Principles of Electric Circuitry
- Troubleshooting
- 3.1 Overview
- 3.2 Troubleshooting When There is Error Display
- 3.2.1 Fuser warming up problem
- 3.2.2 Fan problem
- 3.2.3 Polygon Motor Error
- 3.2.4 Laser problem
- 3.2.5 High voltage circuit problem
- 3.2.6 Fuser high temperature problem
- 3.2.7 CPU Error
- 3.2.8 Engine Communication Error
- 3.2.9 Fuser low temperature problem
- 3.2.10 Standard RAM Error
- 3.2.11 RAM Error (Slot 0)
- 3.2.12 ROM Checksum Error (Font)
- 3.2.13 ROM Checksum Error (Program)
- 3.2.14 Option ROM Error
- 3.2.15 EEPROM Error
- 3.2.16 Engine Initialization Error
- 3.2.17 Other Hardware Error
- 3.2.18 Software Error
- 3.3 Troubleshooting for Paper Jam
- 3.4 Troubleshooting for Abnormal Operations
- 3.5 Troubleshooting for Electrical Parts
- 3.6 Troubleshooting for Print Quality Problems
- Disassembly and Assembly
- Adjustment
- Maintenance
- Appendix

EPSON EPL-6200/EPL-6200L Revision A
Adjustment Feed Registration Adjustment 169
5.3 Feed Registration Adjustment
With the EPL-6200/6200L, the image registration position in sub-scanning direction
(paper feeding direction) is adjusted on each engine mechanism and the registration
position correction value is stored on the non-volatile memory on the main controller at
the factory.
The registration position should be verified and re-adjusted, when any repair with the
main contoller replacement is made. Follow the instructions below to make the feed
registration position adjustment.
5.3.1 Preparation
To make the feed reregistration adjustment, an exclusive adjustment program is
required.
Program Name
AdjustFeedRegi.exe
Applicable Models
EPL-6200, EPL-6200L
System Requirements
Supported OS: Windows 98/Me/2000/XP
Supported Port: Parallel, USB (for Windows Me/2000/XP)
Installation
Put all files in the supplied compressed archive file, into a single folder. (To
uninstall, simply delete whole folder.)
5.3.2 Adjustment
Follow the steps below to execute the adjustment program and proceed the adjustment.
1. Connect the target printer to the PC, and turn it on.
2. Double-click on the adjustment progarm icon, and the following main program menu
window is displayed.
3. Specify the model to be adjusted in the [Model Name] list box.
C A U T I O N
Do not start the adjustment program before connecting the
parallel cable to the printer.
This program can not be executed together with EPSON Status
Monitor on Windows 95/98. Be sure to terminate the EPSON
Status Monitor before starting the adjustment program.
If the power to the printer is turned off or the parallel cable is
disconnected during running of the adjustment program, be sure
to restart the program.
On the “Details of Display” tab of “Property of Screen”, do not
change “font size.”