
user manual

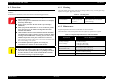
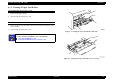


Table Of Contents
- EPSON EPL-6200/EPL-6200L
- Contents
- Product Description
- 1.1 Outline
- 1.2 Basic Specifications
- 1.2.1 Process Specifications
- 1.2.2 Printer Basic Specifications
- 1.2.3 Paper Specification
- 1.2.4 Reliability, Durability, Serviceability
- 1.2.5 Operating Conditions (Including Consumables)
- 1.2.6 Storage and Transport of the Printer Main Unit and Optional Products (Consumables Packaged)
- 1.2.7 Electrical Features
- 1.2.8 Compliance with Standards and Regulations
- 1.2.9 Consumable Components
- 1.3 External Appearance and Parts Name
- 1.4 Controller Specification
- 1.5 Control Panel (EPL-6200)
- 1.6 Control Panel (EPL-6200L)
- 1.7 RAM Expansion
- 1.8 System Requirements (Only for EPL-6200L)
- 1.9 Paper Feed Specifications (Only for EPL-6200L)
- 1.10 Notes on Operation
- 1.11 Status Sheet
- 1.12 Ambient Conditions
- 1.13 Differences in Specifications between Intended Markets
- 1.14 Notes on Installation of Optional Units
- Operating Principles
- 2.1 Overview
- 2.2 Description of Mechanisms
- 2.3 Operating Principles of Electric Circuitry
- Troubleshooting
- 3.1 Overview
- 3.2 Troubleshooting When There is Error Display
- 3.2.1 Fuser warming up problem
- 3.2.2 Fan problem
- 3.2.3 Polygon Motor Error
- 3.2.4 Laser problem
- 3.2.5 High voltage circuit problem
- 3.2.6 Fuser high temperature problem
- 3.2.7 CPU Error
- 3.2.8 Engine Communication Error
- 3.2.9 Fuser low temperature problem
- 3.2.10 Standard RAM Error
- 3.2.11 RAM Error (Slot 0)
- 3.2.12 ROM Checksum Error (Font)
- 3.2.13 ROM Checksum Error (Program)
- 3.2.14 Option ROM Error
- 3.2.15 EEPROM Error
- 3.2.16 Engine Initialization Error
- 3.2.17 Other Hardware Error
- 3.2.18 Software Error
- 3.3 Troubleshooting for Paper Jam
- 3.4 Troubleshooting for Abnormal Operations
- 3.5 Troubleshooting for Electrical Parts
- 3.6 Troubleshooting for Print Quality Problems
- Disassembly and Assembly
- Adjustment
- Maintenance
- Appendix

EPSON EPL-6200/EPL-6200L Revision A
Maintenance Overview 173
6.1 Overview
This section gives information necessary for maintaining the printer in its optimum
condition.
In maintenance and checks, never fail to observe the following precautions.
6.1.1 Cleaning
Check the inside of the printer, and remove foreign matters, if any, such as paper clips,
staples, bits of paper, paper dust or toner.
6.1.2 Maintenance
Regular Replacement Parts and Consumables are as listed below:
The maintenance work of this printer does not require any special tool or grease.
W A R N I N G
Disconnect the power cable before starting maintenance and
checks of the printer.
Always wear gloves for maintenance and checks to avoid injury
from sharp metal edges.
Do not expose yourself to the laser beam to prevent injury
(blindness).
When you perform maintenance or service of the laser printer,
never open any cover on which a warning label about laser
beam has been affixed.
Understand how the laser beam functions and take maximum
precautions not to injure yourself or anyone around you. When
working on the FUSER ASSY or nearby parts, be sure to wait
until the temperature of the parts cool down to a safe level.
After stopping operation of the printer, wait at least 40 minutes and
then start working on the printer.
To avoid dust explosion or ignition, never bring any
consumables close to flame or throw them into fire.
C A U T I O N
Do not use alcohol, paint thinner, or other such solvents.
Do not clean the surface of the roller in the Transfer Roller
Unit. If the roller is particularly dirty, try printing some sheets
to remove the dirt, or take out the Transfer Roller Unit and
blow the dirt off using a compressed air gun.
Table 6-1. Cleaning Items
Item Time for Cleaning Cleaning Method
Paper Feed Roller
When image quality has
lowered or paper feed
error occurs
Wipe the rubber surface with a soft
cloth soaked in water once and then
squeezed strongly.
Table 6-2. Regular Replacement Parts and Consumables
Parts Requiring Periodical
Replacement
Time for Replacement
Developer Cartridge
(Toner Cartridge)
An average of 6,000 pages or 3,000 pages
Pre-installed cartridge:
3,000 pages (EPL-6200)
1,500 pages (EPL-6200L)
Drum Cartridge
(Photoconductor Unit)
After printing of about 20,000 sheets
Fuser Unit
After printing of about 50,000 sheets
(5% pattern continuous printing)
Transfer Roller After printing of about 50,000 sheets