AP-60 User’s Guide
Copyright Notice All rights reserved. No part of this publication may be reproduced, stored in a retrieval system, or transmitted in any form or by any means, electronic, mechanical, photocopying, recording, or otherwise, without the prior written permission of Seiko Epson Corporation. The information contained herein is designed only for use with this Epson product. Epson is not responsible for any use of this information as applied to other equipment.
Important Safety Instructions CAUTION: To reduce the risk of electric shock, do not remove the cover. No user serviceable parts inside. Refer servicing to qualified personnel. CAUTION: These servicing instructions are for use by qualified service personnel only. To reduce the risk of electric shock, do not perform any servicing other than that contained in the operating instructions unless you are qualified to do so.
All safety and operating instructions should be read before using the system. After you have read all instructions, save this information for later reference. The documentation and system use graphical symbols to show how to use the system safely. Please understand and respect these caution symbols in order to avoid injury to persons or property. Warnings Indicate information that, if ignored, could possibly result in personal injury or even death due to incorrect handling.
• Do not leave the system or the remote control with batteries inside a vehicle with the windows closed, in places where they will be exposed to direct sunlight, or in other places that may become extremely hot. Thermal deformation or technical malfunction may occur, which could result in fire. • Do not use sprays containing a flammable gas to remove dirt or dust which is adhering to the system.
• If the batteries leak, wipe away battery fluid with a soft cloth. If fluid gets on your hands, wash them immediately. • Replace the batteries as soon as they run out. • Remove the batteries if you will not be using the system for a long period of time. • Do not expose batteries to heat or flame and do not put them in water. • Dispose of used batteries according to local regulations. • Keep these batteries out of the reach of children.
• Do not install this product where it may be subject to impact or vibration. • Do not install this product in direct sunlight or near a heater vent, fireplace, or other source of heat. • Do not install this product on a slanted ceiling. • Personal injury and/or damage to the equipment could result from dropping or mishandling this product. • Some of the components included with this product may be packaged in plastic bags.
Contents Introduction . . . . . . . . . . . . . . . . . . . . . . . . . . . . . . . . . . . . . . . . . . . . . . . . . . . . . . . . . . . . . . . . . . . . . . . . 9 Getting Started . . . . . . . . . . . . . . . . . . . . . . . . . . . . . . . . . . . . . . . . . . . . . . . . . . . . . . . . . . . . . . . . . . . . Using the Remote Control. . . . . . . . . . . . . . . . . . . . . . . . . . . . . . . . . . . . . . . . . . . . . . . . . . . . . . . . . . . . . . Turning On the System . . . . . . . . . . .
Introduction The Epson® AP-60 is a sound enhancement system designed to turn your classroom or meeting room into a state-of-the-art learning center. With the AP-60’s innovative four speaker design, powerful amplifier, and wireless pendant microphone, your voice will be heard clearly in all areas of the classroom. You can also amplify the sound coming from other devices in your classroom, such as a computer, DVD player, or a portable audio device.
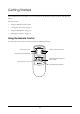
Getting Started The included remote control allows you to turn on both the AP-60 and your Epson projector, and adjust the volume.
Turning On the System 1 Press the P power button on the AP-60 remote control. Press to turn on The power light on the AP-60 changes from orange to green. Power light 2 When you’re done using the system, press the P power button on the remote control to turn off the system. Note If there is no audio signal detected for 60 minutes, the AP-60 automatically turns off to conserve energy.
Using the Microphone 1 Place the microphone around your neck with the black emitter facing away from you. 2 Adjust the neck strap so that the top of the microphone is just below your collarbone. Emitter 3 Press the power button on the pendant microphone until it clicks into place. The power button turns green. Power button Note If the power button turns red or doesn’t illuminate, replace the batteries in the pendant microphone (see page 19 for details).
4 Verify that the Mic light on the AP-60 is lit. The light should match the Channel selector on the pendant microphone. Mic lights Channel selector 5 Adjust the microphone sensitivity by rotating the Gain control wheel on the pendant microphone, if necessary. Gain control wheel Note If your system has more than one microphone, make sure that each microphone is on a different channel. The sound cannot be received properly when multiple microphones are used on the same channel.
Adjusting the Volume Press the Volume + or – buttons on the AP-60 remote control to adjust the master volume. Press to turn volume up or down To temporarily turn off all sound, press the MUTE button on the remote control. Press the button again to restore audio. Tip To achieve a better balance across different audio sources, see“Adjusting Audio Levels” on page 16.
Additional Features and Adjustments Follow the steps in this chapter to connect external audio devices to the pendant microphone, connect a second microphone to the AP-60, and to adjust the audio levels from different audio sources.
Adding a Second Microphone Follow the steps below to connect a second microphone to the AP-60. 1 Check the channel selector switch on top of the pendant microphone and note what channel it’s set to. Channel selector 2 Set the second microphone to the opposite channel and turn it on. 3 Verify that the Mic light for the second microphone is illuminated on the AP-60. The light on the AP-60 should match the channel selected on the second microphone.
3 Press the Volume + or – buttons on the AP-60 remote control to adjust the master volume as necessary.
Replacing Batteries Follow the instructions in this chapter to replace batteries in the pendant microphone or remote control. Replacing Remote Control Batteries If the CMD light doesn’t flash on the AP-60 when you press a button on the remote control, you may need to replace the batteries. CMD light Follow the steps below to replace the batteries in the remote control. 1 Remove the battery compartment cover on the back of the remote control and remove the old batteries.
Replacing Microphone Batteries If the power button on the pendant microphone turns red or doesn’t illuminate, you may need to replace the batteries. Follow the steps below to replace the batteries in the pendant microphone. 1 Open the battery compartment cover on the back of the pendant microphone and remove the old batteries. 2 Insert 2 AA batteries and close the battery compartment cover.
Solving Problems If you’re having a problem with the AP-60, check for a solution in one of these sections: • “Basic Operation Problems” below • “Sound Problems” below • “Problems Using the Pendant Microphone” on page 21 • “Problems Using the Remote Control” on page 21 If you cannot solve the problem on your own, contact Epson for help. Basic Operation Problems Problem Solution The system doesn’t turn on. Press the P power button on the AP-60 remote control to turn the system on or off.
Problems Using the Pendant Microphone Problem Solution The power light won’t come on. You may need to replace the pendant microphone’s batteries (see page 19). There is no sound. Check to make sure that the pendant microphone’s power button is green. If it’s red or not illuminated, replace the batteries (see page 19). Make sure the AP-60 is turned on. If the AP-60 doesn’t receive an audio signal for 60 minutes, it turns off automatically.
Where To Get Help Internet Support Visit Epson’s support website at epson.com/support and select your product for solutions to common problems. You can download product documentation, view FAQs, or e-mail Epson with your questions. Speak to a Support Representative To use the Epson PrivateLine® Support service, call (800) 637-7661 and enter the PIN on the Epson PrivateLine Support card that came with your AP-60. This is the fastest way of speaking to a live representative, and it’s free.
Specifications General Audio channels 2 channels monaural (front and rear) Rated power 2 × 30 W RMS Supported microphones 2 Audio inputs One RCA style connector and one 3.5 mm stereo-mini jack Audio output One 3.5 mm stereo-mini jack Remote Control Range 20 feet (6 meters) Batteries AA Pendant Microphone Pickups 2 Audio input One 3.5 mm stereo-mini jack Batteries AA Dimensions Width 14.25 inches (362 mm) Depth 14.25 inches (362 mm) Height 7.72 inches (196 mm) Weight 15.2 lbs (6.
Notices FCC Compliance Statement For United States Users This equipment has been tested and found to comply with the limits for a Class B digital device, pursuant to Part 15 of the FCC Rules. These limits are designed to provide reasonable protection against harmful interference in a residential installation.
Warranty Epson America, Inc. Limited Warranty What Is Covered: Epson America, Inc. (“Epson”) warrants to the first retail purchaser that the product enclosed with this limited warranty statement, if purchased new and operated in the United States or Canada, will be free from defects in workmanship and materials for a period of three (3) years from the date of original purchase. For warranty service, you must provide proof of the date of original purchase.
Printed in XXX