Art700Basics.
Art700Basics.book Page 2 Monday, July 7, 2008 4:13 PM Copyright Notice All rights reserved. No part of this publication may be reproduced, stored in a retrieval system, or transmitted in any form or by any means, electronic, mechanical, photocopying, recording, or otherwise, without the prior written permission of Seiko Epson Corporation. The information contained herein is designed only for use with this Epson product. Epson is not responsible for any use of this information as applied to other equipment.
Art700Basics.book Page 3 Monday, July 7, 2008 4:13 PM Contents Using the Control Panel . . . . . . . . . . . . . . . . . . . . . . . . . . . . . . . . 5 Loading Paper . . . . . . . . . . . . . . . . . . . . . . . . . . . . . . . . . . . . . . . . . 7 Using Special Papers . . . . . . . . . . . . . . . . . . . . . . . . . . . . . . . . . . . . . . . 10 Placing Originals for Copying or Scanning . . . . . . . . . . . . . . . 12 Copying a Document or Photo . . . . . . . . . . . . . . . . . . . . . . . . .
Art700Basics.book Page 4 Monday, July 7, 2008 4:13 PM Maintaining Your Artisan 700 Series . . . . . . . . . . . . . . . . . . . . 45 Checking the Print Head Nozzles . . . . . . . . . . . . . . . . . . . . . . . . . . . . . . Cleaning the Print Head . . . . . . . . . . . . . . . . . . . . . . . . . . . . . . . . . . . . Checking the Ink Cartridge Status . . . . . . . . . . . . . . . . . . . . . . . . . . . . . Purchasing Epson Ink Cartridges . . . . . . . . . . . . . . . . . . . . . . . . . . . . . .
Art700Basics.book Page 5 Monday, July 7, 2008 4:13 PM Using the Control Panel The control panel is adjustable. To raise it, lift it as shown below. To lower it, press the button and push the control panel down. Caution: To avoid damaging the Artisan 700 Series, always press the the control panel. Don’t try to push it down. button to lower Display/Crop View Auto Correct Stop/Clear Settings Blue status light ■ To save energy, the LCD screen goes dark after 13 minutes of inactivity.
Art700Basics.
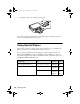
Art700Basics.book Page 7 Monday, July 7, 2008 4:13 PM Loading Paper Your Artisan 700 Series has two paper trays. The main tray is for letter-size, legalsize, A4, or 8 × 10 inch paper. You can load up to 120 sheets of letter-size or A4 plain paper in the main tray. When extended, the tray can hold up to 50 legal-size sheets. The photo tray is for 4 × 6 or 5 × 7-inch paper. You can load up to 20 sheets of 4 × 6 and 20 sheets of 5 × 7-inch paper. 1. Pull out the paper cassette.
Art700Basics.book Page 8 Monday, July 7, 2008 4:13 PM 3. Slide the left edge guide against the paper. Make sure the paper stack fits under the edge guide 4. Adjust the other edge guide to your paper size. 5. Lower the photo tray.
Art700Basics.book Page 9 Monday, July 7, 2008 4:13 PM 6. To load paper in the photo tray, squeeze the edge guides and slide them out. Then insert photo paper with the glossy or printable side face-down. 7. Slide the left edge guide against the paper. Then adjust the other edge guide to your paper size. Note: Make sure the paper fits under the edge guide. 8. Keep the cassette flat as you insert it.
Art700Basics.book Page 10 Monday, July 7, 2008 4:13 PM 9. Extend the output tray and flip up the stopper. For details on paper and instructions on loading envelopes and legal-size sheets, see the on-screen Epson Information Center. Using Special Papers Epson offers a wide array of high quality papers, making it easy to maximize the impact of your photos, presentations, and creative projects. You can purchase genuine Epson ink and paper at Epson Supplies CentralSM at www.epson.com/ink3 (U.S.
Art700Basics.book Page 11 Monday, July 7, 2008 4:13 PM Part number Sheet count Borderless 4 × 6 inches S041808 S041727 40 100 Borderless 5 × 7 inches S041464 20 Borderless 8 × 10 inches S041465 20 Letter (8.5 × 11 inches) S042183 S041667 25 50 Borderless 4 × 6 inches S042181 S042174 60 100 Borderless 5 × 7 inches S041945 20 Borderless 8 × 10 inches S041946 20 Letter (8.
Art700Basics.book Page 12 Monday, July 7, 2008 4:13 PM Placing Originals for Copying or Scanning You can place one or two photos or a document up to letter-size (or A4) on the scanner glass to make color or black and white copies. 1. Open the document cover and place your original face-down on the scanner glass, with the top against the back left corner. 1/4 inch (5 mm) If you’re scanning 3 × 5- or 4 × 6-inch photos, you can place up to two at a time on the scanner glass.
Art700Basics.book Page 13 Monday, July 7, 2008 4:13 PM Copying a Document or Photo Once you’ve placed your originals on the scanner glass, you can make color or black and white copies. See: ■ “Copying a Document” below ■ “Restoring, Cropping, or Copying Photos” on page 14 Copying a Document 1. Place your original for copying (see page 12). 2. Load letter-size plain paper, Epson Bright White Paper, or Epson Presentation Paper Matte. 3. Press the Home button until Copy is selected. 4. Press OK. 5.
Art700Basics.book Page 14 Monday, July 7, 2008 4:13 PM ■ Press d to scroll down to the Paper Type setting and select Plain Paper. Then press OK. ■ For the Document Type setting, choose Text for plain documents or Text & Image if your document contains photos or graphics. Then press OK. ■ To change the copy quality, select Quality, press r, then press u or d to choose Draft, Standard Quality, or Best. Then press OK. For more information about copy settings, see your on-screen Epson Information Center.
Art700Basics.book Page 15 Monday, July 7, 2008 4:13 PM 5. To restore colors in faded photos as you copy, press d to select On. (If your photos are not faded, do not turn on Color Restoration; press OK to select Off.) Then press OK. 6. When you see this screen, press OK to prescan your photos. 7. When you see a message asking you to select the number of copies, press OK. 8. If you placed two photos on the scanner glass, press l or r to view the second one and select the number of copies. 9.
Art700Basics.book Page 16 Monday, July 7, 2008 4:13 PM ■ To change the paper type, select Paper Type, press r, then press u or d to choose the setting for the paper you loaded: For this paper type Choose this setting Epson Premium Photo Paper Glossy Prem. Glossy Epson Premium Photo Paper Semi-gloss Epson Ultra Premium Photo Paper Luster Epson Ultra Premium Photo Paper Glossy Ultra Glossy Epson Photo Paper Glossy Glossy ■ To change the print layout, select Borderless, then press r.
Art700Basics.book Page 17 Monday, July 7, 2008 4:13 PM Printing From Your Camera’s Memory Card The Artisan 700 Series lets you print photos from your digital camera’s memory card, or by connecting your camera directly and using its DPOF™ settings. You can also print photos stored on a USB drive.
Art700Basics.book Page 18 Monday, July 7, 2008 4:13 PM Make sure the image files on your card meet these requirements: File format JPEG with the Exif version 2.21 standard Image size 80 × 80 pixels to 9200 × 9200 pixels Number of files Up to 9990 (If there are more than 999 photos on the card, you can select a group of photos to display. See your on-screen Epson Information Center.) 2. After you insert the card, the memory card access light flashes, then stays on. Memory card access light 3.
Art700Basics.book Page 19 Monday, July 7, 2008 4:13 PM Inserting a USB Drive You can print from an external storage device connected to the Artisan 700 Series, such as a USB flash drive, external hard drive, or CD burner. Note: Epson cannot guarantee the compatibility of any drives. You may not be able to print photos from the storage device if they were saved to the device using a product other than the Artisan 700 Series. 1. Remove any inserted memory card from the Artisan 700 Series. 2.
Art700Basics.book Page 20 Monday, July 7, 2008 4:13 PM Selecting and Printing Photos 1. Load Epson photo paper. See page 10 for a list. 2. Press the Home button until Photos is selected, then press OK. 3. Select View and Print Photos and press OK. 4. Press l or r to move through your photos and display one you want to print. Tip: View Auto Correct: Off appears at the top of the display screen. Press View Auto Correct to see how the image will look when Fix Photo is turned on (see page 21).
Art700Basics.book Page 21 Monday, July 7, 2008 4:13 PM 9. To change any of the print settings displayed on the screen, press x Menu, select Print Settings, press OK, and select your settings. For a list of Epson papers and the corresponding Paper Type settings, see page 22. When you’re done selecting settings, press OK. 10. To change any of the photo adjustments displayed on the screen or fix red-eye, press x Menu. Select Photo Adjustments, press OK, and select your settings.
Art700Basics.book Page 22 Monday, July 7, 2008 4:13 PM Printing Layout Sheets You can print the same photo or multiple photos on a single sheet of paper using the Artisan 700 Series templates. 1. Press the Home button until Photos is selected. 2. Press l or r and select Photo Layout Sheet. You see this screen: 3. Press l or r and select one of the layout settings shown on the screen. Note: As indicated by the icons, some of the layouts let you place different photos on the same sheet. 4.
Art700Basics.book Page 23 Monday, July 7, 2008 4:13 PM For this paper type Choose this setting Epson Premium Presentation Paper Matte Matte Epson Ultra Premium Presentation Paper Matte 6. When you’re done selecting settings, press OK. You see this screen: 7. Select Automatic layout to let the Artisan 700 Series place images in the layout sheets for you, or select Place photos manually to arrange the images yourself. (This option may not be available, depending on the paper settings you choose.) 8.
Art700Basics.book Page 24 Monday, July 7, 2008 4:13 PM ■ Print Settings to change the paper type and size, or other print settings ■ Photo Adjustments to turn on red-eye reduction or other features When you’re done selecting settings, press OK. 12. When you’re ready to print, press x Start. To cancel printing, press y Stop/Clear Settings.
Art700Basics.book Page 25 Monday, July 7, 2008 4:13 PM 6. Press l or r and select PictBridge Setup, then press OK. You see this screen: 7. Select the following settings (see the on-screen Epson Information Center for details): ■ Print Settings to select the paper type and size, or other print settings. ■ Photo Adjustments to turn on red-eye reduction or other features. When you’re done selecting settings, press OK. 8. Follow the instructions that came with your camera to select and print your photos.
Art700Basics.book Page 26 Monday, July 7, 2008 4:13 PM Printing Special Projects You can use your Artisan 700 Series to make ruled paper and graph paper for homework projects, and even notepaper personalized with your favorite photos. You can also print customized labels directly on to ink jet-printable CDs and DVDs.
Art700Basics.book Page 27 Monday, July 7, 2008 4:13 PM 7. When you’re ready to print, press x Start. To cancel printing, press y Stop/ Clear Settings. Printing Personal Notepaper You can print lined or unlined notepaper, personalized with a photo in the background. 1. Load plain letter- or A4-size paper. 2. Insert a memory card (see page 17) or USB drive (see page 19). 3. Press the Home button. 4. Press l or r to select Print Ruled Papers, then press OK. 5.
Art700Basics.book Page 28 Monday, July 7, 2008 4:13 PM You see a preview of how your stationery will look with a photo in the background. 7. To rotate the layout, press d. 8. Press l or r to move through your photos and display the one you want to use for your notepaper. 9. Press OK. 10. When you see a message asking you to load paper, press OK. 11. To print more than 1 sheet, press + or – to select the number (up to 99). 12. When you’re ready to print, press x Start.
Art700Basics.book Page 29 Monday, July 7, 2008 4:13 PM 4. Press l or r to select Print on CD/DVD, then press OK. You see this screen: 5. Select 1-up, 4-up, or CD/DVD Variety (10-up) to indicate the number of photos in the layout, then press OK. 6. Select Automatic layout or Place photos manually, if necessary. 7. Press OK. 8. Press OK again. 9. Press l or r to move through your photos and display one you want to print. Press the + button to select the number of copies you want of that photo.
Art700Basics.book Page 30 Monday, July 7, 2008 4:13 PM 11. If necessary, adjust the inner and outer diameter of your CD as shown on the screen, then press OK. 12. If desired, select Test Print on Letter/A4 paper and follow the on-screen instructions to print a test on plain paper. 13. If your test is satisfactory, select Print on a CD/DVD. The CD/DVD tray extends automatically and you see this screen: 14. Raise the control panel all the way up.
Art700Basics.book Page 31 Monday, July 7, 2008 4:13 PM 15. Place your disc on the tray with the label side up. Gently press it in place (it does not snap in). Caution: Do not try to pull the CD/DVD tray out; it extends automatically as far as possible. 16. Press the L CD Tray button to position the CD/DVD for printing. Caution: Do not turn the Artisan 700 Series off with a CD or DVD loaded in it. Always remove the disc first. 17.
Art700Basics.book Page 32 Monday, July 7, 2008 4:13 PM 19. Remove your disc. 20. Press the L CD Tray button to put away the CD/DVD tray. 21. Press the button and push the control panel down. Note: After printing, handle your CD/DVD carefully. You may need to wait up to 24 hours for the ink to dry fully before inserting it in a drive. Keep printed discs away from moisture and direct sunlight.
Art700Basics.book Page 33 Monday, July 7, 2008 4:13 PM Printing From Your Computer This section describes the basic steps for printing a photo or document stored on your Windows or Macintosh computer. For instructions on two-sided printing, see page 40. For additional printing instructions, see the on-screen Epson Information Center. Before you start, make sure you’ve installed your printer software and connected the Artisan 700 Series to your computer as described on the Start Here sheet.
Art700Basics.book Page 34 Monday, July 7, 2008 4:13 PM 3. Select EPSON Artisan 700 Series, then click the Preferences or Properties button. Note: If you see a Setup, Printer, or Options button, click it. Then click Preferences or Properties on the next screen. 4. On the Main tab, select the basic print settings. Make sure you choose the correct paper Type setting for the paper you are using (see page 39).
Art700Basics.book Page 35 Monday, July 7, 2008 4:13 PM 10. Click OK or Print to start printing. This window appears and shows the progress of your print job. Check ink cartridge status Cancel printing Printing With a Macintosh See the section below for your Mac OS® operating system. Mac OS X 10.5 1. Open a photo or document in an application. 2. Open the File menu and select Print. 3. Select EPSON Artisan 700 as the Printer setting. Select EPSON Artisan 700 Click to expand 4.
Art700Basics.book Page 36 Monday, July 7, 2008 4:13 PM 5. Select the basic page setup options. For borderless photos, choose a Paper Size setting with a Borderless option. Note: If the setting you want isn’t shown (for example, Scale), check for it in your application before printing. Or check for it in the settings for your application at the bottom of this window. (If you’re printing from Preview, you see the settings shown below.) Copy and page settings Application settings 6.
Art700Basics.book Page 37 Monday, July 7, 2008 4:13 PM Note: To reduce or remove red-eye effects in photos, choose Extension Settings from the pop-up menu and select Fix Red-Eye. 8. Click Print. 9. To monitor your print job, click the icon in the dock. Select your print job, then select an option to cancel, pause, or resume printing, if necessary. Cancel printing Pause or resume printing Select the print job Mac OS X 10.3 and 10.4 1. Open a photo or document in an application. 2.
Art700Basics.book Page 38 Monday, July 7, 2008 4:13 PM 3. Click OK to close the Page Setup window. 4. Select Print from the File menu. You see a window like this one: Select Artisan 700 Select Print Settings 5.
Art700Basics.book Page 39 Monday, July 7, 2008 4:13 PM 8. Click Print. 9. To monitor your print job, click the icon in the dock (or click the Center icon and double-click Artisan 700 on the next screen). Print Cancel printing Pause or resume printing Select the print job Selecting the Correct Paper Type Select the correct Type (see page 34) or Media Type (see page 38) setting in your printer software.
Art700Basics.book Page 40 Monday, July 7, 2008 4:13 PM For this paper/media Select this setting Epson Premium Presentation Paper Matte Epson Premium Presentation Paper Matte Double-sided Epson Ultra Premium Presentation Paper Matte Epson Photo Quality Self-adhesive Sheets Epson Iron-on Cool Peel Transfer Paper Premium Presentation Paper Matte Envelopes Envelope Two-sided Printing If you have the optional auto duplexer, you can print on both sides of the page automatically.
Art700Basics.book Page 41 Monday, July 7, 2008 4:13 PM Windows Follow the Windows printing instructions beginning on page 33, but complete the additional steps below before you start printing. 1. Click the Page Layout tab in the printer software. Select Auto or Manual 2. Select Auto as your 2-sided printing setting if you’ve installed the auto duplexer, or Manual if you don’t have the auto duplexer.
Art700Basics.book Page 42 Monday, July 7, 2008 4:13 PM Mac OS X Follow the Macintosh printing instructions beginning on page 35 (Mac OS X 10.5) or page 37 (Mac OS X 10.3 and 10.4), but complete the additional steps below before you start printing. 1. Select Auto Duplex Printing Settings from the pop-up menu. Pop-up menu Click here 2. Select Auto Duplex Printing.
Art700Basics.book Page 43 Monday, July 7, 2008 4:13 PM Scanning a Document or Photo You can use your Artisan 700 Series to scan original documents and photos and save them as digital files on your computer. You can also turn scanned documents into editable/searchable text using ABBYY® FineReader® Sprint Plus (OCR software) included with your Artisan 700 Series. For more information, see the on-screen Epson Information Center.
Art700Basics.book Page 44 Monday, July 7, 2008 4:13 PM You see the Epson Scan standby window. Click here to change the scan mode 4. If the Mode setting in the upper right corner is set to Full Auto Mode, click the Scan button. Note: If you want to automatically restore a color photo as you scan, click the Customize button, then check the Color Restoration box. ■ If you are scanning from Epson Scan directly, the image is scanned and you see its icon in Windows Explorer or Macintosh Finder.
Art700Basics.book Page 45 Monday, July 7, 2008 4:13 PM Maintaining Your Artisan 700 Series Follow the steps here to check and clean the print head, and replace ink cartridges. To align the print head, if necessary, see the on-screen Epson Information Center. Checking the Print Head Nozzles If your printouts have gaps or lines across them, the print head nozzles may be clogged. Follow these steps to check the print head nozzles: 1. Load letter-size plain paper in the main tray. 2. Press the Home button. 3.
Art700Basics.book Page 46 Monday, July 7, 2008 4:13 PM If there are gaps or the pattern is faint, select Head Cleaning, then press OK. Then press x Start to clean the print head. Cleaning the Print Head If print quality has declined and the nozzle check indicates clogged nozzles, you can clean the print head. Print head cleaning uses ink, so clean it only if necessary. Note: You cannot clean the print head if an ink cartridge is expended, and may not be able to clean it when a cartridge is low.
Art700Basics.book Page 47 Monday, July 7, 2008 4:13 PM Checking the Ink Cartridge Status Your Artisan 700 Series will let you know when an ink cartridge is low or expended by displaying a message on its screen or on your computer. You cannot print or copy when an ink cartridge is expended even if the other cartridges are not expended. Replace any expended cartridges before printing or copying. You can still scan and view photos on the display screen.
Art700Basics.book Page 48 Monday, July 7, 2008 4:13 PM Purchasing Epson Ink Cartridges You can purchase genuine Epson ink and paper at Epson Supplies CentralSM at www.epson.com/ink3 (U.S. sales) or www.epson.ca (Canadian sales). You can also purchase supplies from an Epson authorized reseller. To find the nearest one, call 800-GO-EPSON (800-463-7766).
Art700Basics.book Page 49 Monday, July 7, 2008 4:13 PM Replacing Ink Cartridges Make sure you have a new ink cartridge before you begin. You must install new cartridges immediately after removing the old ones. Caution: Do not open ink cartridge packages until you are ready to install the ink. Cartridges are vacuum packed to maintain reliability. Leave the expended cartridge(s) installed until you have obtained a replacement, or the ink remaining in the print head nozzles may dry out.
Art700Basics.book Page 50 Monday, July 7, 2008 4:13 PM 3. Squeeze the tab on the cartridge and lift it straight up. Dispose of it carefully. Do not take the used cartridge apart or try to refill it. Warning: If ink gets on your hands, wash them thoroughly with soap and water. If ink gets into your eyes, flush them immediately with water. Keep ink cartridges out of the reach of children. 4. Remove the cartridge from the package. Do not touch the green chip on the side. 5.
Art700Basics.book Page 51 Monday, July 7, 2008 4:13 PM Solving Problems Check the messages on the display screen to diagnose the cause of most problems. Press the Home button, if necessary, then press l or r to select Problem Solver. Press u or d to see all the help topics. You can also check the basic troubleshooting suggestions (beginning on page 52) or see the on-screen Epson Information Center for more detailed help.
Art700Basics.book Page 52 Monday, July 7, 2008 4:13 PM Problems and Solutions You can often solve problems by checking the messages on the display screen. If the information doesn’t help you solve the problem, check the solutions below. Note: If the screen is dark, press any button to wake the Artisan 700 Series from sleep mode. Printing and Copying Problems ■ Make sure your paper is loaded printable side down (usually the whiter, brighter, or glossy side). Don’t load paper above the edge guides.
Art700Basics.book Page 53 Monday, July 7, 2008 4:13 PM 2. Pull back on the tabs to remove the cover inside the Artisan 700 Series. Then remove the paper as shown, including any torn pieces. 3. Reattach the cover and close the scanner. 4. You may also need to check other locations for jammed paper, such as the paper cassette, the back cover or auto duplexer (if installed), and underneath the Artisan 700 Series. See the on-screen Epson Information Center for details.
Art700Basics.book Page 54 Monday, July 7, 2008 4:13 PM Where To Get Help Epson Technical Support Internet Support Visit Epson’s support website at epson.com/support and select your product for solutions to common problems. You can download drivers and documentation, get FAQs and troubleshooting advice, or e-mail Epson with your questions.
Art700Basics.book Page 55 Monday, July 7, 2008 4:13 PM Notices Important Safety Instructions Before using your all-in-one, read and follow these safety instructions: ■ Be sure to follow all warnings and instructions marked on the product. ■ Use only the type of power source indicated on the product label. ■ Use only the power cord that comes with the product. Use of another cord may cause fires or shock. Do not use the cord with any other equipment.
Art700Basics.book Page 56 Monday, July 7, 2008 4:13 PM ■ Do not use aerosol products that contain flammable gases inside or around the printer. Doing so may cause fire. ■ Do not press too hard on the document table when placing the originals. ■ Do not open the scanner section while the product is in use. ■ Do not touch the flat white cable inside the product. ■ Do not spill liquid on the product. ■ Adjust only those controls that are covered by the operating instructions.
Art700Basics.book Page 57 Monday, July 7, 2008 4:13 PM ■ If you remove an ink cartridge for later use, protect the ink supply area from dirt and dust and store it in the same environment as the product. Note that there is a valve in the ink supply port, making covers or plugs unnecessary, but care is needed to prevent the ink from staining items that the cartridge touches. Do not touch the ink cartridge ink supply port or surrounding area. Do not store the cartridge upside down. Epson America, Inc.
Art700Basics.book Page 58 Monday, July 7, 2008 4:13 PM What This Warranty Does Not Cover: This warranty covers only normal use in the United States and Canada. Using this product for continuous production or similar high duty purposes is not considered normal use; damage, maintenance or service from such use will not be covered under this warranty. This warranty is not transferable.
Art700Basics.book Page 59 Monday, July 7, 2008 4:13 PM To find the Epson Customer Care Center nearest you, visit http://www.epson.com/support. You can also write to: Epson America, Inc., P.O. Box 93012, Long Beach, CA 90809-3012 Declaration of Conformity According to 47CFR, Part 2 and 15 for: Class B Personal Computers and Peripherals; and/or CPU Boards and Power Supplies used with Class B Personal Computers: We: Located at: Epson America, Inc.
Art700Basics.book Page 60 Monday, July 7, 2008 4:13 PM FCC Compliance Statement For United States Users This equipment has been tested and found to comply with the limits for a Class B digital device, pursuant to Part 15 of the FCC Rules. These limits are designed to provide reasonable protection against harmful interference in a residential installation.
Art700Basics.
Art700Basics.
Art700Basics.
Art700Basics.