Artisan ® 835 Series Quick Guide Basic Copying, Printing, Scanning, and Faxing Maintenance Network Setup Solving Problems
Contents Using the Control Panel . . . . . . . . . . . . . . . . . . . . . . . . . . . . . . . . 4 Using the Touch Screen . . . . . . . . . . . . . . . . . . . . . . . . . . . . . . . . . . . . . 4 Placing Originals for Copying, Scanning, or Faxing . . . . . . . . 6 Using the Scanner Glass . . . . . . . . . . . . . . . . . . . . . . . . . . . . . . . . . . . . . 6 Using the Automatic Document Feeder . . . . . . . . . . . . . . . . . . . . . . . . . . . 7 Loading Paper . . . . . . . . . . . . . . . . . . .
Scanning a Document or Photo . . . . . . . . . . . . . . . . . . . . . . . . 30 Quick Scanning With the Scan Button . . . . . . . . . . . . . . . . . . . . . . . . . . 30 Scanning With Epson Scan Software . . . . . . . . . . . . . . . . . . . . . . . . . . . . 31 Scanning With Mac OS X 10.6 . . . . . . . . . . . . . . . . . . . . . . . . . . . . . . . 32 Maintaining Your Product . . . . . . . . . . . . . . . . . . . . . . . . . . . . . 33 Checking the Print Head Nozzles . . . . . . . . . . . . . . . . . .
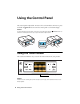
Using the Control Panel The control panel is adjustable. To raise it, lift it as shown below. To lower it, press and hold the Unlock button until the control panel is at the desired angle. Caution: To avoid damaging the product, make sure you press and hold the lower the control panel. Don’t try to push the control panel down. Unlock button to Using the Touch Screen The touch screen makes it easy to use all the creative features of your product.
The touch screen displays only the buttons that are available for the task you are working on. ■ Press l or r to view more photos or access more options. ■ Press ■ Press x Menu to make special settings. The touch screen retains the settings from the last time it was used. If you want to start over, simply press Clear Settings to clear settings for the mode you’re using (Copy, Fax, etc.). ■ To save energy, the touch screen goes dark after several minutes of inactivity. Touch the screen to wake it up.
Placing Originals for Copying, Scanning, or Faxing Before you copy, scan, or fax, place your documents or photos on the scanner glass (see below) or in the Automatic Document Feeder (see page 7). Using the Scanner Glass You can place multiple photos or a document up to letter-size (or A4) on the scanner glass to make color or black and white copies. 1. Open the document cover and place your original face-down on the scanner glass, with the top against the back left corner.
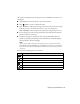
Using the Automatic Document Feeder You can place up to 30 letter-size (or A4) sheets or 10 legal-size sheets in the Automatic Document Feeder. 1. Open the Automatic Document Feeder paper support, and then move the edge guide outward. 2. Fan the originals, then tap them on a flat surface to even the edges. 3. Insert the originals face-up, top edge first. Slide the edge guide against the originals, but not too tightly. The ADF icon appears on the screen.
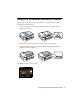
Loading Paper Your product has two paper trays. The main tray is for letter-size, legal-size, A4 size, or 8 × 10-inch paper. You can load up to 120 sheets of letter-size or A4 plain paper in the main tray. When extended, the tray can hold up to 50 legal-size sheets. The photo tray is for 4 × 6 or 5 × 7-inch photo paper. You can load up to 20 sheets. 1. Pull out the paper cassette. Then slide back the photo tray and lift it up. 2. Squeeze the edge guides and slide them out.
3. Slide the left edge guide against the paper. Make sure the paper stack fits under the edge guide 4. Adjust the front edge guide to your paper size. 5. Lower the photo tray.
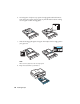
6. To load paper in the photo tray, squeeze the edge guides and slide them out. Then insert photo paper with the glossy or printable side face-down, making sure the paper is under the edge guide. 7. Slide the left edge guide against the paper. Then adjust the front edge guide to your paper size. Note: Make sure the paper fits under the edge guide. 8. Keep the cassette flat as you insert it.
9. Extend the output tray and flip up the stopper. For details on paper and instructions on loading envelopes and legal-size sheets, see the online User’s Guide. Using Special Papers Epson offers a wide array of high quality papers, making it easy to maximize the impact of your photos, presentations, and creative projects. You can purchase genuine Epson ink and paper at Epson Supplies CentralSM at www.epson.com/ink3 (U.S. sales) or www.epson.ca (Canadian sales).
Part number Sheet count Borderless 4 × 6 inches S041808 S041727 40 100 Borderless 5 × 7 inches S041464 20 Borderless 8 × 10 inches S041465 20 Letter (8.5 × 11 inches) S042183 S041667 25 50 Epson Premium Photo Paper Semi-gloss Borderless 4 × 6 inches S041982 40 Letter (8.5 × 11 inches) S041331 20 Epson Photo Paper Glossy Borderless 4 × 6 inches S041809 S042038 50 100 Letter (8.5 × 11 inches) S041141 S041649 S041271 20 50 100 Epson Ultra Premium Presentation Paper Matte Letter (8.
Copying a Document or Photo Once you’ve placed your originals on the scanner or in the Automatic Document Feeder (see pages 6 and 7), you can make color or black-and-white copies. Copying a Document 1. Load letter-size plain paper, Epson Bright White Paper, or Epson Presentation Paper Matte. 2. Press Home if necessary and select Copy. You see this screen. 3. Press + or – to select the number of copies you want. Or press the number 1 to display the numeric keyboard, then select the number and press OK. 4.
■ For the Document Type setting, choose Text for plain documents or Text & Image if your document contains photos or graphics. ■ To change the copy quality, select Quality, then choose Draft, Standard Quality, or Best. Note: To clear previously used copy settings, press Clear Settings. For more information about copy settings, see your online User’s Guide. 7. After you finish selecting your settings, press OK. 8. Press x Start to begin copying. To cancel copying, press y Cancel.
6. When you see this screen, press OK to prescan your photos. 7. When you see a message asking you to select the number of copies, press OK. 8. To print more than 1 copy, press + or – to select the number (up to 99). 9. To crop the photo and enlarge the resulting image area to fit onto your paper, press Display/Crop. ■ To resize the image area, press + or –. ■ To move the image area, use the arrow buttons. ■ To check the zoomed image, press OK. When you finish cropping your photo, press OK. 10.
■ To change the paper type, select Paper Type and choose the setting for the paper you loaded: For this paper type Choose this setting Epson Premium Photo Paper Glossy Epson Premium Photo Paper Semi-gloss Epson Ultra Premium Photo Paper Luster Prem. Glossy Epson Ultra Premium Photo Paper Glossy Ultra Glossy Epson Photo Paper Glossy Glossy Epson Premium Presentation Paper Matte Epson Ultra Premium Presentation Paper Matte Matte Paper Type options depend on the Paper Size setting you choose.
Faxing a Document or Photo Your product lets you send faxes by entering fax numbers or selecting entries from a speed dial list. Using the Automatic Document Feeder, you can fax up to 30 pages at a time. For more information on faxing and fax settings, including using the Epson FAX Utility (Windows only), see the online User’s Guide. Connecting to a Phone Line 1. Connect the phone cable from the wall jack to the LINE port on the back of the product.
When you receive a call and Auto Answer mode is turned on, if the other party is a fax and you pick up the phone or the answering machine answers, the product automatically begins receiving the transmission. If the other party is a caller, the phone can be used as normal or a message can be left on the answering machine. Note: Your phone or answering machine must be connected to the EXT. port (not to a wall jack) for your product to detect incoming fax calls properly.
Entering Your Phone Number 1. Select Your Phone Number from the Header menu. 2. Use the keypad to enter your phone number, up to 20 digits (see below). You don’t need to use dashes. Use the # button to type the + symbol for an international number. 3. Press OK to return to the Header menu. Using the Keypad to Enter Numbers and Characters ■ To enter a fax number, use the numeric keypad. ■ To enter text, press a keypad number repeatedly to switch between uppercase, lowercase, or numbers. ■ Press 1 Symb.
3. Press , then use the numeric keypad to enter the fax number (up to 64 digits). Then press OK. Note: To redial the last fax number you used, press Redial. 4. Select Color or B&W. Note: If the recipient’s fax machine prints only in black and white, your fax is automatically sent in black and white even if you select Color. 5. Press OK, if desired, to see a summary of your fax transmission settings. 6. Press x Start to begin scanning and faxing your document. (To cancel, press y Cancel.
Note: If you've connected an answering machine, you may need to adjust the number of rings after which the fax picks up. (The number of rings to answer must be at least one more than for the answering machine.) To change the number of rings after which the product answers, press Home if necessary, then select Setup, select Fax Settings, select Communication, and Rings to Answer. Manually Receive a Fax To receive a fax manually, press light).
Printing From a Memory Card or External Drive Your product lets you print photos from your digital camera’s memory card or from an external storage device such as a USB flash drive. You can also use your product to print special projects such as: ■ Coloring book pages for your kids ■ Ruled paper and graph paper for homework projects ■ Note paper personalized with your favorite photos For instructions, see the online User’s Guide.
After you insert the card, the memory card access light flashes, then stays on. Memory card access light. Do not remove the card or turn off the product while the light is flashing, or you may lose data on the card. 2. See the online User’s Guide to select and print your photos. Removing Your Card After you finish printing your photos, follow these steps to remove the card: 1. Make sure the memory card access light is not flashing. 2.
2. Insert your USB flash drive or the USB cable for your external drive into the USB port on the front of your product. 3. If there are folders on your storage media, select the folder you want and press OK. 4. See the online User’s Guide to select and print your photos. Note: Before removing your USB drive, make sure its access light is not flashing. Also see step 2 in “Removing Your Card” on page 23. You cannot use the USB port to transfer images from your external storage device to your computer.
Printing From Your Computer This section describes the basic steps for printing from a Windows® or Macintosh® computer. For detailed instructions on printing, see the online User’s Guide. The auto duplexer lets you print on both sides of the page automatically. You can use the auto duplexer with letter- or A4-size plain paper or Epson Bright White Paper. For detailed instructions on two-sided printing from a Windows or Macintosh computer, see the online User’s Guide.
Note: For quick access to the most common settings, click the Shortcuts tab and select one of the presets. You can create your own presets by clicking the Save Settings button on the Advanced tab. For details, see your online User’s Guide. 4. To improve the color, contrast, and sharpness of photos, select Fix Photo. 5. To reduce or remove red-eye effects in photos, select Fix Red-Eye. 6.
2. Select your product as the Printer setting. Select your Epson product Click to expand 3. Click the arrow to expand the Print window, if necessary. 4. Select basic copy and page settings. For borderless photos, choose a Paper Size setting with a Borderless option. Note: If the setting you want isn’t shown (for example, Scale), check for it in your application before printing or check for it at the bottom of this window.
5. Choose Print Settings from the pop-up menu, and select these print settings: Pop-up menu Select your Media Type (see page 29) 6. Choose any other printing options you may need from the pop-up menu. See the online User’s Guide for details. Note: To reduce or remove red-eye effects in photos, choose Color Options from the pop-up menu, select Advanced Settings, then select Fix Red-Eye. 7. Click Print. 8. To monitor your print job, click the icon in the dock.
Selecting the Correct Paper Type Select the correct Type (see page 25) or Media Type (see page 28) setting in your printer software. This tells the product what kind of paper you’re using, so the ink coverage can be adjusted accordingly.
Scanning a Document or Photo You can use your product to scan original documents and photos and save them on your computer. Quick Scanning With the Scan Button Use the touch screen to quickly scan a photo or document and save it on your computer. You can even scan a photo and have it automatically included in an email message. Note: For Mac OS X 10.6, see “Scanning With Mac OS X 10.6” on page 32. 1.
■ If you connected your product to a wireless or wired network, press l or r until you see your computer name, then press OK to begin scanning. Once your image is scanned, you see its icon in Windows Explorer or Macintosh Finder, or as an attachment in your email application. Scanning With Epson Scan Software You can scan from any TWAIN-compliant application using Epson Scan. Or you can start Epson Scan directly from your computer and save your image to a file. Note: For Mac OS X 10.
Note: You cannot use Home mode to scan with the Automatic Document Feeder. 4. Adjust the settings if you wish, then click Preview and when you are ready, click Scan. Note: if you want to automatically restore a color photo as you scan, click the Customize button, then check the Color Restoration box. ■ If you are scanning from Epson Scan directly, the image is scanned and you see its icon in Windows Explorer or Macintosh Finder.
Maintaining Your Product Follow the steps here to check and clean the print head, and replace ink cartridges. If you need to align the print head, see the online User’s Guide. Checking the Print Head Nozzles If your printouts are faint or have gaps in them, the print head nozzles may be clogged. Follow these steps to check the print head nozzles: 1. Load letter- or A4-size plain paper in the main paper tray. 2. Press Home if necessary, then press l or r and select Setup. 3.
Cleaning the Print Head If print quality has declined and the nozzle check indicates clogged nozzles, you can clean the print head. Print head cleaning uses ink, so clean it only if necessary. Note: You cannot clean the print head if an ink cartridge is expended, and may not be able to clean it when a cartridge is low. You must replace the cartridge first (see page 37). 1. Load letter- or A4-size plain paper in the main paper tray. 2. Press Home if necessary, then press l or r and select Setup. 3.
Checking the Ink Cartridge Status Your product will let you know when an ink cartridge is low or expended by displaying a message on its display screen or your computer. You cannot print or copy when an ink cartridge is expended even if the other cartridges are not expended (but you can still scan, fax, and view photos). Replace any expended cartridges before printing or copying. To check ink cartridge status from the display screen anytime, follow these steps: 1.
Purchasing Epson Ink Cartridges You can purchase genuine Epson ink and paper at Epson Supplies Central at www.epson.com/ink3 (U.S. sales) or www.epson.ca (Canadian sales). You can also purchase supplies from an Epson authorized reseller. To find the nearest one, call 800-GO-EPSON (800-463-7766).
Replacing Ink Cartridges Make sure you have a new ink cartridge before you begin. You must install new cartridges immediately after removing the old ones. Caution: Do not open ink cartridge packages until you are ready to install the ink. Cartridges are vacuum packed to maintain reliability. Leave the expended cartridge(s) installed until you have obtained a replacement, or the ink remaining in the print head nozzles may dry out. If you remove a low or expended cartridge, you cannot reinstall and use it.
4. Remove the cartridge from the package. Do not touch the green chip on the side. 5. Remove the yellow tape from the bottom of the cartridge. Caution: Do not remove any other labels or seals, or ink will leak. 6. Insert the new cartridge into the holder and push it down until it clicks into place. 7. Close the scanner. Note: If you see a warning message that the cartridge you just replaced is not installed, open the scanner and press down the cartridge securely.
Network Setup Make sure you follow the instructions on the Start Here sheet to set up your product, choose your connection, and install the software. The on-screen instructions during the installation process help you set up your network connection. Follow the instructions in this chapter only if you need additional help: ■ For wireless network setup, see below. ■ For wired network (Ethernet®) setup, see page 47.
Installing for the First Time Before you begin, make sure that you have the following information ready and write it in the space provided below: ■ Network name (SSID): _________________________________________ ■ Network password: ____________________________________________ Note: If your network password contains uppercase (ABC) or lowercase (abc) letters, be sure to note them correctly. If you don’t know your network name (SSID) or network password, contact the person who set up your wireless network.
5. When you see this screen, select Wireless connection and click Next. 6. When you see this screen, select Set up printer for the first time, then click Next. 7. Mac OS X 10.6: At the next screen, click Next. Then skip to “Setting Up With the Touch Screen” on page 43 to set up the product without using a temporary USB connection.
8. When you see this screen, select a wireless network setup method, then click Next. Tip: If you need help selecting a wireless network setup method, click Which option should I choose for more information on setup methods. Do not connect the USB cable yet. 9. At the next screen, click Next. 10. Do one of the following: ■ If you selected Using temporary USB cable connection, continue following the instructions on the screen.
Setting Up With the Touch Screen If you are using Mac OS X 10.6, or you did not connect a USB cable to set up the product on your wireless network, follow these steps to set it up using the product’s touch screen: 1. Follow the instructions on the screen to start the product’s wireless Setup Wizard. 2. When you see this screen, use the product’s touch screen to select the name of your wireless network, then press OK. When you’re finished, click Next.
3. When you see this screen, do one of the following: ■ If your wireless network has security enabled, use the product’s touch screen to enter your network password. If your password has uppercase (ABC) or lowercase (abc) letters, be sure to enter them correctly. Then go to step 4. ■ If your wireless network doesn’t have security enabled, continue with step 4.
Entering Your SSID Manually If your network doesn’t broadcast its name (SSID), follow these steps to enter it: 1. From the Select SSID screen on the touch screen, press l or r to select Other SSIDs. 2. Use the touch screen to enter your network name. Important: Network names are case-sensitive. Be sure to enter uppercase letters (ABC) or lowercase letters (abc) correctly. ■ Press x Menu to switch between uppercase (ABC), lowercase (abc), or numbers and special characters (123).
4. When you see this screen, click Install. 5. When you see this screen, select Wireless connection and click Next.
6. When you see this screen, select The printer is already on my wireless network, then click Next. 7. Wait while the software is installed. 8. Follow the instructions on the screen to install the rest of your software. 9. When installation is complete, remove the CD and restart your computer. Wired (Ethernet) Network Setup The steps in this section provide detailed instructions for setting up your product on a wired (Ethernet) network.
4. When you see the Software Installation screen, click Install. 5. When you see this screen, select Wired network connection and click Next. 6. When you see the Network Setup screen, do one of the following: ■ For a first-time installation, select Set up printer for the first time, then click Next. ■ If the printer has already been set up for network printing and you want to be able to print from an additional computer, choose The printer is already on my Ethernet network, then click Next. 7.
10. When you see the Firewall Warning screen, click Next. Note: If you see a firewall alert message, click Unblock or Allow to let EpsonNet Setup continue and click Next if necessary. Do not select Ask Me Later, Keep Blocking, or Block. 11. If you see a screen like this one, select the product you would like to set up, then click Next. 12. Wait while EpsonNet Setup configures your product for the network. 13.
Solving Problems Check the messages on the display screen to diagnose the cause of most problems. Press Home if necessary, then press l or r and select Problem Solver. Press l or r to see all the help topics. You can also check the “Problems and Solutions” section below or see the online User’s Guide for more detailed help. Checking for Software Updates Periodically, it’s a good idea to check Epson’s support website for free updates to your product’s software.
Printing and Copying Problems ■ Make sure your paper is loaded printable side down (usually the whiter, brighter, or glossy side). Don’t load paper above the edge guides. ■ Make sure the type of paper you loaded matches the paper size and paper type settings on the control panel when copying (see page 13), when receiving faxes (see page 20), or when printing with your printer software (see page 25). ■ Legal-size documents can be scanned, faxed, or copied using the Automatic Document Feeder.
Paper Feeding Problems If paper jams when printing, check the following: 1. Open the scanner and remove paper as shown, including any torn pieces. Caution: To prevent damage, avoid handling parts inside the printer. 2. Pull back on the tabs to remove the cover inside the product. Then remove the paper as shown, including any torn pieces. 3. Reattach the cover and close the scanner. 4.
Faxing Problems ■ Make sure the recipient’s fax machine is turned on and working. ■ Make sure the LINE port on the product is connected to a telephone wall jack. Verify that the telephone wall jack works by connecting a phone to it. ■ If the line has static, press Home and select Setup, then select Fax Settings, and then Communication. Turn off the V.34 and ECM (Error Correction Mode) settings. ■ If the product is connected to a DSL phone line, you must have a DSL filter connected to the phone jack.
Network Problems If you have a poor wireless connection, try moving the product to a different location. Avoid placing it next to a microwave oven, 2.4 GHz cordless phone, or large metal object such as a filing cabinet. Network setup failed ■ Try moving the product to a different location. ■ Make sure there aren’t any access restrictions (such as MAC address filtering) set on the wireless router. If access restrictions are set, register the product’s MAC address on the router.
■ If network communication was interrupted while starting Epson Scan, exit Epson Scan and restart it after a few seconds. If Epson Scan cannot restart, turn the product off and on, and then try again. Check the Timeout Setting in EPSON Scan Settings. For details, see the Epson Scan Help. Print a Network Status Sheet 1. Press Home if necessary, then press l or r and select Setup. 2. Press l or r and select Network Settings. 3. Press l or r and select Confirm Network Settings. 4.
Days and hours of support are subject to change without notice. Toll or long distance charges may apply. Purchase Supplies and Accessories You can purchase genuine Epson ink, paper, and accessories at Epson Supplies Central at www.epson.com/ink3 (U.S. sales) or www.epson.ca (Canadian sales). You can also purchase supplies from an Epson authorized reseller. To find the nearest one, call 800-GO-EPSON (800-463-7766). Other Software Technical Support ABBYY® FineReader® Phone: (408) 457-9777 www.abbyyusa.
Notices Important Safety Instructions Before using your Epson product, read and follow these safety instructions: ■ Be sure to follow all warnings and instructions marked on the product. ■ Use only the type of power source indicated on the product label. ■ Use only the power cord that comes with the product. Use of another cord may cause fires or shock. Do not use the cord with any other equipment.
■ Avoid placing the product in locations that are subject to rapid changes in heat or humidity, shocks or vibrations, or dust. Do not place the product near a radiator or heating vent or in direct sunlight. Do not place or store the product outdoors. ■ Keep the product away from potential sources of electromagnetic interference, such as loudspeakers or the base units of cordless phones.
Touch Screen Safety ■ Use only a dry, soft cloth to clean the touch screen. Do not use liquid or chemical cleansers. ■ If the touch screen is damaged, contact Epson. If the liquid crystal solution gets on your hands, wash them thoroughly with soap and water. If the liquid crystal solution gets into your eyes, flush them immediately with water. If discomfort or vision problems remain after a thorough flushing, see a doctor immediately.
Telephone Equipment Safety When using telephone equipment, you should always follow basic safety precautions to reduce the risk of fire, electric shock, and personal injury, including the following: ■ Avoid using a telephone during an electrical storm. There may be a remote risk of electric shock from lightning. ■ Do not use a telephone to report a gas leak in the vicinity of the leak. Caution: To reduce the risk of fire, use only a No. 26 AWG or larger telecommunication line cord.
FCC Compliance Statement For United States Users This equipment complies with Part 68 of the FCC rules and the requirements adopted by the ACTA. On the back side is a label that contains, among other information, the FCC registration number and the ringer equivalence number (REN) for this equipment. You must, upon request, provide this information to your local telephone company. The information associated with the services the equipment is to be connected are REN: 0.1B, Jack type: RJ-11C.
A plug and jack used to connect this equipment to the premises wiring and telephone network must comply with the applicable FCC Part 68 rules and requirements adopted by the ACTA. A compliant telephone cord and modular plug is provided with this product. It is designed to be connected to a compatible modular jack that is also compliant. See installation instructions for details.
WARNING The connection of a non-shielded equipment interface cable to this equipment will invalidate the FCC Certification of this device and may cause interference levels which exceed the limits established by the FCC for this equipment. It is the responsibility of the user to obtain and use a shielded equipment interface cable with this device. If this equipment has more than one interface connector, do not leave cables connected to unused interfaces.
use an address in Canada or the U.S. (excluding Puerto Rico and U.S. Possessions). Shipments to other locations will be made freight collect. You are responsible for securely packaging the defective unit and returning it to Epson within five (5) working days of receipt of the replacement. Epson requires a debit or a credit card number to secure the cost of the replacement printer in the event that you fail to return the defective one.
WARRANTY OR ANY OTHER LEGAL THEORY. IN NO EVENT SHALL EPSON OR ITS AFFILIATES BE LIABLE FOR DAMAGES OF ANY KIND IN EXCESS OF THE ORIGINAL RETAIL PURCHASE PRICE OF THE PRODUCT. In Canada, warranties include both warranties and conditions. Some jurisdictions do not allow limitations on how long an implied warranty lasts, and some jurisdictions do not allow the exclusion or limitation of incidental or consequential damages, so the above limitations and exclusions may not apply to you.
Responsible Use of Copyrighted Materials Epson encourages each user to be responsible and respectful of the copyright laws when using any Epson product. While some countries’ laws permit limited copying or reuse of copyrighted material in certain circumstances, those circumstances may not be as broad as some people assume. Contact your legal advisor for any questions regarding copyright law.
CPD-27981 Printed in XXXXXX