
User`s guide

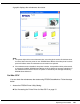
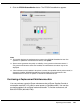
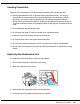
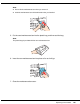
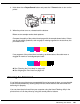

Table Of Contents
- Front Matter
- Contents
- Safety Instructions
- Using Your Software
- Paper Handling
- Basic Printing
- Printing with Special Layout Options
- Using the Control Panel
- Installing Options
- Replacing Consumables
- Maintaining Your Printer
- Using the Printer on a Network
- Troubleshooting
- Where To Get Help
- Product Information
- Operating System Versions
- Index

Maintaining Your Printer 138
3. Access the EPSON Printer Utility3 dialog.
& See “Accessing the Printer Driver for Mac OS X” on page 15.
4. Click the Nozzle Check button in the Utility dialog.
5. Follow the on-screen instructions.
Using the Control Panel (B-500DN)
Follow the steps below to check the print head nozzles using the control panel.
1. Make sure that letter/A4 size paper is loaded in the front paper cassette.
2. Make sure that READY appears on the LCD screen, and then press the r Right button.
Menu appears on the LCD screen.
3. Press the d Down or u Up button to select TEST PRINT, and then press the OK or
r Right button.
4. Press the d Down or u Up button to select NOZZLE CHECK, and then press the OK or
r Right button.
5. Press the OK button to print the nozzle check pattern.
After printing, the cleaning menu appears. If you find a print quality problem, press the
OK button to clean the print head.
Using the Printer Buttons (B-300)
Follow the steps below to check the print head nozzles using the printer buttons.
1. Make sure that no lights are indicating errors.
2. Turn off the printer.
3. Make sure that letter/A4 size paper is loaded in the front paper cassette.