EXPERIMENTAL CLASSROOM Fourth Street Academic Technology Center _________________________________ ITS Student Technology Services Reference Manual
Table of Contents ________________________________________________ General Overview…………………………………………………................ 3 Classroom Set Up and Shut Down………………………………………… Preparing the Classroom at the Start of the Day………………. Restoring the Classroom Between Classes……………………. Turning off the Presentation Wall………………………………… Closing Down the Classroom…………………………………….. 5 5 8 9 11 Gaming………………………..………………………………………………. 12 Using the Microsoft XBox with Display 2………………………………..
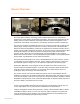
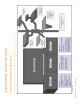
General Overview _______________________________________________ The Fourth Street Academic Technology Centerʼs experimental classroom, (FSATCEC) is designed as an active learning and teaching environment. The technologies integrated into this learning space have been selected to encourage student and instructor engagement, foster collaboration and facilitate a constructivist (constructionist) approach to teaching and learning.
Two round tables located in the center of the classroom provide physical breakout spaces and space for student laptops and the wireless Crestron remote control and the wireless keyboard & mouse. An online Computer Classroom Reservation Form must be submitted to reserve an ITS Student Technology Servicesʼ experimental classroom, http://www.nyu.edu/its/classrooms.
Preparing the Classroom at the Start of the Day Presentation Wall ________________________________________________ Preparing the Classroom at the Start of the Day CLASSROOM SET UP AND SHUT DOWN 5
The lab assistant or lab tech assigned to the MM2 Classroom is in charge of the Library and MM3 as well. The classroom key (MM2) and the library key (CAB 1) are in the same key-chain and must be carried by the person in charge for the duration of the shift. The keys are in the key box behind the front desk. The classroom air conditioner must be turned on at least one hour before the first class of the day to give the classroom sufficient time to cool down.
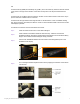
The wireless keyboard and mouse will not turn on if their batteries are out of charge. Batteries are available in Cabinet 6. Place the mouse and keyboard on the work tray on the Presentation Tree. Step 5: The Crestron remote control is mounted on the north wall, to the right of the SmartBoard main display. Undock it and place it on the round table, closer to the Presentation Wall. Step 6: Secure the A/V laptop connectors to the laptop tray. The Mac Pro tower is in Cabinet 8.
Restoring the Classroom Between Classes ________________________________________________ Begin this process 15 minutes before the designated class time. If the room is in use by individual students allow a half hour interval to clear the room and restart the computers. NOTE: If there is less than a 15-minute interval between classes, wait till the class in session leaves and begin this process immediately at the first opportunity.
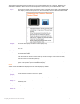
Turning off the Presentation Wall ________________________________________________ Step 1: Step 2: Launch Remote Desktop from dock. Select Classroom from the list on the left. From the list that appears on the right, select all the computers except the MM2 Instructor Computer.
Turn off the wireless keyboard and mouse and place them back in Cabinet 6. Place all the SmartBoard pens and eraser back in Cabinet 6. Step 6: Insert the Crestron remote control back in its designated place on the wall to the right of the Presentation Tree, Step 7: Hit the PWR-OFF button to power off the Crestron. Then tap over ʻYesʼ on the display screen. The “Press to Begin…” screen signals that the Crestron has been turned off.
Closing Down the Classroom _______________________________________________ Step 1: Fold down and cover the document camera. Step 2: Make sure the decks, arms and trays on the Presentation Tree are in their default position. Step 3: Turn off both printers and put on their covers. Step 4: Turn the classroom air conditioners off. Step 5: Turn all classroom lights off. The switch for the lights above the Presentation Wall is located on the back behind the SmartBoard. Turn wall all classroom lights off.
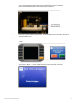
GAMING ________________________________________________________________________________________________ The three gaming consoles are connected to their own display. USING THE MICROSOFT XBOX USING THE MICROSOFT XBOX Step 1: The XBox remote is located in Cabinet 7. A client can check out the XBox remote from Step 1: the TheAcademic XBox remote is located in Cabinet 7. A Library client can check the XBox remote from Technology Centerʼs Lending using theirout NYUCard.
USING THE NINTENDO WII Step 1: The Nintendo Wii is mounted on the Presentation Tree. Step 2: The Wii remote with auxiliary toggle attachments (two parts) are in Cabinet 7. A client can check out the Wii remote from the Academic Technology Centerʼs Lending Library using their NYUCard. Step 3: Press the ROUT VID (Route Video) button on the Crestron. I. II. Step 4: Select Source (Input): Press Aux 1, to select the Wii game console.
USING THE TEAM COMPUTERS ________________________________________________ Display 2 and 3 are connected to an individual workstation each, enabling them to display the workstation that they are connected to. This converts the side displays to team computers allowing for group and collaborative activities. USING TEAM COMPUTER #18 WITH DISPLAY 2: Step 1: If Display 2 is turned off, turn it on. Step 2: Select Input1A by pressing the Input select button on the Display or the Remote Control.
USING TEAM COMPUTER #6 WITH DISPLAY 3: Step 1: If Display 3 is turned off, turn it on. Step 2: Select RGB1 by pressing the Input select button on the Display or the Remote Control. Step 3: Set the Team computer to mirror its Desktop on Display 2. i. Open System Preferences ii. Open the Display pane iii. The resolution is set to 1080p (1920 X 1080) iv. Select the Arrangement tab and select-click the Mirroring option v.
APPENDICES TECHNICAL SPECIFICATIONS ________________________________________ Presentation Wall Apple Mac Pro Tower The Mac Pro controls the Presentation Wallʼs SmartBoard Interactive White Board. It is pre-configured to connect the NYU Network and is customized for presentational use. All the software applications including the SmartBoard tools and devices available to the presenter are installed on this computer.
Wireless Mouse Specifications: Model: A1015 EMC No.: 1938 Batteries: Two rechargeable AA batteries Crestron Remote Control Panel The Crestron Remote Control Panel is mounted on the wall to the right of the Presentation Tree. It controls the video and audio devices available on the Presentation Wall. During a class the Remote Panel is removed from its wall mount and positioned on the Presentation Tree.
Work Tray This work tray is mounted on the Presentation Tree. The articulating arm extends 42” and provides the presenter with a workspace that is adjustable. The extension allows the presenter face both the Presentation Wall and the classroom more easily. Both the laptop tray and work tray can be used in conjunction with each other to create a multi-level work surface. Specifications: Size: 20.5” (W) X 14” (L) A stool is available for sitting.
Student Computer Workstations 27” IMacs Students have access to 25 personal workstations. 7 Sony DSR-11 DV Decks These enable users to digitize DV footage as well as make and copy DV tapes of their edited work.
Supported Media Type: Fil, Plain paper, Transparencies Grayscale Depth: 16-bit (64K gray levels) Color Depth: 48-bit color Optical Resolution: 4800 dpi X 9600 dpi Scan Element Type: CCD Lamp / Light Source Type: Cold Cathode Fluorescent Lamp 25 Headphones Each workstation is supplied with a pair of headphones enabling learners to play sound on their workstations and listen better without disturbing others and the classroom environment.
Appendix 2: Team Computers and Gaming Consoles- Quickstart Guide 22
Appendix III: Controlling Media with the Crestrol Remote Control Panel- Quickstart Guide 23
USING THE CRESTRON REMOTE CONTROL PANEL TO ROUTE AUDIO AND VIDEO _______________________________________ * Route Video (ROUT VID) Adjusts Video Source Destinations. Step Step 1: 1: Press the the ROUT VID VID button. Press ROUT button. Step 2: Step Step 2: 2: Select an Input Source by clicking one one of the or or Select an Input Source by clicking of options, the options, Destination for the selected source. Output Destination for the selected source.
The default setting is the MAC Instructor Computer, directing its sound to All Speakers. You may choose to use all speakers, or pick specific ones, such as Front Speakers or Rear Speakers. For example, you can select the MAC Instructor Computer and direct its sound to the Front Speakers, and also select the connected laptop and direct its sound to the Rear Speakers.