Bluetooth Print Adapter from EPSON ® TM User’s Guide Printed on recycled paper
Copyright Notice All rights reserved. No part of this publication may be reproduced, stored in a retrieval system, or transmitted in any form or by any means, electronic, mechanical, photocopying, recording, or otherwise, without the prior written permission of SEIKO EPSON CORPORATION. The information contained herein is designed only for use with this EPSON product. EPSON is not responsible for any use of this information as applied to other products.
Contents Welcome PDA System Requirements Laptop System Requirements Setting Up the Print Adapter Before You Begin Connecting the Print Adapter Checking the Connection to the Printer Using a Palm PDA Installing the Software Sending Your First Print Job Using a Pocket PC Installing the Software Sending Your First Print Job Using a Laptop Adding a Virtual COM Port Configuring the Printer Driver Printing Problem Solving Where to Get Help Notices FCC Compliance Statement Declaration of Conformity Regulator
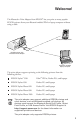
Welcome! ® The BluetoothTM Print Adapter from EPSON lets you print to many popular EPSON printers from your Bluetooth-enabled PDA or laptop computer without using a cable.
This manual provides instructions for setting up the print adapter, installing the Bluetooth printing software to your Bluetooth device, and printing. For information on setting up your printer or installing the printer driver, see your printer documentation. For best results, print text and low-resolution graphics with your print adapter. Because of the speed limitations of Bluetooth wireless communications, high-resolution graphics and photographs may require significant time to print.
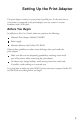
Setting Up the Print Adapter The print adapter connects to your printer’s parallel port. At the same time as your printer is connected to the print adapter, you can connect it to your computer with a USB cable.
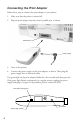
Connecting the Print Adapter Follow these steps to connect the print adapter to your printer: 1. Make sure that the printer is turned off. 2. Plug the print adapter into the printer’s parallel port, as shown. Parallel port Power supply 3. Turn on the printer. 4. Connect the power supply to the print adapter, as shown. Then plug the power supply into an electrical outlet. The green light on the print adapter flashes for a few seconds and then goes out.
Checking the Connection to the Printer Make sure that both the print adapter and the printer are turned on, then press the test button on the print adapter for one second to print a test page. If the test page fails to print, try the following: Make sure the print adapter is securely connected to the printer’s parallel port. Make sure the printer is working and is not out of ink or paper. Unplug the print adapter, plug it back in, and try printing the test page again.
6
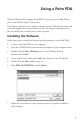
Using a Palm PDA With the Bluetooth Print Adapter from EPSON, you can use your Palm PDA to print to the EPSON Stylus® C80 printer. This chapter explains how to install the software on the CD-ROM that came with your print adapter and send your first print job. The steps for subsequent print jobs are similar, but you won’t have to select a printer. Installing the Software Follow these steps to install the Bluetooth printing software to your Palm PDA: 1. Connect your Palm PDA to your computer. 2.
Sending Your First Print Job Before you begin, make sure your Bluetooth SDIO card is installed in your Palm PDA. Follow these steps to send your first print job: 8 1. Tap the BTPrint C80 icon on your PDA’s main screen. 2. Tap the icon of the program you want to print from. 3. Tap the Menu icon in the lower left corner of your PDA’s graffiti area. You see a drop-down menu similar to the one below.
4. Tap BtPrint. You see this screen: 5. Tap Select Printer. 6. If a printer appears in the list on the next screen, go to step 7. If no printer appears, tap Find More. You briefly see the message Searching for Bluetooth Devices. 7. Select Stylus C80_xxxxxx ( where xxxxxx indicates the last six digits in the printer’s MAC address). Then tap OK. 8. Change any print options you want to, and tap OK to begin printing.
10
Using a Pocket PC You can use your Pocket PC to print to the following printers: EPSON Stylus C60, EPSON Stylus C80 (black and white printing only), EPSON Stylus Photo 820, EPSON Stylus Photo 890, and EPSON Stylus Photo 1280. This chapter explains how to install the software on the CD-ROM that came with your print adapter and send your first print job. The steps for sending subsequent print jobs are similar, but you won’t have to choose a printer unless you want to change it.
Sending Your First Print Job Follow the steps below to print for the first time from a Pocket PC with built-in Bluetooth capabilities. You can also print from a Pocket PC with the Socket Bluetooth Card. Visit the Socket web site at http://www.socketcom.com and select the Bluetooth Connection Kit as your product. Then follow the instructions in the on-screen User’s Guide to connect to the printer and print. 1. Start the Compaq Bluetooth Manager and click Search. Click here 2.
3. Select which groups, if any, you want to save the printer to and click OK. 4. On the next screen, click OK in the upper right side of the screen. 5. Click the printer icon in the All Devices screen.
14 6. In the Device Information screen, select Actions and then select Connect to P1. 7. When you’ve successfully connected to the printer, start PrintPocketCE and select the document you want to print.
8. When you see this screen, choose EPSON Stylus or ESC/P 2 from the Printer list and COM8 from the Port list. Change any other settings you want and click Start Printing. If your Pocket PC has a Socket Bluetooth Card, select Bluetooth: Socket CF Card from the Port list. If you see a message that the serial connection was terminated, click OK. Your job will print.
16
Using a Laptop If your Bluetooth-enabled laptop computer supports the Bluetooth Serial Port Profile, you can use it to print to the following printers: EPSON Stylus C60, EPSON Stylus C80, EPSON Stylus Photo 820, EPSON Stylus Photo 890, and EPSON Stylus Photo 1280. Your laptop may either have built-in Bluetooth capabilities, or a Troy WindPort PCMCIA card.
18 2. Right-click your printer icon, and then select Properties. 3. If you are using Windows XP, 2000, or NT, click the Ports tab. Click the checkbox next to the name of the virtual COM port you created. Click Apply, and then OK.
4. If you are using Windows Me, 98, or 95, click the Details tab. Select the virtual COM port you created. Click Apply and then OK. Printing This section provides general steps for printing. For detailed information, see the documentation that came with your laptop, PCMCIA card, or USB adapter. 1. If necessary, connect to the print adapter using the discovery program provided with your Bluetooth PCMCIA card, USB adapter, or built-in adapter.
When you’re done printing, you may need to break the Bluetooth connection from the host computer to let other people use the printer. See the documentation for your Bluetooth device for details. If you’re having problems printing, see if there is an updated driver for your printer on EPSON’s support site (http://support.epson.com). You can also try printing with the generic ESC/P 2 driver in your Windows software. See your Windows documentation for details.
Problem Solving If you are unable to print, check the following: To verify that you have a connection, make sure that the print adapter’s green light is on. If the light is off, unplug and reconnect the print adapter and try printing again. Make sure that neither the print adapter nor your Bluetooth device is on a metal table or near large metal objects. Also, make sure they are not located near an 802.11b access point. If necessary, move to a different location and try again.
To speak to a technical support representative, dial: U.S.: (562) 276-7500, 6 AM to 8 PM, Pacific Time, Monday through Friday and 7 AM to 4 PM, Saturday Canada: (905) 709-2567, 6 AM to 6 PM, Pacific Time, Monday through Friday Toll or long distance charges may apply.
Notices This chapter includes legal notices and other important information. FCC Compliance Statement For United States Users This equipment has been tested and found to comply within the limits for a Class B digital device pursuant to Part 15 of the FCC Rules. These limits are designed to provide reasonable protection against harmful interference in a residential installation.
Declare under sole responsibility that the product identified herein, complies with 47CFR Part 2 and 15 of the FCC rules as a Class B digital device. Each product marketed is identical to the representative unit tested and found to be compliant with the standards. Records maintained continue to reflect the equipment being produced can be expected to be within the variation accepted, due to quantity production and testing on a statistical basis as required by 47CFR §2.909.