C68 Quick Guide.
C68 Quick Guide.book Page 2 Wednesday, June 8, 2005 3:21 PM Contents Introduction . . . . . . . . . . . . . . . . . . . . . . . . . . . . . . . . . . . . . . . . . . . . 3 Loading Paper . . . . . . . . . . . . . . . . . . . . . . . . . . . . . . . . . . . . . . . . . . 4 Basic Printing . . . . . . . . . . . . . . . . . . . . . . . . . . . . . . . . . . . . . . . . . . . 6 Printing in Windows . . . . . . . . . . . . . . . . . . . . . . . . . . . . . . . . . . . . . . . . . 6 Printing in Macintosh OS X . . .
C68 Quick Guide.book Page 3 Wednesday, June 8, 2005 3:21 PM Introduction The Epson Stylus® C68 printer is the ideal desktop printer for business and home use. With its exceptional speed and print resolutions, it is practical for everyday use, yet capable of delivering superior photo printing. The Stylus C68 provides you with Epson’s exclusive DURABrite® Ultra inks. These quick-drying inks are resistant to water and fading, so prints stand the test of time.
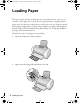
C68 Quick Guide.book Page 4 Wednesday, June 8, 2005 3:21 PM Loading Paper The type of paper you choose affects the way your printout looks, so be sure to select the correct paper for your job. If you are just printing a rough draft, plain paper is fine. For the best results however, you’ll want to use one of Epson’s special ink jet papers designed for your printer. For example, your photos will look great printed on Epson Ultra Premium Glossy Photo Paper.
C68 Quick Guide.book Page 5 Wednesday, June 8, 2005 3:21 PM 3. Insert the paper, printable side up, against the right edge guide. Then slide the left edge guide against the left edge of the paper (but not too tightly). Letter-size paper 4 × 6-inch or 5 × 7-inch paper Note: You can load up to 100 sheets of plain paper and up to 20 sheets of most types of photo paper. (See the on-screen User’s Guide for specific paper capacity guidelines.
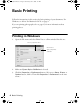
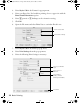
C68 Quick Guide.book Page 6 Wednesday, June 8, 2005 3:21 PM Basic Printing Follow the instructions in this section for basic printing of your documents. For Windows, see below. For Macintosh OS X, see page 9. If you are printing photographs, also see page 15 for more information about printing photos. Printing in Windows 1. Open the File menu and select Print. You see a Print window like this one: Select your printer here Click here to open your printer software 2.
C68 Quick Guide.book Page 7 Wednesday, June 8, 2005 3:21 PM You see the basic print settings window: Select the type of document you’re printing Select your paper Type Select your paper Size Select your document or image orientation Click here for more options 4.
C68 Quick Guide.book Page 8 Wednesday, June 8, 2005 3:21 PM 7. For more printing options, click the Advanced button. Then select the following settings as necessary.
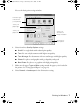
C68 Quick Guide.book Page 9 Wednesday, June 8, 2005 3:21 PM During printing, this window appears and shows the progress of your print job. You can use the buttons to cancel, pause, or resume printing. You can also see how much ink you have left. Cancel printing Pause or resume printing Check remaining ink levels Tip: You can also cancel printing by pressing the paper button on your printer. Printing in Macintosh OS X Follow the steps below for basic printing of your Macintosh OS X documents.
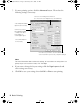
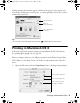
C68 Quick Guide.book Page 10 Wednesday, June 8, 2005 3:21 PM 2. Select Stylus C68 in the Format for pop-up menu. 3. Select your Paper Size. For borderless printing, choose a paper size with the Sheet Feeder-Borderless option. 4. Select portrait or landscape as the orientation setting. 5. Click OK. 6. Open the File menu and select Print. You see a window like this one: Select Stylus C68 Select Print Settings 7. Select Stylus C68 in the Printer pop-up menu. 8. Select Print Settings from the pop-up menu.
C68 Quick Guide.book Page 11 Wednesday, June 8, 2005 3:21 PM Depending on your settings, you can choose these other options from the pop-up menu: ■ Copies & Pages: Select the number of copies you want, or a page range. ■ Layout: Select page layout options. ■ Output Options: Save your print job as a PDF file. ■ Scheduler: Schedule your print job to print at a later time. ■ Paper Handling: Select page printing options, such as Reverse print order.
C68 Quick Guide.book Page 12 Wednesday, June 8, 2005 3:21 PM 12. To monitor the progress of your print job, click the appears in the dock on the bottom of your desktop. printer icon when it If you’re using OS X 10.2.x, click the Print Center icon instead, then double-click Stylus C68 in the Printer List window. You see a screen like this: Pause printing Resume printing Cancel printing Select the print job Tip: You can also cancel printing by pressing the paper button on your printer. 13.
C68 Quick Guide.book Page 13 Wednesday, June 8, 2005 3:21 PM Using Special Papers You can use the following special Epson papers in your Stylus C68: Paper name Size Part number Epson Ultra Premium Glossy Photo Paper Borderless 4 × 6 inches S041934 Letter (8.5 × 11 inches) S041935 Epson Premium Bright White Paper Letter (8.
C68 Quick Guide.
C68 Quick Guide.book Page 15 Wednesday, June 8, 2005 3:21 PM Printing Photos You can print beautiful snapshots and enlargements with or without white borders. With proper care, photographs from your Epson Stylus printer will last for many years. The special Epson DURABrite Ultra inks designed for your printer are formulated to achieve improved lightfastness when used with Epson papers for prints that are properly displayed or stored. For best results, always use Epson papers.
C68 Quick Guide.book Page 16 Wednesday, June 8, 2005 3:21 PM You see a window like this one: Select Photo or Best Photo Click there for photos without white borders 3. Select Photo or Best Photo as the Quality Option setting. 4. Select one of the following for the paper Type option, to match the paper you’re using: ■ Premium Glossy Photo Paper ■ Premium Semigloss Photo Paper ■ Ultra Premium Glossy Photo Paper ■ Matte Paper - Heavyweight ■ Glossy Photo Paper 5.
C68 Quick Guide.book Page 17 Wednesday, June 8, 2005 3:21 PM Customizing Your Photo Settings 1. On the Main tab, click the Advanced button in the bottom right corner of the window. If you see a warning note, click Continue. 2.
C68 Quick Guide.book Page 18 Wednesday, June 8, 2005 3:21 PM 4. Select the following page layout settings as necessary: Select image position options here Select image resizing options here Select borderless setting here (see step 6, below Note: Some layout settings may not be available, depending on other settings you choose. 5. Select image position or resizing options as necessary. These affect only your printed image, and are not available for borderless printing. 6.
C68 Quick Guide.book Page 19 Wednesday, June 8, 2005 3:21 PM Printing Photos in Macintosh OS X 1. Open the File menu and select Page Setup. You see a window like this one: Select Stylus C68 Select your Paper Size 2. Select Stylus C68 in the Format for pop-up menu. 3. Select your Paper Size. For borderless photos, choose one of the following: ■ 4 × 6 (Sheet Feeder - Borderless) ■ 5 × 7 (Sheet Feeder - Borderless) ■ 8 × 10 (Sheet Feeder - Borderless) ■ US Letter (Sheet Feeder - Borderless) 4.
C68 Quick Guide.book Page 20 Wednesday, June 8, 2005 3:21 PM 8. Select Print Settings from the pop-up menu. You see a window like this one: Select Stylus C68 Select Print Settings 9. Select one of the following Media Types to match the paper you’re using: ■ Premium Glossy Photo Paper ■ Premium Semigloss Photo Paper ■ Ultra Premium Glossy Photo Paper ■ Matte Paper - Heavyweight ■ Glossy Photo Paper 10. Select Quality (for higher quality) or Speed (for faster printing) using the slider. 11.
C68 Quick Guide.book Page 21 Wednesday, June 8, 2005 3:21 PM Customizing Your Photo Settings 1. Click Advanced. 2. Select these settings as necessary: For color management settings, select Color Management from the pop-up menu Click here to select Photo RPM (5760 × 720) for the best print quality on certain paper types Select various print options here Note: When you select Photo RPM for the highest print quality, printing will take longer.
C68 Quick Guide.book Page 22 Wednesday, June 8, 2005 3:21 PM 4. If necessary, adjust the Expansion slider to choose Min, Max, or the in-between setting. Min is the least amount of image expansion, but there may be a small white edge on the borders of the print. Max expands the image to ensure that there are no unprinted edges, but the edges of the image may not appear in the print. 5. Click Print.
C68 Quick Guide.book Page 23 Wednesday, June 8, 2005 3:21 PM Replacing Ink Cartridges When the red ink light flashes, one or more ink cartridges are low on ink. When the red ink light stays on, you need to replace the cartridge(s). When you print, you’ll also see a message on your screen telling you which cartridge is low or empty. When a cartridge is more than six months old, you may need to replace it if printouts don’t look their best.
C68 Quick Guide.book Page 24 Wednesday, June 8, 2005 3:21 PM Ink Cartridge Precautions Warning: Keep ink cartridges out of the reach of children, and don’t drink the ink. If ink gets on your hands, wash them thoroughly with soap and water. If ink gets in your eyes, flush them immediately with water. Caution: Don’t remove the cartridge label, or ink will leak. Don’t remove the green IC chip from the cartridge. Installing a cartridge without an IC chip can damage the printer.
C68 Quick Guide.book Page 25 Wednesday, June 8, 2005 3:21 PM The ink cartridge holder moves to the left, and the cartridge that needs to be replaced stops under the ink out mark. The power light begins to flash. Caution: To avoid damaging the printer, never move the print head by hand. Note: Don’t hold down the ink button for more than 2 seconds, or the printer will start to clean the print head. 3. Press the ink button again.
C68 Quick Guide.book Page 26 Wednesday, June 8, 2005 3:21 PM 4. Open the cartridge cover. Squeeze the back tab of the empty cartridge as you lift it out of the printer. Don’t take the used cartridge apart or try to refill it. Warning: If ink gets on your hands, wash them thoroughly with soap and water. If ink gets into your eyes, flush them immediately with water. 5. Before you remove the new cartridge from its package, shake it four or five times. Then remove it from the package.
C68 Quick Guide.book Page 27 Wednesday, June 8, 2005 3:21 PM 6. Lower it into the holder. Push down gently until the cartridge is firmly seated. 7. If you need to replace other ink cartridges, repeat steps 5 and 6 before continuing with step 8. 8. Close the cartridge cover. 9. Close the printer cover and press the charging the ink delivery system. ink button.
C68 Quick Guide.book Page 28 Wednesday, June 8, 2005 3:21 PM The green power light flashes and the printer makes noise. Charging takes about half a minute. When it’s finished, the green power light stops flashing and stays on, and the red light goes out. Caution: power light is flashing, unless the Never turn off the printer while the green printer hasn’t moved or made noise for more than 5 minutes.
C68 Quick Guide.book Page 29 Wednesday, June 8, 2005 3:21 PM Solving Problems If you have a problem with your Epson Stylus C68, check the printer’s lights (as described below) to diagnose what may be causing it. You can also try “Problems and Solutions” on page 30 for basic troubleshooting suggestions, or see your on-screen User’s Guide for more detailed help. If you cannot solve the problem, see “Where To Get Help” on page 32.
C68 Quick Guide.book Page 30 Wednesday, June 8, 2005 3:21 PM Lights Explanation Red paper light and red ink light flash and green power light is off Paper may be blocking movement of the print head. Turn off the printer, then open the cover and remove any jammed paper or other foreign objects. Turn the printer back on. If the lights are still on, contact Epson as described on page 32. Green power light is off; red paper light and red ink light flashes (quickly) The printer may have an internal error.
C68 Quick Guide.book Page 31 Wednesday, June 8, 2005 3:21 PM Macintosh OS X: Open the Applications folder and select Epson Printer Utility. Select C68 Series in the printer list, click OK, and select Head Cleaning. 3. Click Start or Next. Cleaning takes several seconds. The printer runs a head cleaning cycle and the power light flashes. Caution: Never turn off the printer while head cleaning is in progress. You may damage the printer. 4.
C68 Quick Guide.book Page 32 Wednesday, June 8, 2005 3:21 PM ■ If paper jams, press the paper button for several seconds to clear the jam. If that doesn’t work, open the cover and pull the paper out from the front, including small pieces that may have torn off. Reload the paper and press the paper button. ■ Heavily saturated prints may curl, causing a paper jam when printing on both sides of the paper. ■ Make sure you use new, smooth, high-quality paper, loaded printable side up.
C68 Quick Guide.book Page 33 Wednesday, June 8, 2005 3:21 PM Please have the following information ready: ■ Product name (Epson Stylus C68) ■ Product serial number (located on the back of the printer) ■ Proof of purchase (such as a store receipt) and date of purchase ■ Computer configuration and operating system version ■ Description of the problem You can purchase genuine Epson ink and paper from an authorized Epson reseller. To find the nearest reseller, please call 800-GO-EPSON (800-463-7766).
C68 Quick Guide.
C68 Quick Guide.book Page 35 Wednesday, June 8, 2005 3:21 PM Important Safety Instructions Before using your printer, read these safety instructions to make sure you use it safely and effectively: ■ Be sure to follow all warnings and instructions marked on the printer. ■ Use only the type of power source indicated on the printer’s label. ■ Connect all equipment to properly grounded power outlets.
C68 Quick Guide.book Page 36 Wednesday, June 8, 2005 3:21 PM ■ Unplug the printer and refer servicing to qualified service personnel under the following conditions: If the power cord or plug is damaged; if liquid has entered the printer; if the printer has been dropped or the case damaged; if the printer does not operate normally or exhibits a distinct change in performance. Adjust only those controls that are covered by the operating instructions.
C68 Quick Guide.book Page 37 Wednesday, June 8, 2005 3:21 PM FCC Compliance Statement For United States Users This equipment has been tested and found to comply with the limits for a Class B digital device, pursuant to Part 15 of the FCC Rules. These limits are designed to provide reasonable protection against harmful interference in a residential installation.
C68 Quick Guide.book Page 38 Wednesday, June 8, 2005 3:21 PM Declaration of Conformity According to 47CFR, Part 2 and 15 for Class B Personal Computers and Peripherals; and/ or CPU Boards and Power Supplies used with Class B Personal Computers: We: Epson America, Inc.
C68 Quick Guide.book Page 39 Wednesday, June 8, 2005 3:21 PM Epson America, Inc. Limited Warranty What Is Covered: Epson America, Inc. (“Epson”) warrants to the original retail purchaser that the Epson printer covered by this limited warranty statement, if purchased and operated only in the United States or Canada, conforms to the manufacturer’s specifications and will be free from defects in workmanship and materials for a period of one (1) year from the date of original purchase.
C68 Quick Guide.book Page 40 Wednesday, June 8, 2005 3:21 PM label or serial number be removed or should the product fail to be properly maintained or fail to function properly as a result of misuse, abuse, improper installation, neglect, improper shipping, damage caused by disasters such as fire, flood, and lightning, improper electrical current, software problems, interaction with non-Epson products, or service other than by an Epson Authorized Servicer.
C68 Quick Guide.book Page 41 Wednesday, June 8, 2005 3:21 PM Copyright Notice All rights reserved. No part of this publication may be reproduced, stored in a retrieval system, or transmitted in any form or by any means, electronic, mechanical, photocopying, recording, or otherwise, without the prior written permission of Seiko Epson Corporation. The information contained herein is designed only for use with this Epson product.
C68 Quick Guide.
C68 Quick Guide.
C68 Quick Guide.book Page 44 Wednesday, June 8, 2005 3:21 PM CPD-19656 Printed in XXXXXX XX.