User’s Guide NPD4894-03 EN
User’s Guide Copyright and Trademarks Copyright and Trademarks Copyright and Trademarks No part of this publication may be reproduced, stored in a retrieval system, or transmitted in any form or by any means, electronic, mechanical, photocopying, recording, or otherwise, without the prior written permission of Seiko Epson Corporation. No patent liability is assumed with respect to the use of the information contained herein.
User’s Guide Contents Contents Basic printing. . . . . . . . . . . . . . . . . . . . . . . . . Canceling printing. . . . . . . . . . . . . . . . . . . . . Other Options. . . . . . . . . . . . . . . . . . . . . . . . . . Printing photos the easy way. . . . . . . . . . . . . . Product presets (For Windows Only). . . . . . . . 2-sided printing. . . . . . . . . . . . . . . . . . . . . . . Fit to page printing. . . . . . . . . . . . . . . . . . . . . Pages per Sheet printing. . . . . . . . . . . . . . . . .
User’s Guide Contents Removing jammed paper from inside the product. . . . . . . . . . . . . . . . . . . . . . . . . . . . . . 87 Removing jammed paper from the paper cassette. . . . . . . . . . . . . . . . . . . . . . . . . . . . . . . 88 Preventing paper jams. . . . . . . . . . . . . . . . . . . . 90 Reprinting after a paper jam (for Windows only). . . . . . . . . . . . . . . . . . . . . . . . . . . . . . . . 90 Print Quality Help. . . . . . . . . . . . . . . . . . . . . . . . . 91 Horizontal banding. .
User’s Guide Contents Where To Get Help Technical Support Web Site. . . . . . . . . . . . . Contacting Epson Support. . . . . . . . . . . . . . Before Contacting Epson. . . . . . . . . . . . . Help for Users in Europe. . . . . . . . . . . . . . . . . . . . . . . . . . 106 . 106 . 106 .
User’s Guide Introduction Introduction Where to Find Information The latest version of the following manuals are available on the Epson support website. http://www.epson.eu/Support (Europe) http://support.epson.net/ (outside Europe) ❏ Start Here (paper): Provides you with an introduction to the product and services. ❏ Important Safety Instructions (paper): Provides you with instructions to ensure the safe use of this product. This manual may not be included depending on model and region.
User’s Guide Introduction Operating System Versions In this manual, the following abbreviations are used. ❏ Windows 8 refers to Windows 8, Windows 8 Pro, Windows 8 Enterprise. ❏ Windows 7 refers to Windows 7 Home Basic, Windows 7 Home Premium, Windows 7 Professional, and Windows 7 Ultimate. ❏ Windows Vista refers to Windows Vista Home Basic Edition, Windows Vista Home Premium Edition, Windows Vista Business Edition, Windows Vista Enterprise Edition, and Windows Vista Ultimate Edition.
User’s Guide Introduction Note: You can make network service settings using a Web browser on your computer, smartphone, tablet PC, or laptop that is connected to the same network as the product.
User’s Guide Important Instructions Important Instructions Safety Instructions Read and follow these instructions to ensure safe use of this product. Make sure you keep this guide for future reference. Also, be sure to follow all warnings and instructions marked on the product. ❏ Use only the power cord supplied with the product and do not use the cord with any other equipment.
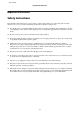
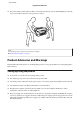
User’s Guide Important Instructions ❏ The product is heavy and should not be lifted or carried by fewer than two persons. When lifting the product, the two persons should assume the correct positions (see below). Note: The following provides safety instructions for ink cartridges. & “Replacing Ink Cartridges” on page 52 Product Advisories and Warnings Read and follow these instructions to avoid damaging the product or your property. Make sure you keep this guide for future reference.
User’s Guide Important Instructions ❏ If you use an extension cord with the product, make sure that the total ampere rating of the devices plugged into the extension cord does not exceed the cord’s ampere rating. Also, make sure that the total ampere rating of all devices plugged into the wall outlet does not exceed the wall outlet’s ampere rating.
User’s Guide Important Instructions Using the LCD screen ❏ The LCD screen may contain a few small bright or dark spots, and because of its features it may have an uneven brightness. These are normal and do not indicate that it is damaged in any way. ❏ Only use a dry, soft cloth to clean the LCD screen or touchscreen. Do not use liquid or chemical cleaners. ❏ The exterior cover of the LCD screen could break if it receives a heavy impact.
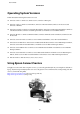
User’s Guide Getting to Know Your Product Getting to Know Your Product Product Parts a. Edge guides b. Rear paper feed slot c. Control panel d. Output tray e. Output tray extension f. Stopper g. Edge guides h. Paper cassette i. Paper cassette cover a. Printer cover b. Paper cassette 1 c.
User’s Guide Getting to Know Your Product d. Print head (under the ink cartridge holder) e. Ink cartridge holder f. Ink cartridge cover a. Maintenance box b. Rear cover 1 c. Rear cover 2 d. AC inlet e. LAN port f. USB connector Guide to the Control Panel Buttons/Lights a b P Function Turns the product on or off. The power light turns on when the product is on. Flashes when the product is printing, replacing an ink cartridge, charging ink, or cleaning the print head.
User’s Guide Getting to Know Your Product Buttons/Lights Error The orange light on the left turns on or flashes when an error occurs. Data The blue light on the right flashes while the product is processing data. It stays on when there are print jobs waiting to be processed. c d Function - LCD screen displays menus. Cancels/returns to the previous menu. e f l, u, r, d, OK g y Press l, u, r, d to select menus. Press OK to confirm your selection and go to next screen.
User’s Guide Paper and Media Handling Paper and Media Handling Introduction to Using, Loading, and Storing Media You can achieve good results with most types of plain paper. However, coated papers provide superior prints because they absorb less ink. Epson provides special papers that are formulated for the ink used in Epson ink jet products, and recommends these papers to ensure high-quality results.
User’s Guide Paper and Media Handling Loading capacity (sheets or height) Media Type Size paper cassette 1 paper cassette 2*1 Borderless printing rear paper feed slot 2-sided printing A3 27.5 mm*3 27.5 mm*3 1 - ✓ B4 27.5 mm*3 27.5 mm*3 1 - ✓ Legal 27.5 mm*3 27.5 mm*3 1 - ✓ Letter 27.5 mm*3 27.5 mm*3 1 - ✓ A4 27.5 mm*3 27.5 mm*3 1 - ✓ B5 27.5 mm*3 27.5 mm*3 1 - ✓ A5 27.5 mm*3 - 1 - ✓ A6 27.
User’s Guide Paper and Media Handling Loading capacity (sheets or height) Media Type Epson Matte Paper Heavyweight Epson Premium Glossy Photo Paper Epson Premium Semigloss Photo Paper Epson Ultra Glossy Photo Paper Epson Photo Paper, Glossy Size paper cassette 1 paper cassette 2*1 rear paper feed slot Borderless printing 2-sided printing A3+ 20 - 1 ✓ - A3 20 - 1 ✓ - A4 20 - 1 ✓ - A3+ 20 - 1 ✓ - A3 20 - 1 ✓ - A4 20 - 1 ✓ - 10 × 15 cm (4 × 6 in.
User’s Guide Paper and Media Handling Note: The availability of paper varies by location. Paper type settings on the LCD screen The product automatically adjusts itself for the type of paper you select in your print settings. That is why the paper type setting is so important. It tells your product what kind of paper you are using and adjusts the ink coverage accordingly. The table below lists the settings you should choose for your paper.
User’s Guide Paper and Media Handling For this paper Printer driver paper type Colored paper Color Recycled paper Recycled Epson Ultra Glossy Photo Paper Epson Ultra Glossy Epson Premium Glossy Photo Paper Epson Premium Glossy Epson Premium Semigloss Photo Paper Epson Premium Semigloss Epson Photo Paper, Glossy Photo Paper Glossy Epson Matte Paper – Heavyweight Epson Matte Thick paper Thick-Paper Epson Photo Quality Ink Jet Paper Epson Matte Envelopes Envelope Note: The availability o
User’s Guide Paper and Media Handling C Pinch and slide the edge guides to the sides of the paper cassette. Note: When using paper larger than A4, extend the paper cassette to the symbol on the cassette. D Slide the edge guide to adjust to the paper size you will use.
User’s Guide Paper and Media Handling E Load paper toward the edge guide with printable side face down, and check that the paper is not sticking out from the end of the cassette. Note: ❏ Paper cassette 2 supports paper B5 or larger only. ❏ Fan and align the edges of the paper before loading.
User’s Guide Paper and Media Handling F Slide the edge guides to the edges of the paper. Note: For plain paper, do not load paper above the H arrow mark inside the edge guide. For Epson special media, make sure the number of sheets is less than the limit specified for the media. & “Selecting Paper” on page 16 G Put the paper cassette cover back on.
User’s Guide Paper and Media Handling H Keep the cassette flat and slowly and carefully reinsert it all the way into the product. Note: When you insert the paper cassette, the screen for making paper size and paper type settings is automatically displayed. Make sure the paper settings match the paper you have loaded. I Slide out the output tray and raise the stopper.
User’s Guide Paper and Media Handling A Pull the paper cassette 1 all the way out. B Remove the cover. C Pinch and slide the edge guides to the sides of the paper cassette. D Load envelopes lengthwise with the flap facing up and to the right. Note: Make sure the number of envelopes does not exceed the limit.
User’s Guide Paper and Media Handling E Slide the edge guides to the edges of the envelopes and check that the envelopes are not sticking out from the end of the cassette. Note: Even if you do not feel a click, slide the edge guides to the edges of the envelopes. F Put the paper cassette cover back on. G Keep the cassette flat and slowly and carefully reinsert it all the way into the product.
User’s Guide Paper and Media Handling H Slide out the output tray and raise the stopper. Note: ❏ The thickness of envelopes and their ability to fold vary widely. If the total thickness of the stack of envelopes exceeds 10mm, press down on the envelopes to flatten them before loading. If print quality declines when a stack of envelopes is loaded, load one envelope at a time. ❏ Do not use envelopes that are curled or folded. ❏ Flatten the envelope and the flaps before loading.
User’s Guide Paper and Media Handling A Slide out the output tray, and raise the stopper. B Open the rear paper feed slot. C While holding only one sheet of paper with the printable side face-up at the center of the rear paper feed slot, slide the edge guides until they are flush with the edges of the paper. Note: The printable side is often whiter or brighter than the other side. D Insert the paper into the rear paper feed slot. The paper is automatically fed.
User’s Guide Paper and Media Handling Note: ❏ When loading envelopes, load the short edge first with the flap facing down. ❏ Do not use envelopes that are curled or folded. ❏ Flatten the envelope and the flaps before loading. ❏ Flatten the leading edge of the envelope before loading. ❏ Avoid using envelopes that are too thin, as they may curl during printing. Note for paper with binding holes: ❏ You can use pre-punched paper with binding holes on one of the long edges.
User’s Guide Printing Printing Printing from Your Computer Printer Driver and Status Monitor The printer driver lets you choose from a wide variety of settings to get the best printing results. The status monitor and the printer utilities help you check the product and keep it in top operating condition. Note for Windows users: ❏ Your printer driver automatically finds and installs the latest version of the printer driver from Epson’s Web site.
User’s Guide Printing ❏ Windows 7 and Server 2008 R2: Click the start button, select Devices and Printers. Then right-click the product and select Printing preferences. ❏ Windows Vista and Server 2008: Click the start button, select Control Panel, and then select Printer from the Hardware and Sound category. Then select the product and then click Select printing preferences. ❏ Windows XP and Server 2003: Click Start, Control Panel, (Printers and Other Hardware,) then Printers and Faxes.
User’s Guide Printing Basic Operations Basic printing Follow the steps below to print from your computer. If you cannot change some of the printer driver settings, they may have been locked by the administrator. Contact your administrator or a power user for assistance. Note: ❏ The screen shots in this manual may vary depending on the model. ❏ Before you print, load paper properly.
User’s Guide Printing C Click the Main tab. D Select the appropriate Paper Source setting. E Select the appropriate Document Size setting. You can also define a custom paper size. For details, see the online help. F Check Borderless to print borderless photos.
User’s Guide Printing A Open the file you want to print. B Access the Print dialog box. & “Accessing the printer driver for Mac OS X” on page 31 Note: If the simplified dialog box is displayed, click the Show Details button (for Mac OS X 10.8 or 10.7) or the d button (for Mac OS X 10.6 or 10.5.8) to extend this dialog box. C Select the product you are using as the Printer setting. Note: Depending on your application, you may not be able to select some of the items in this dialog box.
User’s Guide Printing F Select Print Settings from the pop-up menu. G Select the appropriate Paper Source setting. H Select the appropriate Media Type setting. & “Paper type settings from the printer driver” on page 19 I Select the appropriate Print Quality setting. Note: If you are printing high-density data on plain paper, letterhead, or preprinted paper, select Standard-Vivid to make your printout vivid.
User’s Guide Printing For Windows Note: You cannot cancel a print job that has been completely sent to the product. In this case, cancel the print job by using the product. A Access the EPSON Status Monitor 3. & “For Windows” on page 81 B Click the Print Queue button. The Windows Spooler appears. C Right-click on the job you want to cancel and then select Cancel. For Mac OS X Follow the steps below to cancel a print job. Note: If you have sent a print job from a Mac OS X 10.6 or 10.5.
User’s Guide Printing For Mac OS X 10.8: Click the button to cancel the print job. Other Options Printing photos the easy way Epson Easy Photo Print lets you lay out and print digital images on various types of paper. The step-by-step instructions in the window let you preview the printed images and get the effects you want without having to make any difficult settings. Using the Quick Print function, you can perform one-click printing with the settings you make.
User’s Guide Printing ❏ For Windows 8: Enter "Epson Easy Photo Print" at the search charm, and select the software. For Windows 7 and Vista: Click the start button, point to All Programs, click Epson Software, and then click Easy Photo Print. For Windows XP: Click Start, point to All Programs, point to Epson Software, then click Easy Photo Print.
User’s Guide Printing Note: ❏ This feature may not be available at some settings. ❏ The loading capacity differs during 2-sided printing. & “Selecting Paper” on page 16 ❏ Only use papers that are suitable for 2-sided printing. Otherwise, the printout quality may deteriorate. & “Selecting Paper” on page 16 ❏ Manual 2-sided printing may not be available when the product is accessed over a network or is used as a shared printer.
User’s Guide Printing D Check the other settings and print. Note: ❏ When printing automatically, and if you are printing high-density data such as photos or graphs, we recommend making the settings in the Print Density Adjustment window. ❏ The actual binding margin may be different from the specified settings depending on your application. Experiment with a few sheets to examine actual results before printing the entire job. ❏ Manual 2-sided printing allows you to print the even-numbered pages first.
User’s Guide Printing Product settings for Windows A Access the printer settings. & “Accessing the printer driver for Windows” on page 30 B Select Reduce/Enlarge Document and Fit to Page in the More Options tab, and then select the size of the paper you are using from Output Paper. Note: If you want to print a reduced image with centering, select Center. C Check the other settings and print. Product settings for Mac OS X A Access the Print dialog box.
User’s Guide Printing Product settings for Windows A Access the printer settings. & “Accessing the printer driver for Windows” on page 30 B Select 2-Up or 4-Up as Multi-Page in the Main tab. C Click Page Order, and make the appropriate settings. D Check the other settings and print. Product settings for Mac OS X A Access the Print dialog box.
User’s Guide Printing B Click Watermark Features on the More Options tab, and then select an Anti-Copy Pattern from the Anti-Copy Pattern list. Note: ❏ This feature is available only with the following settings selected. Paper Type: plain papers Quality: Standard Auto 2-Sided Printing: Off Borderless: Off Color Correction: Automatic Short Grain Paper: Off ❏ C If you want to create your own watermark, click Add/Delete. For more details about each setting, see the online help.
User’s Guide Printing B Click Watermark Features on the More Options tab, and then select a watermark from the Watermark list. Note: ❏ If you want to create your own watermark, click Add/Delete. For more details about each setting, see the online help. ❏ Saved watermarks can only be used with the printer driver in which you saved the settings. Even if multiple printer names are set for a printer driver, the settings are only available for the printer name in which you saved the settings.
User’s Guide Printing D Click OK to return to the More Options window. E Click OK to close the printer settings window and print. Administrator Settings for Printer Driver (for Windows Only) Administrators can lock the following printer driver settings for each user to prevent unintended changes of the settings. ❏ Anti-Copy Pattern ❏ Watermark ❏ Header/Footer ❏ Color ❏ 2-sided printing ❏ Multi-Page Note: You need to logon as an administrator in Windows.
User’s Guide Printing C Make the appropriate settings. For more details about each setting, see the online help. D Click OK.
User’s Guide Menu List of Control Panel Menu List of Control Panel The table below shows the functions and settings available from the Menu on the control panel. See the following section for details on the Wi-Fi Setup displayed on the Home screen. & “System Administration Settings” on page 48 Menu Settings Description Ink Levels Checks the status of ink cartridges and the maintenance box. Maintenance Print Head Nozzle Check Prints a pattern to check if the print head nozzles are clogged.
User’s Guide Menu List of Control Panel System Administration Settings The administrator can lock the control panel to prevent unintended changes from being made. To lock the control panel, select the menus as shown below, then enter the password. Menu > Admin Settings > Lock Setting > On The password is required when entering the System Administration settings in Menu. The password set in Lock Setting is also necessary when making settings in Epson WebConfig or EpsonNet Config.
User’s Guide Menu List of Control Panel Menu Settings and Description Wi-Fi/Network Settings Wi-Fi/Network Status Wi-Fi Setup You can see the current network settings and print a networks status sheet. Wi-Fi Setup Wizard For details on the setting items, see the online Network Guide.
User’s Guide Menu List of Control Panel Menu Settings and Description Restore Default Settings Resets the selected settings to their defaults.
User’s Guide Ink Cartridge and Consumable Information Ink Cartridge and Consumable Information Ink Cartridges You can use the following ink cartridges with this product: Icon Black Cyan Magenta Yellow 27 27XL 27XXL 27 27XL 27 27XL 27 27XL Alarm Clock * For information on Epson’s ink cartridge yields, visit the following website. http://www.epson.eu/pageyield Note: Not all cartridges are available in all regions.
User’s Guide Replacing Ink Cartridges Replacing Ink Cartridges Ink Cartridge Safety Instructions, Precautions, and Specifications Safety instructions Observe the following when handling the ink cartridges: ❏ Keep ink cartridges out of the reach of children. ❏ Be careful when you handle used ink cartridges, as there may be some ink around the ink supply port. If ink gets on your skin, wash the area thoroughly with soap and water. If ink gets into your eyes, flush them immediately with water.
User’s Guide Replacing Ink Cartridges ❏ Do not touch the green chip or the small window on the side of the cartridge. Doing so may prevent normal operation and printing. ❏ Do not leave the product with the ink cartridges removed or do not turn off the product during cartridge replacement. Otherwise, ink remaining in the print head nozzles will dry out and you may not be able to print.
User’s Guide Replacing Ink Cartridges ❏ When color ink is expended and black ink still remains, you can continue printing temporarily with black ink only. For more information refer to “Temporary Printing with Black Ink When Color Ink Cartridges are Expended” on page 57. ❏ If an ink cartridge is running low, prepare a new ink cartridge. ❏ Be careful not to break the hooks on the side of the ink cartridge when you remove it from the package.
User’s Guide Replacing Ink Cartridges To check the ink cartridge status, do one of the following: ❏ Open the printer driver, click the Main tab, and then click the Ink Levels button. ❏ Double-click the product shortcut icon on your Windows taskbar. To add a shortcut icon to the taskbar, see the following section: & “From the shortcut icon on the taskbar” on page 31 ❏ Open the printer driver, click the Maintenance tab, then click the EPSON Status Monitor 3 button.
User’s Guide Replacing Ink Cartridges B Click the EPSON Status Monitor icon. The EPSON Status Monitor appears. Note: ❏ The graphic displays the ink cartridge status when EPSON Status Monitor was first opened. To update the ink cartridge status, click Update. ❏ The ink levels displayed are an approximate indication. Using the control panel A Enter Menu from the Home screen. B Select Ink Levels. Note: ❏ The ink levels displayed are an approximate indication.
User’s Guide Replacing Ink Cartridges Temporary Printing with Black Ink When Color Ink Cartridges are Expended When color ink is expended and black ink still remains, you can continue printing for a short time using only black ink. However, you should replace the expended ink cartridge(s) as soon as possible. See the following section to continue printing temporarily with black ink.
User’s Guide Replacing Ink Cartridges A When EPSON Status Monitor 3 tells you to cancel your print job, click Cancel or Cancel Print to cancel your print job. Note: If the error stating that a color ink cartridge is expended originates with another computer on the network, you may need to cancel the print job at the product. B Load plain paper or envelope. C Access the printer settings. & “Accessing the printer driver for Windows” on page 30 D Click the Main tab, and make suitable settings.
User’s Guide Replacing Ink Cartridges H Print your file. I EPSON Status Monitor 3 is displayed on your computer screen again. Click Print in Black to print with black ink. For Mac OS X Follow the steps below to continue printing temporarily with black ink. A If printing can not be resumed, click the product icon in the Dock. If an error message is displayed prompting you to cancel the print job, click Delete and follow the steps below to reprint the document with black ink.
User’s Guide Replacing Ink Cartridges B Open System Preferences, click Print & Scan (Mac OS X 10.8 or 10.7) or Print & Fax (Mac OS X 10.6 or 10.5), and select the product from the Printers list. Next, click Options & Supplies and then Driver. C Select On for Permit temporary black printing. D Load plain paper or envelope. E Access the Print dialog box. & “Accessing the printer driver for Mac OS X” on page 31 F Click the Show Details button (for Mac OS X 10.7) or the d button (for Mac OS X 10.
User’s Guide Replacing Ink Cartridges The window below appears when black ink runs low and there is more color ink than black ink. It appears only when plain papers is selected as the paper type, and Standard is selected as the Quality. The window gives you the option to either continue using black ink normally or conserve black ink by using a mixture of color inks to create black. ❏ Click the Yes button to use a mixture of color inks to create black.
User’s Guide Replacing Ink Cartridges B Open the ink cartridge cover. C Pinch and remove the ink cartridge. Note: ❏ The illustration shows replacement of the black ink cartridge. Replace the cartridge appropriate to your situation. ❏ D Removed ink cartridges may have ink around the ink supply port, so be careful not to get any ink on the surrounding area when removing the cartridges. Gently shake new replacement cartridges four or five times and remove the replacement ink cartridge from its package.
User’s Guide Replacing Ink Cartridges Note: ❏ Be careful not to break the hooks on the side of the ink cartridge when you remove it from the package. ❏ E Do not touch the green chip or the small window on the side of the cartridge. Doing so may prevent normal operation and printing. Remove only the yellow tape. c ❏Important: You must remove the yellow tape from the cartridge before installing it; otherwise, print quality may decline or you may not be able to print.
User’s Guide Replacing Ink Cartridges F Insert the cartridge and press it until it clicks. G Close the ink cartridge cover. Press OK to check on the control panel of the product if the cartridges are installed correctly. H Close the printer cover. Ink charging starts. Note: The P light continues to flash while the product is charging ink. Do not turn off the product during ink charging. If the ink charging is incomplete, you may not be able to print. Ink cartridge replacement is complete.
User’s Guide Maintaining Your Product and Software Maintaining Your Product and Software Checking the Print Head Nozzles If you find that the printout is unexpectedly faint or that dots are missing, you may be able to identify the problem by checking the print head nozzles. You can check the print head nozzles from your computer by using the Nozzle Check utility or from the product by using the buttons. Using the Nozzle Check utility for Windows Follow the steps below to use the Nozzle Check utility.
User’s Guide Maintaining Your Product and Software Using the control panel Follow the steps below to check the print head nozzles using the product control panel. A Make sure that no warnings or errors are indicated in the control panel. B Make sure that A4-size paper is loaded in the paper cassette. C Enter Menu from the Home screen. D Select Maintenance. E Select Print Head Nozzle Check, and then follow the instructions on the LCD screen to print a nozzle check pattern.
User’s Guide Maintaining Your Product and Software Important: c Do not turn off the product during head cleaning. If the head cleaning is incomplete, you may not be able to print. Note: ❏ Do not open the printer cover during head cleaning. ❏ Perform the nozzle check first to identify any defective color(s); this will allow you to select the appropriate color(s) for the head cleaning function. Black ink may be used when printing color images.
User’s Guide Maintaining Your Product and Software Using the control panel Follow the steps below to clean the print head using the product control panel. A Make sure that no warnings or errors are indicated in the control panel. B Enter Menu from the Home screen. C Select Maintenance. D Select Print Head Cleaning. E Follow the instructions on the LCD screen to continue. F Select the color you want to clean, and follow the instructions on the LCD screen to start cleaning.
User’s Guide Maintaining Your Product and Software D Follow the on-screen instructions to align the print head. Using the Print Head Alignment utility for Mac OS X Follow the steps below to align the print head using the Print Head Alignment utility. A Make sure that no warnings or errors are indicated in the control panel. B Make sure A4-size paper is loaded in the paper cassette 1. C Access the Epson Printer Utility 4.
User’s Guide Maintaining Your Product and Software G When you selected Vertical Alignment, find the most solid pattern in each of #1 to #6 groups, then enter the pattern number. When you selected Horizontal Alignment, find the least separated and overlapped pattern. H Finish aligning the print head.
User’s Guide Maintaining Your Product and Software Sharing the Product for Printing You can setup the printer so that other computers on the network can share it. The computer connected directly to the printer acts as a server. Other computers on the network access the server and share the printer. For more details, see the computer’s help. If you want to use the printer over a network, see the Network Guide.
User’s Guide Maintaining Your Product and Software D Select Maintenance, Paper Guide Cleaning, and then follow the instructions on the control panel. Note for the product with paper cassette 2: If the stain does not clears, load paper in paper cassette 2, then try step 3 to 4. Replacing Maintenance Box Checking the maintenance box status The maintenance box status is shown in the same screen of the ink cartridge status. You can check the status from the printer software or the control panel.
User’s Guide Maintaining Your Product and Software B Remove the replacement maintenance box from the package. Note: Do not touch the green chip on the side of the box. Doing so may prevent normal operation. C Open the rear cover 1. D Put your hand on the handle of the maintenance box, and then pull the box outward. Note: If ink gets on your hands, wash them thoroughly with soap and water. If ink gets into your eyes, flush them immediately with water.
User’s Guide Maintaining Your Product and Software F Insert the maintenance box into place as far as it will go. G Close the rear cover 1. Maintenance box replacement is complete. Transporting the Product If you move the product some distance, you need to prepare it for transportation in its original box or one of a similar size. c ❏Important: When storing or transporting the product, avoid tilting it, placing it vertically, or turning it upside down; otherwise ink may leak.
User’s Guide Maintaining Your Product and Software D Secure the ink cartridge holder to the case with tape as shown. E Close the printer cover. F Unplug its power code and disconnect all other cables from the product. G Remove all paper from the rear paper feed slot. H Close the rear paper feed slot and the output tray. I Remove all paper from the paper cassette and re-insert the cassette into the product. J Repack the product in its box, using the protective materials that came with it.
User’s Guide Maintaining Your Product and Software For Windows A Windows 8 and Server 2012: Select Desktop, Settings charm, and Control Panel. Windows 7, Vista, and Server 2008: Click the start button and select Control Panel. Windows XP and Server 2003: Click Start and select Control Panel. B Windows 8, Windows 7, Vista, Server 2012 and Server 2008: Select Uninstall a program from the Programs category. Windows XP: Double-click the Add or Remove Programs icon.
User’s Guide Maintaining Your Product and Software For Windows Note: ❏ For Windows 8, 7, Vista, Server 2012 and Server 2008, you need an administrator account and password if you log on as a standard user. ❏ For Windows XP and Server 2003, you must log on to a Computer Administrator account. A Turn off the product. B Disconnect the product’s interface cable from your computer. C Do one of the following. Windows 8 and server 2012: Select Desktop, Settings charm, and Control Panel.
User’s Guide Maintaining Your Product and Software In some cases, a message may appear to prompt you to restart your computer. If so, make sure I want to restart my computer now is selected and click Finish. For Mac OS X Note: ❏ To uninstall your software you need to download the Uninstaller. Access the site at: http://www.epson.com Next, select the support section of your local Epson Web site. ❏ To uninstall applications, you must log on to a Computer Administrator account.
User’s Guide Error Indicators Error Indicators Error Messages on the Control Panel This section describes the meaning of messages displayed on the LCD screen. Messages Solutions Paper Jam & “Paper Jams” on page 83 Printer Error Turn the product off and then back on. Make sure that no paper is still in the product. If the error still appears, contact Epson Support. Maintenance box is nearing end of its service life. Replace maintenance box before the end its service life.
User’s Guide Troubleshooting for Printing Troubleshooting for Printing Diagnosing the Problem Troubleshooting product problems is best handled in two steps: first diagnose the problem, then apply likely solutions until the problem is fixed. The information that you need to diagnose and solve most common problems is provided by online problem solving, the control panel, or the status monitor. Refer to the appropriate section below.
User’s Guide Troubleshooting for Printing Checking product status If a problem occurs while printing, an error message will appear in the status monitor window. When you need to replace an ink cartridge or a maintenance box, click the How To button on the window, and the status monitor will lead you step-by-step through the cartridge or the maintenance box replacement procedure.
User’s Guide Troubleshooting for Printing ❏ Current Status: If the ink is low/expended or the maintenance box is nearly full/full, the How to button appears in the EPSON Status Monitor 3 window. Clicking How to displays ink cartridge or maintenance box replacement instructions. ❏ Ink Levels: EPSON Status Monitor 3 provides a graphic display of the ink cartridge status. ❏ Information: You can view information about the installed ink cartridges by clicking Information.
User’s Guide Troubleshooting for Printing You can also use this utility to check the ink cartridge status before printing. EPSON Status Monitor displays the ink cartridge status at the time it was opened. To update the ink cartridge status, click Update. When ink is low/expended or the maintenance box is nearly full/full, a How to button appears. Click How to, and EPSON Status Monitor will lead you step by step through the ink cartridge or maintenance box replacement procedure.
User’s Guide Troubleshooting for Printing Removing jammed paper from the rear cover A Turn the product around. Note: If you need to change the position of the product, two people are required to lift the product. B Open the rear cover 1. C Remove the jammed paper.
User’s Guide Troubleshooting for Printing D Pull out the rear cover 2. E Carefully remove the jammed paper. F Carefully remove the jammed paper.
User’s Guide Troubleshooting for Printing G Open the rear cover 2. H Carefully remove the jammed paper. I Reattach the rear cover 2.
User’s Guide Troubleshooting for Printing J Close the rear cover 1. Removing jammed paper from inside the product A Carefully remove the jammed paper. B Open the printer cover.
User’s Guide Troubleshooting for Printing C Remove all of the paper inside, including any torn pieces. Important: c Do not touch the flat white cable connected to the cartridge holder. D Close the printer cover. Note: If there are still some torn pieces of paper inside the product even after clearing the paper jam, follow the steps below to remove them. Menu > Maintenance > Remove Paper Removing jammed paper from the paper cassette A Pull the paper cassette all the way out.
User’s Guide Troubleshooting for Printing C Carefully remove any paper jammed inside the product. D Align the edges of the paper. E Put the paper cassette cover back on.
User’s Guide Troubleshooting for Printing F Keep the cassette flat and slowly and carefully reinsert it all the way into the product. Preventing paper jams If your paper jams frequently, check the following. ❏ The paper is smooth, not curled or wrinkled. ❏ You are using high-quality paper. ❏ The printable side of the paper is face down in the paper cassette. ❏ The printable side of the paper is face up in the rear paper feed slot. ❏ The paper stack was fanned before loading.
User’s Guide Troubleshooting for Printing E Click OK to close the printer settings window, and then print your file. Print Preview window opens. F Select a page that has already been printed in the page list box on the left side, and then select Remove Page from the Print Options menu. Repeat this step for all the pages that have already been printed. G Click Print on the Print Preview window. Print Quality Help If you are having print quality problems, then compare it with the illustrations below.
User’s Guide Troubleshooting for Printing Horizontal banding ❏ Make sure the printable side (the whiter or glossier side) of the paper is face up in the rear paper feed slot. ❏ Make sure the printable side (the whiter or glossier side) of the paper is face down in the paper cassette. ❏ Run the Nozzle Check utility and then clean any print heads which produced a defective nozzle check result.
User’s Guide Troubleshooting for Printing ❏ Adjust the color settings in your application or in your printer driver settings. For Windows, check the More Options window. For Mac OS X, check the Color Options dialog box from the Print dialog box. ❏ Run the Nozzle Check utility and then clean any print heads which produced a defective nozzle check result. & “Checking the Print Head Nozzles” on page 65 ❏ If you have just replaced an ink cartridge, make sure the date on the box.
User’s Guide Troubleshooting for Printing ❏ For Windows, if your printouts are still smeared when using Thick Paper and Envelopes, follow the instructions below. Select Short Grain Paper from Extended Settings in your printer driver’s Maintenance tab. This setting is not available when Borderless or Anti-Copy Pattern are selected.
User’s Guide Troubleshooting for Printing ❏ Uninstall the printer driver, then reinstall it. & “Uninstalling Your Software” on page 76 Printout has a slight slant ❏ Make sure that the paper is loaded into the rear paper feed slot or the paper cassette correctly.
User’s Guide Troubleshooting for Printing Printing is too slow ❏ Make sure the paper type selected in the LCD menu or printer driver is appropriate for the type of paper loaded in the product. & “Selecting Paper” on page 16 ❏ Choose a lower print quality in the printer driver's Main window (Windows), or in the Print Settings dialog box from the printer driver's Print dialog box (Mac OS X).
User’s Guide Troubleshooting for Printing Multiple pages feed ❏ For plain paper, do not load paper above the line just under the H arrow mark inside the edge guide. For Epson special media, make sure the number of sheets is less than the limit specified for the media. & “Selecting Paper” on page 16 ❏ Make sure the edge guides are snug against the edges of the paper. ❏ Make sure the paper is not curled or folded. If so, flatten it or curl it slightly toward the opposite side before loading.
User’s Guide Troubleshooting for Printing ❏ If you are connecting the product to your computer via a USB hub, connect the product to the first-tier hub from your computer. If the printer driver is still not recognized on your computer, try to directly connect the product to your computer without the USB hub. ❏ If you are connecting the product to your computer via a USB hub, make sure the USB hub device is recognized by your computer.
User’s Guide Troubleshooting for Printing D Close the ink cartridge cover firmly. E Close the printer cover. Other Problem Printing plain papers quietly When plain paper is selected for the paper type in the printer driver, try choosing Quiet Mode for quieter operations. This will reduce the print speed. For Windows, select On as Quiet Mode in the Main tab of your printer driver. For Mac OS X, select On from the Quiet Mode.
User’s Guide Product Information Product Information System Requirements For Windows System PC Interface Windows 8 (32-bit, 64-bit), Windows 7 (32-bit, 64-bit), Vista (32-bit, 64-bit), XP SP1 or higher(32-bit), or XP Professional x64 Edition, Server 2012, Server 2008 R2, Server 2008, and Server 2003 Hi-Speed USB For Mac OS X System PC Interface Mac OS X 10.5.8, 10.6.x, 10.7.x, 10.8.x Hi-Speed USB Note: The UNIX File System (UFS) for Mac OS X is not supported.
User’s Guide Product Information Paper Note: ❏ Since the quality of any particular brand or type of paper may be changed by the manufacturer at any time, Epson cannot attest to the quality of any non-Epson brand or type of paper. Always test samples of paper stock before purchasing large quantities or printing large jobs. ❏ Poor quality paper may reduce print quality and cause paper jams or other problems. If you encounter problems, switch to a higher grade of paper.
User’s Guide Product Information Printable area Highlighted portions show printable area. Single sheets: Normal Borderless Envelopes: Minimum margin Media type Single sheets Envelopes (#10/DL/C6) Envelop (C4) A 3.0 mm (0.12 in.) 3.0 mm (0.12 in.)*1 3.0 mm (0.12 in.)*1 B 3.0 mm (0.12 in.) 5.0 mm (0.20 in.) 5.0 mm (0.20 in.) C 3.0 mm (0.12 in.) 3.0 mm (0.12 in.)*2 3.0 mm (0.12 in.)*2 *1The recommended margin is 21 mm. *2The recommended margin is 50 mm.
User’s Guide Product Information Network interface specification Wi-Fi Standard: IEEE 802.11b/g/n*1 Security: WEP (64/128bit) WPA-PSK (AES) *2 Frequency Band: 2.4 GHz Communication Mode: Infrastructure Ad hoc Wi-Fi Direct*3 Ethernet Security Protocol Standard: IEEE802.3i/u, IEEE802.3az*4 Communication Mode: Ethernet 100BASE-TX/10BASE-T SSL / TLS HTTPS Server/Client IPPS *1Complies with either IEEE 802.11b/g/n or IEEE 802.11b/g depending on location of purchase.
User’s Guide Product Information 0.7 to 0.4 A Rated current Power consumption (with USB connection) Printing Approx. 22 W (ISO/IEC24712) Ready mode Approx. 5.8 W Sleep mode Approx. 1.5 W Power off Approx. 0.3 W Note: Check the label on the back of the product for its voltage.
User’s Guide Product Information Low voltage directive 2006/95/ EC EN60950-1 EMC directive 2004/108/EC EN55022 Class B EN61000-3-2 EN61000-3-3 EN55024 R&TTE directive 1999/5/EC EN300 328 EN301 489-1 EN301 489-17 EN60950-1 For European users: We, Seiko Epson Corporation, hereby declare that the equipment Model B511B is in compliance with the essential requirements and other relevant provisions of Directive 1999/5/EC.
User’s Guide Where To Get Help Where To Get Help Technical Support Web Site If you need further help, visit the Epson support website shown below. Select your country or region and go to the support section of your local Epson website. The latest drivers, FAQs, manuals, or other downloadables are also available from the site. http://support.epson.net/ http://www.epson.
User’s Guide Where To Get Help Help for Users in Europe Check your Pan-European Warranty Document for information on how to contact Epson support.
User’s Guide Index Index Eco Mode.........................................................................................49 Enlarging pages...............................................................................40 Envelopes loading....................................................................................24, 27 printable area.............................................................................102 Epson Easy Photo Print................................................................
User’s Guide Index aligning.........................................................................................68 checking.......................................................................................65 cleaning........................................................................................66 Print Head Alignment....................................................................47 Print Head Cleaning.......................................................................
User’s Guide Index Short Grain Paper...........................................................................94 Skip Blank Page...............................................................................49 Sleep Timer................................................................................48, 49 Smeared prints..........................................................................93, 95 Software uninstalling..................................................................................