
User Manual


Table Of Contents
- Contents
- Your Ink Tank System
- Product Basics
- Using the Control Panel
- Product Parts Locations
- The Power Off and Sleep Timers
- Epson Connect Solutions for Smartphones, Tablets, and More
- Using AirPrint
- Using Google Cloud Print
- Using the Mopria Print Service
- Android Printing Using the Epson Print Enabler
- Using Fire OS Printing
- Using Windows 10 Mobile Printing
- Using Epson Print and Scan App with Windows Tablets
- Wi-Fi or Wired Networking
- Loading Paper
- Loading Paper in Cassette 1 (Upper Cassette)
- Loading Paper in Cassette 2 (Lower Cassette)
- Loading Paper and Envelopes in the Rear Paper Feed Slot
- Selecting the Paper Settings for Each Source - Control Panel
- Turning Off the Paper Setting Alert
- Paper Loading Capacity
- Available Epson Papers
- Borderless Paper Type Compatibility
- Paper or Media Type Settings - Printer Software
- Placing Originals on the Product
- Copying
- Printing from a Computer
- Printing with Windows
- Selecting Basic Print Settings - Windows
- Selecting Double-sided Printing Settings - Windows
- Selecting Additional Layout and Print Options - Windows
- Selecting a Printing Preset - Windows
- Selecting Extended Settings - Windows
- Printing Your Document or Photo - Windows
- Selecting Default Print Settings - Windows
- Changing Automatic Update Options
- Printing with the Built-in Epson Driver - Windows 10 S
- Printing on a Mac
- Cancelling Printing Using a Product Button
- Printing with Windows
- Scanning
- Using Memory Cards with Your Product
- Using an External Device with Your Product
- Printing Personalized Projects
- Printing on CDs/DVDs
- Refilling Ink
- Adjusting Print Quality
- Cleaning and Transporting Your Product
- Solving Problems
- Checking for Software Updates
- Product Status Messages
- Message Appears Prompting You to Reset Ink Levels
- Running a Product Check
- Resetting Control Panel Defaults
- Solving Setup Problems
- Solving Network Problems
- Solving Copying Problems
- Solving Paper Problems
- Solving Problems Printing from a Computer
- Solving Page Layout and Content Problems
- Solving Print Quality Problems
- Solving Scanning Problems
- Solving Scanned Image Quality Problems
- Image Consists of a Few Dots Only
- Line of Dots Appears in All Scanned Images
- Straight Lines in an Image Appear Crooked
- Image is Distorted or Blurry
- Image Colors are Patchy at the Edges
- Image is Too Dark
- Back of Original Image Appears in Scanned Image
- Ripple Patterns Appear in an Image
- Image is Scanned Upside-Down
- Scanned Image Colors Do Not Match Original Colors
- Scan Area is Not Adjustable in Thumbnail Preview
- Scanned Image Edges are Cropped
- Solving Memory Card Problems
- Solving CD/DVD Problems
- Uninstall Your Product Software
- Where to Get Help
- Technical Specifications
- Windows System Requirements
- Mac System Requirements
- Paper Specifications
- Printable Area Specifications
- Scanning Specifications
- Ink Specifications
- Memory Card Specifications
- External USB Device Specifications
- Dimension Specifications
- Electrical Specifications
- Environmental Specifications
- Interface Specifications
- Network Interface Specifications
- Safety and Approvals Specifications
- Notices
121
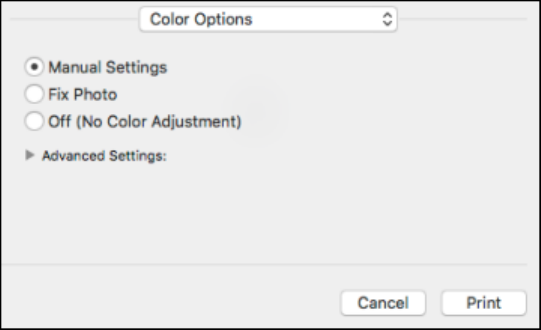
3. Select Color Options from the pop-up menu in the print window.
Note: The available settings on the Color Options menu depend on the option you selected on the
Color Matching menu.
4. Select one of the available options.
Color Matching and Color Options - Mac
Parent topic: Printing on a Mac
Color Matching and Color Options - Mac
You can select from these settings on the Color Matching and Color Options menus.
Color Matching Settings
EPSON Color Controls
Lets you manage color using controls in your printer software or turn off color management.
ColorSync
Prints using standard color profiles for your product and paper to help match image colors. You can
customize the conversion method and filter settings on the ColorSync pop-up menu in the print
window.