
User Manual


Table Of Contents
- Contents
- Your Ink Tank System
- Product Basics
- Using the Control Panel
- Product Parts Locations
- The Power Off and Sleep Timers
- Epson Connect Solutions for Smartphones, Tablets, and More
- Using AirPrint
- Using Google Cloud Print
- Using the Mopria Print Service
- Android Printing Using the Epson Print Enabler
- Using Fire OS Printing
- Using Windows 10 Mobile Printing
- Using Epson Print and Scan App with Windows Tablets
- Wi-Fi or Wired Networking
- Loading Paper
- Loading Paper in Cassette 1 (Upper Cassette)
- Loading Paper in Cassette 2 (Lower Cassette)
- Loading Paper and Envelopes in the Rear Paper Feed Slot
- Selecting the Paper Settings for Each Source - Control Panel
- Turning Off the Paper Setting Alert
- Paper Loading Capacity
- Available Epson Papers
- Borderless Paper Type Compatibility
- Paper or Media Type Settings - Printer Software
- Placing Originals on the Product
- Copying
- Printing from a Computer
- Printing with Windows
- Selecting Basic Print Settings - Windows
- Selecting Double-sided Printing Settings - Windows
- Selecting Additional Layout and Print Options - Windows
- Selecting a Printing Preset - Windows
- Selecting Extended Settings - Windows
- Printing Your Document or Photo - Windows
- Selecting Default Print Settings - Windows
- Changing Automatic Update Options
- Printing with the Built-in Epson Driver - Windows 10 S
- Printing on a Mac
- Cancelling Printing Using a Product Button
- Printing with Windows
- Scanning
- Using Memory Cards with Your Product
- Using an External Device with Your Product
- Printing Personalized Projects
- Printing on CDs/DVDs
- Refilling Ink
- Adjusting Print Quality
- Cleaning and Transporting Your Product
- Solving Problems
- Checking for Software Updates
- Product Status Messages
- Message Appears Prompting You to Reset Ink Levels
- Running a Product Check
- Resetting Control Panel Defaults
- Solving Setup Problems
- Solving Network Problems
- Solving Copying Problems
- Solving Paper Problems
- Solving Problems Printing from a Computer
- Solving Page Layout and Content Problems
- Solving Print Quality Problems
- Solving Scanning Problems
- Solving Scanned Image Quality Problems
- Image Consists of a Few Dots Only
- Line of Dots Appears in All Scanned Images
- Straight Lines in an Image Appear Crooked
- Image is Distorted or Blurry
- Image Colors are Patchy at the Edges
- Image is Too Dark
- Back of Original Image Appears in Scanned Image
- Ripple Patterns Appear in an Image
- Image is Scanned Upside-Down
- Scanned Image Colors Do Not Match Original Colors
- Scan Area is Not Adjustable in Thumbnail Preview
- Scanned Image Edges are Cropped
- Solving Memory Card Problems
- Solving CD/DVD Problems
- Uninstall Your Product Software
- Where to Get Help
- Technical Specifications
- Windows System Requirements
- Mac System Requirements
- Paper Specifications
- Printable Area Specifications
- Scanning Specifications
- Ink Specifications
- Memory Card Specifications
- External USB Device Specifications
- Dimension Specifications
- Electrical Specifications
- Environmental Specifications
- Interface Specifications
- Network Interface Specifications
- Safety and Approvals Specifications
- Notices
97
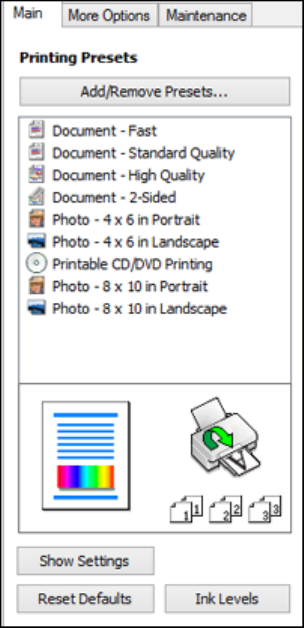
Selecting a Printing Preset - Windows
For quick access to common groups of print settings, you can select a printing preset on the Main or
More Options tab.
Note: You can create your own preset by clicking the Add/Remove Presets button.
1. Click the Main or More Options tab.
You see the available Printing Presets on the left:
2. Place your cursor over one of the Printing Presets to view its list of settings.