User's Guide CMP0211-00 EN
SC-P9500 Series/SC-P7500 Series User's Guide Copyrights and Trademarks Copyrights and Trademarks No part of this publication may be reproduced, stored in a retrieval system, or transmitted in any form or by any means, electronic, mechanical, photocopying, recording, or otherwise, without the prior written permission of Seiko Epson Corporation. The information contained herein is designed only for use with this Epson printer.
SC-P9500 Series/SC-P7500 Series User's Guide Contents Contents Loading and Removing Cut Sheets/Poster Board ..................................... Loading Cut Sheets and Poster Board. . . . . . . . Removing Cut Sheets/Poster Board. . . . . . . . . Setting Loaded Paper. . . . . . . . . . . . . . . . . . . . . . How to Set. . . . . . . . . . . . . . . . . . . . . . . . . . . When there is no paper information on the control panel or in the driver. . . . . . . . . . . . . . Using the Paper Basket. . . . . . .
SC-P9500 Series/SC-P7500 Series User's Guide Contents Customizing the Printer Driver. . . . . . . . . . . . . Saving various settings as your Select Settings .................................. Adjusting the Ink Density. . . . . . . . . . . . . . . Rearranging display items. . . . . . . . . . . . . . . Summary of the Utility Tab. . . . . . . . . . . . . . . . . . 56 . . . . Setting color management with the applications .....................................
SC-P9500 Series/SC-P7500 Series User's Guide Contents Appendix Options and Consumable Products. . . . . . . . . . . 152 Epson Special Media. . . . . . . . . . . . . . . . . . . . 152 Ink cartridges. . . . . . . . . . . . . . . . . . . . . . . . . 152 Others. . . . . . . . . . . . . . . . . . . . . . . . . . . . . . 154 Absorption pad replacement kit (absorption pads for borderless printing). . . . . . . . . . . . . . 155 Supported Media. . . . . . . . . . . . . . . . . . . . . . . . .
SC-P9500 Series/SC-P7500 Series User's Guide Notes on Manuals Notes on Manuals Screenshots Used in this Guide Meaning of Symbols ❏ Screenshots used in this guide may differ slightly from the actual screens. Also, screens may differ depending on the operating system or the usage environment. Warning: Caution: Warnings must be followed to avoid serious bodily injury. ❏ Unless otherwise specified, the Windows screenshots used in this guide are of Windows 10.
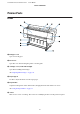
SC-P9500 Series/SC-P7500 Series User's Guide Notes on Manuals Printer Parts Front A Roll paper cover Open to load roll paper. B Front cover Open this cover when cleaning the printer or clearing jams. C Cartridge covers (on the left and right) Open when installing ink cartridges. U “Replacing Ink Cartridges” on page 123 D Paper support Use this to adjust the direction of the output paper. E Paper basket Output from the printer collects in this basket, keeping the media clean and free of creases.
SC-P9500 Series/SC-P7500 Series User's Guide Notes on Manuals G Maintenance cover (front) Open when cleaning around the caps. U “Cleaning around the print head and caps” on page 138 H Control panel U “Control panel” on page 11 I Cut sheet cover Open when loading cut sheets or poster board. J Paper slot Insert the paper into this slot. Inside A Adapter holder The roll paper adapter is placed in this holder when loading the roll paper. B Wipers Wipe off ink from the nozzle surface of the print head.
SC-P9500 Series/SC-P7500 Series User's Guide Notes on Manuals C Suction caps During head cleaning, this cap sucks the optimum amount of ink from the print head nozzles. Try cleaning these when automatic cleaning does not clear clogging in the print head. U “Cleaning around the print head and caps” on page 138 D Drying prevention caps Except when printing, these caps cover the print head nozzles to prevent them from drying.
SC-P9500 Series/SC-P7500 Series User's Guide Notes on Manuals Off : 10Base-T Red : 100Base-TX Green: 1000Base-T E Data light The network connection status and data reception are indicated by a lit or flashing light. On : Connected. Flashi : Receiving data. ng F AC inlet Connect the supplied power cable here. G Maintenance Box Absorbs waste ink. For SC-P9500 Series this is placed in two locations on the left and right, while SC-P7500 Series is in one location on the right.
SC-P9500 Series/SC-P7500 Series User's Guide Notes on Manuals Control panel Home screen operations A Menu Allows you to make paper settings, printer settings, and perform printer maintenance. See the following for a list of the menus. U “Paper Setting” on page 101 B Information display area Displays the printer's status, error messages, and so on. A Home button Touch this button while a menu is displayed to return to the Home screen.
SC-P9500 Series/SC-P7500 Series User's Guide Notes on Manuals You can check the status of the wired LAN connection and change settings. Features The main features of this printer are described below. H Switch screens while printing You can switch the screen display while printing. You can switch to the Professional display (shown above) that shows the remaining ink level, or the Simple display that shows the print completion time.
SC-P9500 Series/SC-P7500 Series User's Guide Notes on Manuals Three spot color inks that help to realize a wide range of color reproduction Notes on Usage and Storage This printer is equipped with Orange, Green, and Violet inks allowing us to realize a wide range of color reproduction, thereby achieving high PANTONE coverage.
SC-P9500 Series/SC-P7500 Series User's Guide Notes on Manuals ❏ Do not install the printer next to heat sources or directly in the path of air from a ventilator or air conditioner. Failure to observe this precaution could result in the print head nozzles drying and clogging. ❏ To prevent the accumulation of dust and other foreign matter in the printer, close all covers before placing it in storage.
SC-P9500 Series/SC-P7500 Series User's Guide Notes on Manuals ❏ To avoid getting dirt on the ink supply port, store the removed ink cartridge properly. The ink supply port has a valve in it so it does not need to be capped. ❏ Do not use wavy or warped paper. For roll paper, cut off any parts that are wavy or curled, and then load the paper again. For cut sheets, use new paper.
SC-P9500 Series/SC-P7500 Series User's Guide Notes on Manuals Note: Typically, print outs and photos fade over time (color distortion) due to the effects of light and various constituents in the air. This also applies to Epson special media. However, with the correct storage method, the degree of color distortion can be minimized. ❏ See the documentation supplied with Epson special media for detailed information on handling the paper after printing.
SC-P9500 Series/SC-P7500 Series User's Guide Introducing the Software Introducing the Software Provided Software The following table lists the provided software. The supplied software disc contains the software for Windows. When using a Mac or a computer without a disc drive, download the software from http://epson.sn and then install it. For details on the various software, see the online help of each software or the Administrator's Guide (online manual).
SC-P9500 Series/SC-P7500 Series User's Guide Introducing the Software Software Name Function Epson Media Installer This tool adds paper information to a printer or printer driver. If you are using Windows, you can start it from the printer driver. If you are using a Mac, you can start it from the /Applications/Epson Software/Epson Utilities/Epson Media Installer.app.
SC-P9500 Series/SC-P7500 Series User's Guide Introducing the Software Using Web Config Function Summary This section introduces the main functions of Web Config. See the Administrator's Guide for more details. This section describes how to start the software and provides a summary of its functions. Starting Start the software from a web browser on a computer that is connected to the same network as the printer. A Check the IP address of the printer from the control panel.
SC-P9500 Series/SC-P7500 Series User's Guide Introducing the Software C Updating Software or Installing Additional Software Follow the on-screen instructions. c Important: Do not turn off the computer or printer during the update. When you install the software during setup as described in the Setup Guide, Epson Software Updater is installed.
SC-P9500 Series/SC-P7500 Series User's Guide Introducing the Software Uninstalling Software E Select the target printer icon, and then click OK. F Follow the on-screen instructions to continue. Windows c Important: ❏ You must log in as an Administrator. ❏ If the password or confirmation of an administrator is requested, enter the password and then continue with the operation. When the delete confirmation message appears, click Yes. A Turn off the printer, and unplug the interface cable.
SC-P9500 Series/SC-P7500 Series User's Guide Basic Operations Basic Operations C Open the roll paper cover. D Lower the lock lever for the adapter holder to release the lock. E Move the adapter holder to the left. Loading and Removing the Roll Paper Loading Roll Paper Load roll paper after attaching the supplied roll paper adapters. Use the printer's roll paper adapter. Do not use roll paper adapters from other models. c Important: Insert the paper just before printing.
SC-P9500 Series/SC-P7500 Series User's Guide Basic Operations F G Place the roll paper on top of the printer. Adjust the size of the roll paper adapters to the size of the roll core. Change the size of both of the roll paper adapters so that they are the same size. 3-inch core H 23 2-inch core Raise the adapter lock lever to release the lock on each of the two roll paper adapters.
SC-P9500 Series/SC-P7500 Series User's Guide Basic Operations I Attach the roll paper adapters to both ends of the roll paper, and then lower the lock levers on the left and right to lock them in place. c Important: Rolling the roll paper with too much force may damage the adapter holder or the printer. If the adapter is damaged, you may not be able to remove it from the printer. To avoid this, remove the adapter while lifting it up. Make sure you insert the adapters fully before locking them.
SC-P9500 Series/SC-P7500 Series User's Guide Basic Operations O Insert the leading edge of the roll paper into the paper feed slot, and continue to feed until you hear a sound. Q Close the roll paper cover. R Check the media type. U “Setting Loaded Paper” on page 30 Cutting the roll paper The printer is equipped with a built-in cutter. You can cut roll paper after printing by using one of the following methods.
SC-P9500 Series/SC-P7500 Series User's Guide Basic Operations Manual cut method c Important: When Off is selected in the printer driver or Off is selected for Auto Cut in the control panel, the paper can be cut in any location after printing as described below. The commercially available media types, such as those shown below, may not be cut cleanly by the built-in cutter. Furthermore, cutting the following media types may damage or reduce the lifetime of the built-in cutter.
SC-P9500 Series/SC-P7500 Series User's Guide Basic Operations A Press Paper loading information from the home screen, and then select Remove. C Lower the lock lever for the adapter holder to release the lock. D Move the adapter holder to the left. The paper is rewound and ejected. When Manage Remaining Amount is set to On, the barcode is automatically printed prior to rewinding. Note: If printed paper is not cut and remains, a confirmation screen appears.
SC-P9500 Series/SC-P7500 Series User's Guide Basic Operations E Roll over the paper roll to the front side to place it on the top of the printer. Loading and Removing Cut Sheets/Poster Board c Important: If the paper is wavy or curled, use new paper. If wavy or curled paper is loaded, this printer may not be able to recognize the paper size, feed the paper, or print correctly.
SC-P9500 Series/SC-P7500 Series User's Guide Basic Operations D Load the paper with the side you want to print on facing forward, and the edge aligned with the line on the right. Removing Cut Sheets/Poster Board Normally, the paper should be loaded vertically. While supporting the paper so that it does not fall, press Paper loading information on the control panel, and then select Remove. The paper is ejected. You can load thick paper with a length of up to 762 mm.
SC-P9500 Series/SC-P7500 Series User's Guide Basic Operations B Setting Loaded Paper Set the paper type before you start printing. Not setting a paper type that matches the loaded paper will cause wrinkles, scuffing, uneven colors, and other trouble. To manage the amount of roll paper remaining, set Remaining Amount Management to On, and then set Remaining Amount and Remaining Alert. How to Set A The paper type is shown on the screen displayed after loading paper.
SC-P9500 Series/SC-P7500 Series User's Guide Basic Operations D Use Epson Media Installer Touch OK on the paper setting screen to start feeding the paper. You can add paper information over the Internet. When the message "Ready." is displayed on the Home screen, you can start printing. Note: To make detailed paper settings such as the platen gap and drying time, touch Advanced Paper Settings, and then set each item. See the following for items you can set.
SC-P9500 Series/SC-P7500 Series User's Guide Basic Operations Printer driver (Windows) B Add the paper information. C Paper information is added to the paper type for the printer driver and Epson Print Layout. Touch Download Media Settings and select the paper you want to use. Click the Download and Register button to add the selected paper information. Select the paper you want to print on. Download the latest printer driver from the Epson Website.
SC-P9500 Series/SC-P7500 Series User's Guide Basic Operations ❏ When using the Adobe PostScript 3 expansion unit for the first time Delete any custom paper information that you have already registered to the printer, and then add it again once the Adobe PostScript 3 expansion unit is installed.
SC-P9500 Series/SC-P7500 Series User's Guide Basic Operations Using the Paper Basket A Check that the paper supports are in the position shown in the illustration. B Hold the roll paper with both hands and pull it straight down. Using the paper basket allows you to print smoothly by preventing the paper from getting dirty or wrinkled. c Important: Normally the capacity of the paper basket should be one sheet at a time. If multiple sheets are left in the basket, they may not be ejected correctly.
SC-P9500 Series/SC-P7500 Series User's Guide Basic Operations c Important: Note: If you are printing on thick paper, the leading edge of the paper may catch on the cloth and may not be ejected correctly. If this occurs, you can adjust the left and right bands to improve the angle of the cloth. If you print while the cloth is stretched too far or on the floor, you may not be able to eject correctly. To reduce the angle of the cloth, pass the string through a hole close to the cloth.
SC-P9500 Series/SC-P7500 Series User's Guide Basic Operations Note: To increase the angle of the cloth, pass the string through a hole close to the edge of the belt. A Lift the roll section off the floor. B While holding down the button on the right of the roll section, move straight towards the printer. You can wind up the cloth evenly by feeding the bottom of the cloth over the iron frame.
SC-P9500 Series/SC-P7500 Series User's Guide Basic Operations D Rotate the roll section counter-clockwise a little to add a little slack and prevent the cloth from stretching during storage. If there are lumps in the cloth, pat it down from the top to flatten it to prevent it from becoming deformed during storage. Loading for rear ejecting This section explains how to switch the paper basket from the stored state to the ready state. A Raise the paper supports to the horizontal position.
SC-P9500 Series/SC-P7500 Series User's Guide Basic Operations Using the Auto Take-up Reel Unit (SC-P9500 Series Only) c Important: Confirm that the end of the roll is cut straight across. The unit will not function as expected if the end of the roll is wavy or curved. U “Manual cut method” on page 26 The optional auto take-up reel unit automatically takes up paper as it is printed. It improves efficiency for banners or large jobs involving continuous printing on roll paper.
SC-P9500 Series/SC-P7500 Series User's Guide Basic Operations Backward : The roll is taken up with the printable side in. Attaching the Paper Forward : The roll is taken up with the printable side out. This section describes how to attach roll paper to the auto take-up reel unit roll core. Off : The auto take-up reel unit does not take up paper. The procedure varies with the take-up direction. c Important: Before proceeding, set Auto Cut to Off.
SC-P9500 Series/SC-P7500 Series User's Guide Basic Operations E Tape the end to the roll core. Note: The tensioner supplied with the auto take-up reel unit is used with some types of paper. Slacken the paper and insert the tensioner near the center of the paper as shown. See the following section for information on paper that requires the tensioner. Place tape (available from third-party suppliers) at the center and then at the left and right ends.
SC-P9500 Series/SC-P7500 Series User's Guide Basic Operations A Set the auto take-up reel unit Auto switch to Off. Plug the power cord into an outlet and confirm that the power lamp lights. B Turn on the printer. C Check that the roll paper is correctly loaded in the printer. D Select Paper loading information - Prepare for Take-up on the printer's control panel. F After wrapping the paper around the core, ensure that paper around the core is sufficiently loose.
SC-P9500 Series/SC-P7500 Series User's Guide Basic Operations (2) Cut the paper. Caution: Removing paper from the auto take-up reel unit requires two workers, one on each end of the roll. (3) Keep the Manual switch pressed in the take-up direction (either Forward or Backward). A single worker working by his or herself could drop the roll, resulting in injury. U “Manual cut method” on page 26 A C Set the auto take-up reel unit Auto switch to Off.
SC-P9500 Series/SC-P7500 Series User's Guide Basic Operations Basic Printing Methods D Select the Media Type, Color, Print Quality, Mode, and Source according to the paper loaded in the printer. E Make sure you select the same Page Size as you set in the application. This section explains how to print and how to cancel printing. Printing (Windows) Make print settings such as paper size and paper source from the connected computer and then print. A Turn on the printer, and load the paper.
SC-P9500 Series/SC-P7500 Series User's Guide Basic Operations The progress bar is displayed, and printing starts. B When you have created the data, from the File menu of the application, click Print and so on. C Click Show Details at the bottom of the screen. Screen while printing The following screen is displayed when you start printing, and the progress bar (the computer's processing status) is displayed.
SC-P9500 Series/SC-P7500 Series User's Guide Basic Operations D Also, if an error occurs while printing, a notification message is displayed. Check that this printer is selected, and then set the paper size. Select the paper size, borderless printing options, and paper source in the Paper Size menu. E Select Print Settings from the list, and then set each item. Set the Media Type, Color, Print Quality, and other settings according to the type of paper loaded in the printer.
SC-P9500 Series/SC-P7500 Series User's Guide Basic Operations B Canceling Printing (Windows) Select the job you want to cancel, and then select Cancel from the Document menu. To cancel all jobs, click Cancel All Documents in the Printer menu. When the computer has finished sending data to the printer, you cannot cancel the print job from the computer. Cancel on the printer. P U “Canceling Printing (from the Printer)” on page 47 When the progress bar is displayed Click Cancel.
SC-P9500 Series/SC-P7500 Series User's Guide Basic Operations Printable area Canceling Printing (from the Printer) This section describes the printable areas for the printer. The Cancel button is displayed on the control panel screen during printing. Touch the Cancel button. The print job is canceled even in the middle of printing. It may take a while before the printer returns to the ready status.
SC-P9500 Series/SC-P7500 Series User's Guide Basic Operations *4 The printer driver supports the following maximum paper lengths. Also, when using UltraSmooth Fine Art paper/ baryta, the value for A is 45 mm. Windows: 18 m (708.66 inch) When you want to change the margins, make changes in Top Margin and Bottom Margin from Paper Setting. Mac: 18 m (708.66 inch) When printing on paper longer than this, you need commercially available banner printing software.
SC-P9500 Series/SC-P7500 Series User's Guide Basic Operations When printing borderless on the left and right, the left and right margins are 0 mm. Turning Off the Power Using Power Off Timer The printer offers the following two power management options. Saving Power *1 SC-P9500 Series *2 SC-P7500 Series *3 15.5 mm when printing Enhanced Matte Poster Board The printer enters sleep mode or turns off automatically if no operations are performed for a set period.
SC-P9500 Series/SC-P7500 Series User's Guide Basic Operations U “General Settings” on page 106 50
SC-P9500 Series/SC-P7500 Series User's Guide Using the Optional Hard Disk Unit ❏ Print jobs that specify output paper sizes (widths) that are larger than that selected with the printer Using the Optional Hard Disk Unit Note: You can set held jobs in General Settings - Printer Settings - PS3 Menu - Store Held Job.
SC-P9500 Series/SC-P7500 Series User's Guide Using the Optional Hard Disk Unit C We take no responsibility for any data loss, data corruption, or other problems due to any cause, even including those listed above and within the warranty period. Be aware that we are also not responsible for the recovery of lost or corrupted data. On the Layout screen, click the Settings button from Hard Disk Unit, and then select Print Job.
SC-P9500 Series/SC-P7500 Series User's Guide Using the Optional Hard Disk Unit B Check that the printer is selected, and then select Hard Disk Unit Settings from the list. Viewing and Printing Saved Print Jobs This section describes how to view and print saved jobs from the control panel. C Select Print Job. After clicking Print, the operations differ depending on the selected content as shown below. ❏ Print and Save: Saves the job to the hard disk at the same time as printing.
SC-P9500 Series/SC-P7500 Series User's Guide Using the Printer Driver(Windows) B Using the Printer Driver (Windows) Right-click your printer icon, and click Printing preferences. Displaying the Settings Screen The printer driver setting screen is displayed.
SC-P9500 Series/SC-P7500 Series User's Guide Using the Printer Driver(Windows) Displaying Help Right-click on the item you want to check and display You can access the printer driver help in the following ways: Right-click the item, and then click Help. ❏ Click Help ❏ Right-click on the item you want to check and display Click the Help Button to Display By displaying help, you can use the contents page or keyword search to read the help.
SC-P9500 Series/SC-P7500 Series User's Guide Using the Printer Driver(Windows) C Customizing the Printer Driver When you enter a name in Name and click Save, the settings are saved in List. You can save the settings or change the display items as you prefer. Saving various settings as your Select Settings You can save all printer driver settings as a Select Setting. Additionally, in Select Setting the recommended settings for a variety of uses are already available.
SC-P9500 Series/SC-P7500 Series User's Guide Using the Printer Driver(Windows) B E Select Media Type, and then click Paper Configuration. When you enter a name in Name and click Save, the settings are saved in List. You can select saved settings from Media Type on the Main screen. C Set the ink density according to the paper you want to register, and then click OK. Note: D Click Custom Settings. ❏ You can save up to 100 settings.
SC-P9500 Series/SC-P7500 Series User's Guide Using the Printer Driver(Windows) A Go to the Utility tab and click Menu Arrangement. B Select Edit Item. ❏ Drag and drop unnecessary items to Not Display. Note: When Delete Group is performed, the group (folder) is deleted, however the settings in the deleted group (folder) remain. You also need to delete individually from List in the save location. D or group items in the List box. C❏ Order You can move and order items by dragging and dropping.
SC-P9500 Series/SC-P7500 Series User's Guide Using the Printer Driver(Windows) EPSON Status Monitor 3 Summary of the Utility Tab You can check the printer's status, such as the remaining ink level and error messages, on the computer's screen. You can perform the following maintenance functions from the printer driver's Utility tab. Monitoring Preferences You can select the error notifications displayed on the EPSON Status Monitor 3 screen, or register a shortcut for the Utility icon to the Taskbar.
SC-P9500 Series/SC-P7500 Series User's Guide Using the Printer Driver(Windows) Speed and Progress You can set various functions for printer driver basic operations. Menu Arrangement You can arrange the display items of Select Setting, Media Type, and Paper Size. For example, you can reord them by frequency of access. U “Rearranging display items” on page 57 Export or Import You can export or import the printer driver settings.
SC-P9500 Series/SC-P7500 Series User's Guide Using the Printer Driver(Mac) Saving to Presets Using the Printer Driver (Mac) A Set each item in Paper Size and Print Settings that you want to save to the preset. Select Paper Configuration from the list, and then set the ink density according to the paper you want to use. Displaying the Settings Screen The display method of the printer driver setting screen may differ depending on the application or the OS version.
SC-P9500 Series/SC-P7500 Series User's Guide Using the Printer Driver(Mac) Using Epson Printer Utility 4 Deleting from Presets A Click Show Presets... in Presets of the Print dialog box. You can perform maintenance tasks such as Nozzle Check or Head Cleaning by using Epson Printer Utility 4. This utility is installed automatically when you install the printer driver. B Starting Epson Printer Utility 4 Select the setting you want to delete, click Delete, and then click OK.
SC-P9500 Series/SC-P7500 Series User's Guide Using the Printer Driver(Mac) Nozzle Check This function prints a nozzle check pattern to check if the print head nozzles are clogged. If you see banding or gaps in the print outs, perform head cleaning to clear any clogged nozzles. U “Print Head Nozzle Check” on page 115 Head Cleaning If you see banding or gaps in the print outs, perform head cleaning. Cleans the surface of the print head to improve the print quality.
SC-P9500 Series/SC-P7500 Series User's Guide Printing Varieties For Minimize Top Margin, set Print Quality to Quality Options, and then set in Quality Options. Printing Varieties Printing with Darker Tones of Black (Black Enhance Overcoat) Black Enhance Overcoat is a function that improves the dynamic range by increasing the maximum density of black by using Light Gray ink to overcoat dark and gray areas in the prints. Black Enhance Overcoat can only be used on glossy paper.
SC-P9500 Series/SC-P7500 Series User's Guide Printing Varieties Select Color Management, then select Printer Manages Colors in Color Handling, and click Print. Making Settings in Windows A When using applications featuring a color management function, specify how to adjust colors from these applications. When using applications without a color management function, start from step 2. Depending on the type of the application, make the settings following the table below.
SC-P9500 Series/SC-P7500 Series User's Guide Printing Varieties D Make the necessary settings. Open the Print screen. See the printer driver help for more details on each item. Select Color Management, then select Printer Manages Colors in Color Handling, and click Print. Note: You can adjust the correction value by checking the sample image on the left side of the screen. You can also use the color circle to fine-tune the color balance. E B Display the Print screen.
SC-P9500 Series/SC-P7500 Series User's Guide Printing Varieties D G Select Main from the list and then clear the Simple Settings check box in the Print Quality area. If necessary, click Settings and then adjust items such as the Gamma, Brightness, Contrast, Saturation, and color balance. See the printer driver help for more details on each item. H E Select the print target. If you want to select the color correction method yourself, select Custom at the very bottom of the list.
SC-P9500 Series/SC-P7500 Series User's Guide Printing Varieties Printing Black and White Photos Note: For information on supported platforms, see the website for the application in question. Setting example for Adobe Photoshop CC You can print black and white photos with rich gradation by adjusting the image data color by the printer driver. You can correct image data when printing without processing the data from applications. The original data is not affected. Open the Print screen.
SC-P9500 Series/SC-P7500 Series User's Guide Printing Varieties D To make detailed adjustments, proceed to Step 4. If you do not want to make adjustments, proceed to Step 6. Adobe Photoshop CS3 or later Adobe Photoshop Elements 6 or later Adobe Photoshop Lightroom 1 or later Click Settings in Mode. In other applications, set No Color Management. Note: For information on supported platforms, see the website for the application in question. Setting example for Adobe Photoshop CC Open the Print screen.
SC-P9500 Series/SC-P7500 Series User's Guide Printing Varieties B Display the Print screen, select Print Settings from the list, and then select Advanced B&W Photo as the Color. D Make the necessary settings. E Check other settings, and then start printing. See the printer driver help for more details on each item. U “Performing Printing (Mac)” on page 44 C Click Advanced Color Settings.
SC-P9500 Series/SC-P7500 Series User's Guide Printing Varieties Borderless Printing You can print your data without margins on the paper. The types of borderless printing you can choose vary as shown below depending on the media type. ❏ Retain Size Create the print data larger than the paper size in the applications to produce borderless output. The printer driver does not enlarge the image data. Use settings such as Page Setup in the applications to set the size of the image data as follows.
SC-P9500 Series/SC-P7500 Series User's Guide Printing Varieties About Roll Paper Cutting When performing borderless printing on roll paper, you can specify whether it is left and right borderless printing or all edges borderless printing, and how to cut the paper in the printer driver's Roll Paper Option. The cutting operation for each value is shown in the following chart. Printer driver settings Normal Cut Single Cut Double Cut The default printer driver setting is Normal Cut.
SC-P9500 Series/SC-P7500 Series User's Guide Printing Varieties C Setting Procedures for Printing If you select Auto Expand, set how much of the image goes beyond the edge of the paper as shown below. Making Settings in Windows A Select Auto Expand or Retain Size as the Method of Enlargement. When the printer driver's Main screen is displayed, you can configure various settings required for printing such as Media Type, Source, Page Size.
SC-P9500 Series/SC-P7500 Series User's Guide Printing Varieties D Where XXXX is the actual paper size, such as A4. When using roll paper, click Roll Paper Option, and then set Auto Cut option. U “About Roll Paper Cutting” on page 72 Note: If page setting options are not available in the application's print dialog, display the page settings dialog. B Select Page Layout Settings from the list, and then set Roll Paper Option or Expansion.
SC-P9500 Series/SC-P7500 Series User's Guide Printing Varieties Enlarged/Reduced Printing You can enlarge or reduce the size of your data. There are three setting methods. ❏ Fit to Output Size printing Automatically enlarges or reduces the image size to fit the paper size. Note: Moving the slider towards Mid decreases the image enlargement ratio. Therefore, some margins may appear at the edges of the paper depending on the paper and printing environment.
SC-P9500 Series/SC-P7500 Series User's Guide Printing Varieties Fit to Page/Scale to fit paper size C Making Settings in Windows Settings in Mac A A When the printer driver's Layout screen is displayed, set the same paper size as the data's paper size in Page Size or Paper Size. U “Printing (Windows)” on page 43 Open the Print screen, select Paper Handling from the list, and then check Scale to fit paper size.
SC-P9500 Series/SC-P7500 Series User's Guide Printing Varieties Fit to Roll Paper Width (Windows Only) A D Select Fit to Roll Paper Width. E Select the width of the roll paper loaded in the printer from the Roll Width list. F Check other settings, and then start printing. Display the printer driver Main tab and select Roll Paper for Source. U “Printing (Windows)” on page 43 B C Display the Layout tab and choose a Page Size that matches the page size used in the document size.
SC-P9500 Series/SC-P7500 Series User's Guide Printing Varieties Custom Scale Setting Settings in Mac A Making Settings in Windows A When the printer driver's Layout screen is displayed, set the same paper size as the data's paper size in Page Size or Paper Size. When the Print screen is displayed, select the size of the paper loaded in the printer from the Paper Size list.
SC-P9500 Series/SC-P7500 Series User's Guide Printing Varieties U “Performing Printing (Mac)” on page 44 Multi-Page Printing You can print multiple pages of your document on one sheet of paper. If you print continuous data prepared at A4 size, it is printed as shown below. Note: 79 ❏ In Windows, you cannot use the Multi-Page printing function when performing borderless printing. ❏ In Windows, you can use the reduce/enlarge function (Fit to Page) to print the data on different sizes of paper.
SC-P9500 Series/SC-P7500 Series User's Guide Printing Varieties Making Settings in Windows Settings in Mac A A When the printer driver's Layout screen is displayed, select Multi-Page, and then click N-up - Settings. U “Performing Printing (Mac)” on page 44 U “Printing (Windows)” on page 43 B Note: You can print frames around arranged pages using the Border function. In the Print Layout screen, specify the number of pages per sheet and the page order.
SC-P9500 Series/SC-P7500 Series User's Guide Printing Varieties Poster Printing (Enlarge to cover several sheets and print - Windows only) Setting Procedures for Printing A Prepare the print data using applications. The poster printing function automatically enlarges and divides the print data. You can join the printed sheets to create a large poster or calendar. Poster printing is available up to 16-fold (four sheets by four sheets) of normal printing size. There are two ways to print posters.
SC-P9500 Series/SC-P7500 Series User's Guide Printing Varieties D When with margins is selected: Select borderless poster printing or poster printing with margins, and then select any pages that you do not want to print. Clear Borderless Poster Print. When borderless is selected: Select Borderless Poster Print. Note: Regarding the size after joining together: When Borderless Poster Print is cleared and printing with margins is selected, the Print Cutting Guides items are displayed.
SC-P9500 Series/SC-P7500 Series User's Guide Printing Varieties The following section describes how to join four printed pages together. Joining the output paper together The steps for joining the output paper together differ between borderless poster printing and poster printing with margins. A Ready the two top sheets and trim the excess from the left sheet by cutting along the line joining the two join guides (the centers of the X marks). B Lay the upper left sheet on top of upper right sheet.
SC-P9500 Series/SC-P7500 Series User's Guide Printing Varieties C With the two sheets overlapping, trim the excess by cutting along the line joining the two cut guides (the lines to the left of the X marks). D Rejoin the two sheets. E Repeat Steps 1 to 4 for the lower sheets. Use an adhesive tape to stick the backs of the sheets together. 84 F Trim the bottom from the upper sheets by cutting along the line joining the two guides (the lines above the X marks).
SC-P9500 Series/SC-P7500 Series User's Guide Printing Varieties H I With the two sheets overlapping, trim the excess by cutting along the line joining the two cut guides (the lines above the X marks). 85 Join the upper and lower sheets together. Use an adhesive tape to stick the backs of the sheets together.
SC-P9500 Series/SC-P7500 Series User's Guide Printing Varieties J After joining all the sheets, trim off the borders by cutting along the cut guides (outside the X marks). Printing at Non-Standard Sizes Before printing at non-standard sizes, including vertical or horizontal banners and documents with equal sides, save the desired paper size in the printer driver. Once they have been saved in the printer driver, custom sizes can be selected in the application Page Layout and other print dialogs.
SC-P9500 Series/SC-P7500 Series User's Guide Printing Varieties ❏ If the length and width ratio is the same as a defined paper size, select the defined paper size from Fix Aspect Ratio and select either Landscape or Portrait for the Base. In this case, you can only adjust either the paper width or paper height. c Important: When using commercially available software, the possible output sizes are restricted. If you are using applications that support banner printing, you can set a longer paper length.
SC-P9500 Series/SC-P7500 Series User's Guide Printing Varieties U “Performing Printing (Mac)” on page 44 Note: D ❏ To edit a saved custom size, choose its name from the list on the left. ❏ To copy a saved custom size, select the size in the list on the left and click Duplicate. ❏ To delete a saved custom size, select it in the list on the left and click −. ❏ The custom paper size setting differs depending on the operating system version. See your operating system's documentation for details.
SC-P9500 Series/SC-P7500 Series User's Guide Printing Varieties B Banner printing (on roll paper) Select Roll Paper or Roll Paper (Banner) from the Source list. You can print banners and panoramic pictures if you create and set print data for banner printing in your application. There are two ways to print a banner.
SC-P9500 Series/SC-P7500 Series User's Guide Printing Varieties D On the Layout screen make sure the Monitoring Preferences check box is selected. Layout Manager (Windows Only) The Layout Manager function allows you to place multiple pieces of print data created in different applications on the paper freely and print them at once. You can create a poster or display material by placing multiple pieces of print data where you like. Also, Layout Manager allows you to use paper effectively.
SC-P9500 Series/SC-P7500 Series User's Guide Printing Varieties Placing the same data B Open the file you want to print in your application. C Select Layout Manager in the Main tab of the printer driver and choose an option for Paper Size that matches the size of the document created in the application. U “Printing (Windows)” on page 43 Placing data freely Note: The option selected for Paper Size is the size used in the Layout Manager. The actual printing paper size is set in the screen in Step 7.
SC-P9500 Series/SC-P7500 Series User's Guide Printing Varieties G The overall size and placement of the objects can be changed using the Preferences and Arrangement options in the File menu. Click File - Properties, and make print settings on the printer driver screen. See the Layout Manager screen help for more details on each function. Set Media Type, Source, Paper Size or Page Size, and so on. H Click the File menu on the Layout Manager screen, and then click Print. Printing starts.
SC-P9500 Series/SC-P7500 Series User's Guide Printing Varieties Saving A On the Layout Manager screen, click File menu and then Save as. B Enter the file name, select the location, and then click Save. C Close the Layout Manager screen. Opening saved files A Right-click the utility icon ( ) in the Windows taskbar and select Layout Manager from the menu that appears. The Layout Manager screen is displayed.
SC-P9500 Series/SC-P7500 Series User's Guide Color Management Printing Color Management Print Settings Color Management Printing You can perform color management printing using this printer's printer driver in the following two ways. About Color Management Choose the best method according to the application you are using, the operating system environment, the aim of the print out, and so on.
SC-P9500 Series/SC-P7500 Series User's Guide Color Management Printing Setting color management with the applications Setting profiles Settings for the input profile, printer profile, and intent (matching method) vary between three types of color management printing since their color management engines are used differently. This is because color management usage differs between the engines. Make settings in the printer driver or application as described in the following table.
SC-P9500 Series/SC-P7500 Series User's Guide Color Management Printing C Set color management to off. For Mac For Windows Select Print Settings from the list, and then select Off (No Color Adjustment) as the Printer Color Adjustment setting. In the Main screen, select Specify Size as the Mode setting, and select Off (No Color Adjustment). Note: In Windows 7, Windows Vista, and Windows XP (Service Pack 2 or later and .NET 3.0) Off (No Color Adjustment) is selected automatically.
SC-P9500 Series/SC-P7500 Series User's Guide Color Management Printing Setting example for Adobe Photoshop CC Setting color management with the printer driver Open the Print screen. Select Color Management and then Document. Select Printer Manages Colors as the Color Handling setting, and then click Print. Color management printing by Host ICM (Windows) Use image data in which an input profile has been embedded. Also, the application must support ICM.
SC-P9500 Series/SC-P7500 Series User's Guide Color Management Printing When Epson special media is selected for Media Type in the Main screen, the printer profile corresponding to the media type is automatically selected and displayed in the Printer Profile Description box. C Select Color Matching from the list, and then click ColorSync. D Check other settings, and then start printing. To change the profile, select Show all profiles at the bottom.
SC-P9500 Series/SC-P7500 Series User's Guide Color Management Printing OS Color Management Settings Windows 10, Printer Manages Colors A In the printer driver's Main screen, select Specify Size as the Mode, select ICM, and then click Settings. U “Printing (Windows)” on page 43 Windows 8.1, Windows 8, Windows 7, Windows Vista Windows XP (Service Pack 2 or later and .NET 3.0 or later) Windows XP (other than the above) No Color Management In other applications, set No Color Management.
SC-P9500 Series/SC-P7500 Series User's Guide Color Management Printing C Intent Explanation Perceptual Converts the data so that a more visually natural image is produced. This feature is used when a wider gamut of color is used for image data. Relative Colorimetric Converts the data so that a set of color gamut and white point (or color temperature) coordinates in the original data match their corresponding print coordinates. This feature is used for many types of color matching.
SC-P9500 Series/SC-P7500 Series User's Guide Menu List Menu List Paper Setting Settings item Setting/Additional Explanation Roll Paper Remove Roll paper is ejected. After the paper has been ejected, information on how to remove the roll paper is displayed. Feed/Cut Paper Backward, Forward, Cut Touch Cut to cut the paper. Prepare for Take-up This item is only displayed when the take-up reel unit is connected. Roll paper take-up preparation starts.
SC-P9500 Series/SC-P7500 Series User's Guide Menu List Settings item Setting/Additional Explanation Advanced Paper Settings Confirm ICC profile Displays the ICC profile name. This is only displayed when the optional PS unit is connected and a custom paper is set. Confirm Color Density Displays the Color Density. This is only displayed when the optional PS unit is connected and a custom paper is set. Paper Thickness 0.01 - 1.50 mm (0.01 mm units)/0.4 - 59.1 mil (0.
SC-P9500 Series/SC-P7500 Series User's Guide Menu List Settings item Setting/Additional Explanation Remaining Amount Management Remaining Amount Management On, Off Remaining Amount Enter the amount of paper remaining. Remaining Alert A warning is displayed when the amount of remaining roll paper is running low. Enter the amount of remaining roll paper that will trigger the warning. Change Paper Type You can change the set paper type.
SC-P9500 Series/SC-P7500 Series User's Guide Menu List Settings item Setting/Additional Explanation Advanced Paper Settings Confirm ICC profile Displays the ICC profile name. This is only displayed when the optional PS unit is connected and a custom paper is set. Confirm Color Density Displays the Color Density. This is only displayed when the optional PS unit is connected and a custom paper is set. Paper Thickness 0.01 - 1.50 mm (0.01 mm units)/0.4 - 59.1 mil (0.
SC-P9500 Series/SC-P7500 Series User's Guide Menu List Settings item Remove Setting/Additional Explanation Poster board is ejected. After the paper is ejected, information on how to remove the poster board is displayed. Print Adjustments Paper Feed Adjust Quality First, Length Accuracy First Print Head Alignment Uni-D Alignment, Bi-D Alignment You can adjust automatically or manually. Perform print head alignment when the print results look grainy or out-of-focus. Normally, select Auto.
SC-P9500 Series/SC-P7500 Series User's Guide Menu List General Settings Settings item Setting/Additional Explanation Basic Settings LCD Brightness 1-9 Sounds Button Press 0-10 Paper Set 0-10 Completion Notice 0-10 Error Notice 0-10 Sound Type Pattern1, Pattern2 Inside Light Auto, Manual Alert Lamp Notice On, Off Sleep Timer 1-60 Power Off Timer Off, 30minutes, 1h, 2h, 4h, 8h, 12h Circuit Breaker Interlock Startup On, Off Date/Time Settings Date/Time, Time Difference Language Dut
SC-P9500 Series/SC-P7500 Series User's Guide Menu List Settings item Setting/Additional Explanation Paper Source Settings Roll Paper Setup Auto Loading On, Off Cut Settings Auto Cut On, Off Print Cutting Guideline On, Off If Auto Cut is set to Off, you can choose whether or not (On/Off) to print cutting lines on roll paper. Cutting lines are not printed if Auto Cut is set to On or when printing cut sheets or poster board.
SC-P9500 Series/SC-P7500 Series User's Guide Menu List Settings item Setting/Additional Explanation Advanced Paper Settings Confirm ICC profile Displays the ICC profile name. This item is only displayed when the PS option is connected. Confirm Color Density Displays the Color Density. This item is only displayed when the PS option is connected. Paper Thickness 0.01 - 1.50 mm (0.4 - 59.1 mil) (0.01 mm units) Platen Gap Auto, 1.2, 1.6, 1.9, 2.1, 2.
SC-P9500 Series/SC-P7500 Series User's Guide Menu List Settings item Setting/Additional Explanation Auto Cleaning On Set the timing that you want the printer to check the status of the nozzles, and if clogged nozzles are detected. If the nozzles are not clogged, cleaning is not performed. Standard Sets normal automatic cleaning. Custom You can set the timing and frequency for auto cleaning.
SC-P9500 Series/SC-P7500 Series User's Guide Menu List Settings item Setting/Additional Explanation PS3 Menu (This item is only displayed when the PS option is connected.) Version Displays the PostScript/PDF version. Output Size Auto, A Series, US-ANSI, US-ARCH, B Series (ISO), B Series (JIS), Photo Series, Others, User-Defined Margin Options Standard, Add Margins, Clip By Margins Select the difference between the size of the print data and the size of the output paper.
SC-P9500 Series/SC-P7500 Series User's Guide Menu List Settings item Print Nozzle Check Pattern during Print Setting/Additional Explanation Every Pages, Off Prints a nozzle check pattern for any page. When this is set, a check pattern for clogged nozzles is printed at the top of the page. See the following for details on the nozzle check pattern. U “Print Head Nozzle Check” on page 115 Store Held Job On, Off Only available when the optional hard disk unit is installed.
SC-P9500 Series/SC-P7500 Series User's Guide Menu List Settings item Setting/Additional Explanation Security Settings Admin Settings Admin Password Register, Change, Clear All Settings Lock Setting On, Off Password Encryption On, Off Select On to encrypt the password. You need to restart the printer to apply the password encryption settings. Do not turn off the power while the printer is restarting. If the power does turn off while the printer is restarting, you need to set the password again.
SC-P9500 Series/SC-P7500 Series User's Guide Menu List Settings item Setting/Additional Explanation Head Cleaning Cleans the selected color. Only run this when the nozzles are clogged. U “Cleaning the print head” on page 116 Power Cleaning Cleans the selected color. Only run this when you cannot clear the clogged nozzles even after repeating normal print head cleaning several times. U “Cleaning the print head” on page 116 Remove Paper Removes any scraps of paper that remain inside the printer.
SC-P9500 Series/SC-P7500 Series User's Guide Menu List Status Settings item Setting/Additional Explanation Firmware Version Displays the firmware versions for the printer, Adobe PS3 expansion unit, SpectroProofer mounter, ILS30EP, and the auto take-up unit. Hard Disk Unit Displays the connection status for the hard disk unit. Adobe PS3 Expansion Unit Displays the connection status for the Adobe PS3 expansion unit.
SC-P9500 Series/SC-P7500 Series User's Guide Maintenance U “Print Head Nozzle Check” on page 115 Maintenance Cleaning the print head Use this if you notice faint or missing areas in the prints. Cleans the surface of the print head to improve the print quality. There are two types of cleaning available depending on the level of cleaning required; normal head cleaning and powerful head cleaning.
SC-P9500 Series/SC-P7500 Series User's Guide Maintenance C Touch Menu - Maintenance - Print Head Nozzle Check. D Touch Start to start printing a check pattern. E Review the printed check pattern while referring to the following section. U “Loading and Removing Cut Sheets/Poster Board” on page 28 B Choose a paper type that matches the paper in the printer.
SC-P9500 Series/SC-P7500 Series User's Guide Maintenance U “From the printer” on page 117 U “Notes on Print Head Cleaning” on page 117 From the computer A Select Menu - Maintenance - Cleaning the Maintenance Parts - Wiping the Print Head on the control panel. B Select nozzle arrays for cleaning. C Touch Z to start cleaning. U “From the computer” on page 118 Notes on Print Head Cleaning Ink is consumed during head cleaning.
SC-P9500 Series/SC-P7500 Series User's Guide Maintenance Select Clean All Colors to clean all of the print heads (nozzles). Note: The more color pairs selected, the longer it takes to perform cleaning. Also, depending on the status of the nozzles, it can take up to about 27 minutes. When you select Auto Select, a nozzle check is performed and only the clogged print heads (nozzles) are cleaned. Cleaning is not performed if the print heads (nozzles) are not clogged.
SC-P9500 Series/SC-P7500 Series User's Guide Maintenance You can also select automatic adjustment and manual adjustment for each menu. Perform manual adjustment when using these types of paper. ❏ Auto adjustment We normally recommend using this method as it rarely causes any problems and is easy to execute. It takes about 9 to 35 minutes to complete the adjustments. The time required varies depending on the menu selected.
SC-P9500 Series/SC-P7500 Series User's Guide Maintenance E Item Name Explanation Bi-D Alignment Adjusts differences in the print position for bi-directional printing for each color. It takes about 9 to 13 minutes to complete the adjustments. The time required varies depending on the menu selected. H Check the printed adjustment pattern, and then enter the set value into the control panel. Uni-D Alignment (1) Check the adjustment position for #1 VLM1. Select Auto or Manual.
SC-P9500 Series/SC-P7500 Series User's Guide Maintenance (3) Find the average value of all #1 VLM1 adjustment patterns. (2) Note the number of the pattern with the fewest lines (the lines essentially overlap). In the following example image, "0" is the best choice. (3) Find the average value of all #1 A adjustment patterns. If the values you found are not whole numbers, round to the nearest whole number. (4) Enter the setting value on the control panel.
SC-P9500 Series/SC-P7500 Series User's Guide Maintenance Paper Feed Adjust Use this setting if you are unable to resolve banding issues (horizontal striped lines or uneven colors) in the standard print area (for cut sheets, the area excluding the 1 to 2 cm strip at the bottom of the paper) even after cleaning the print head or performing head alignment. E Touch Start button to print an adjustment pattern or measurement positions.
SC-P9500 Series/SC-P7500 Series User's Guide Maintenance Replacing Consumables A Open the ink cover. B Pull out the ink cartridge. Replacing Ink Cartridges If one of the installed ink cartridges is expended, printing cannot be performed. If an ink cartridge is expended while printing, you can continue printing after replacing the ink cartridge. If you continue to use ink cartridges that are running low, you may need to replace the ink cartridge while printing.
SC-P9500 Series/SC-P7500 Series User's Guide Maintenance D Push the ink cartridge in firmly. SC-P9500 Series: 2 (left and right) Match the color of the ink cartridge to the color of the label on the back of the ink cover. SC-P7500 Series: 1 (right only) Replace the Maintenance Box on the side with the Not Enough Space message displayed. The replacement procedure is the same for both sides. When you need to replace both sides, repeat Steps 2 to 5.
SC-P9500 Series/SC-P7500 Series User's Guide Maintenance D U “Removing Cut Sheets/Poster Board” on page 29 Insert the new maintenance box. c Important: B From the Home screen, touch Menu Maintenance - Replace Cutter. C Touch Start to move the cutter to the replacement position. D Press down the knob on the cutter replacement cover, and pull it down and towards you to remove. E Loosen the screw that secures the cutter with a cross-head screwdriver. F Remove the old cutter from the printer.
SC-P9500 Series/SC-P7500 Series User's Guide Maintenance G Install the new cutter. Cleaning the Printer Insert a screw into the cutter side of the hole on the printer. To keep your printer in optimum operating condition, clean it regularly (about once a month). Cleaning the outside H Tighten the screw with a cross-head screwdriver to secure the cutter. A Remove any paper from the printer.
SC-P9500 Series/SC-P7500 Series User's Guide Maintenance Ink and particles of paper adhering to the platen should be removed, as they may otherwise soil the paper. c Important: When cleaning, do not touch the rollers, the pads for borderless printing, or the ink tubes indicated in gray in the following illustration. Doing so may cause a malfunction or soiled prints. c Important: Failure to remove dust and particles of paper from the platen could result in clogged nozzles or damage to the print head.
SC-P9500 Series/SC-P7500 Series User's Guide Maintenance E Use a commercially available cotton swab to wipe off the paper particles and dust from the inner edges of the pads for borderless printing as shown below. c Important: Do not rub too strongly on the pads for borderless printing. Doing so could cause the pads for borderless printing to come off or lift up causing a malfunction or a paper jam to occur. F After cleaning, close the front cover.
SC-P9500 Series/SC-P7500 Series User's Guide Problem Solver Problem Solver What to do When a Message is Displayed If the printer displays one of the messages shown below, refer to the solution listed and take the necessary steps. Messages What to do Change paper settings Paper setting in the printer driver is different from paper information registered in the printer. Change paper setting from the application or the driver. For details, see your documentation.
SC-P9500 Series/SC-P7500 Series User's Guide Problem Solver SpectroProofer Error If SpectroProofer Error is displayed, see the two numbers at the end of the error number for the solution. See the manual supplied with the mounter for more information on removing, cleaning, and installing, the mounter. If this message appears on the LCD panel again, contact your dealer or Epson Support. U See “Where To Get Help” on page 178 Error Number What to do 01 The mounter is not installed correctly.
SC-P9500 Series/SC-P7500 Series User's Guide Problem Solver When an Error Message and Error Code are Displayed Error messages What to do A printer part needs to be replaced. Contact Epson Support. For details, see your documentation. A part used in the printer is nearing the end of its service life. XXXXXXXX (Where XXXXXXXX is a 6-digit or 8-digit alphanumeric code.) Contact your dealer or Epson Support and tell them the maintenance request code. This cannot be cleared until the part is replaced.
SC-P9500 Series/SC-P7500 Series User's Guide Problem Solver Troubleshooting o Check the printer port. You cannot print (because the printer does not work) Click the Port tab in the printer Properties dialog and check the option selected for Print to following port(s). The printer does not turn on. o Is the power cable plugged into the electrical outlet or the printer? The printer turns off automatically.
SC-P9500 Series/SC-P7500 Series User's Guide Problem Solver o Is the USB hub recognized correctly? o Make sure the USB hub is recognized correctly on the computer. If the computer correctly detects the USB hub, disconnect all USB hubs from the computer and connect the printer directly to the computer USB port. Ask the USB hub manufacturer about USB hub operation. Open the status dialog for your printer and check whether printing is paused.
SC-P9500 Series/SC-P7500 Series User's Guide Problem Solver The printer sounds like it is printing, but nothing prints The prints are not what you expected The print head moves, but nothing prints. Print quality is poor, uneven, too light, or too dark. o Confirm the printer operation. o Print a nozzle check pattern. Because a nozzle check pattern can be printed without connecting to a computer, you can check the operations and print status for the printer.
SC-P9500 Series/SC-P7500 Series User's Guide Problem Solver o Did you select a low quality mode (such as Speed) as the Print Quality? o If the options selected for Print Quality > Quality Options place priority on speed, quality will be sacrificed for print speed, potentially causing print quality to decline. To improve print quality, select Resolution options that give priority to quality.
SC-P9500 Series/SC-P7500 Series User's Guide Problem Solver o In Quality Options from the printer driver, set Optimize Edge Quality to Add Top Margin or Optimize Media Edge Print Quality. o Are the settings for Top Margin/Bottom Margin too short? If the values set for Top Margin/Bottom Margin in the Paper menu are wider than the margins set in the application, priority will be given to the values selected for Top Margin/Bottom Margin.
SC-P9500 Series/SC-P7500 Series User's Guide Problem Solver o Is the paper wavy or warped? o If the paper becomes wavy or warped due to changes in temperature or humidity, the paper may be scuffed. If you print continuously without cutting the paper for each page, the pages may rub together causing scuffing to occur. Set Margin Between Pages to 65 mm in Custom Paper Setting. Check the following points. o ❏ Insert the paper just before printing. ❏ Do not use wavy or warped paper.
SC-P9500 Series/SC-P7500 Series User's Guide Problem Solver Cleaning around the print head and caps C Remove the rear maintenance cover. D Use the cleaning stick to wipe in the directions indicated by the arrows to remove any ink, fluff, or trash. If print head clogging cannot be cleared using automatic cleaning, clean the print head and the area around the caps. c Important: ❏ Never touch any parts or circuit boards other than those that need to be cleaned.
SC-P9500 Series/SC-P7500 Series User's Guide Problem Solver E F Replace the rear maintenance cover. Use a new cleaning stick to wipe any dirt off the drying caps. (1) Hold the cleaning stick so that it is vertical, and wipe the inner areas of all of the drying caps. c Important: F Do not press too hard on the edges or the area surrounding the caps with tweezers or cleaning sticks. Doing so could cause the parts to become deformed preventing capping from being performed correctly.
SC-P9500 Series/SC-P7500 Series User's Guide Problem Solver (3) Flatten the cleaning stick and wipe all of the edges of the drying caps. (4) Hold the cleaning stick so that it is vertical, and wipe all of the guides. (2) Wipe any dirt off the outer edges of the wiper (one part). (5) If there is any fluff or dust in the caps, remove it with the tip of the cleaning stick or with tweezers. (3) Wipe any dirt off the upper edge of the wiper (three parts).
SC-P9500 Series/SC-P7500 Series User's Guide Problem Solver (2) Flatten the cleaning stick and wipe all of the edges of the suction caps. I Close the front cover. J Attach the front maintenance cover, and then close the ink cover on the right. K Press the Z button on the printer's control panel. The print head returns to its original position. Cleaning is performed automatically if the print head is clogged. The paper is creased.
SC-P9500 Series/SC-P7500 Series User's Guide Problem Solver Print outs are wrinkled o Is ink dry on the printed surface? Depending on the printing density and media type, the ink may take a while to dry. Do not stack the paper until the printed surface is dry. Also, if you set the Drying Time per Head Pass in Paper Configuration from the printer driver, you can stop the operation after printing (ejecting and cutting paper) and wait until the ink is dry.
SC-P9500 Series/SC-P7500 Series User's Guide Problem Solver C Open the front cover. D Clean the platen near the back where soiling occurs. Use a soft cloth to remove any dust or dirt. E If any paper particles (resemble white powder) have accumulated in the holes shown in the illustration below, use a pointed object such as a toothpick to push them in. F Remove paper particles and dust around the outer edges with commercially available cotton swabs as shown below.
SC-P9500 Series/SC-P7500 Series User's Guide Problem Solver F When replacing the pads for borderless printing, replace only the ones at the places where soiling occurs on the paper back side. There is no need to replace all of the pads for borderless printing. A Make sure the printer is turned off and the screen has turned off, and then unplug the power cable from the outlet. B Leave the printer for a minute. C Open the front cover.
SC-P9500 Series/SC-P7500 Series User's Guide Problem Solver Bend the pad for borderless printing marked with an * in the "Consumables and Options" illustration as shown in the diagram. H I Press the pad for borderless printing into the pad section. J Gently press the pad for borderless printing until it is seated flatly in place. Insert the leg of the pad for borderless printing all the way into the hole.
SC-P9500 Series/SC-P7500 Series User's Guide Problem Solver Too much ink is fired. o o The paper may expand or contract if it is not stored correctly so that margins appear even when borderless is set. See the documentation supplied with the paper for more information on the storage method. Are the Media Type settings correct? Make sure that the printer driver's Media Type settings match the paper that you are using. The amount of ink to be fired is controlled according to the media type.
SC-P9500 Series/SC-P7500 Series User's Guide Problem Solver o Is the paper damp? o Do not use paper that is damp. Also, Epson special media should be left in the bag until you intend to use it. If it is left out for a long time, the paper curls up and gets damp so that it does not feed properly. When using paper that curls easily, make sure you are in an environment with a room temperature of 23 degrees or higher.
SC-P9500 Series/SC-P7500 Series User's Guide Problem Solver Paper does not collect in the paper basket or is creased or folded when the paper basket is used. o c Important: Do not touch the cables around the print head. Failure to observe this precaution could damage the printer. Does the print job require a lot of ink, or is the humidity of the workplace high? D Depending on the job and the work environment, paper may not collect in the paper basket. Take the following measures as appropriate.
SC-P9500 Series/SC-P7500 Series User's Guide Problem Solver c Important: Before you reload the roll paper, cut the edge straight horizontally. Cut any wavy or creased sections. If there is a problem at the edge, decreased print quality and paper jams may occur. C Remove the jammed paper. D Close the front cover. E Turn the printer off and then back on. F Reload the paper and resume printing. Do not touch the rollers, ink absorbing areas, or ink tubes.
SC-P9500 Series/SC-P7500 Series User's Guide Problem Solver The paper is not cut cleanly. o When an error occurs during color measurement (when using the SpectroProofer mounter), the colors do not match even after performing color calibration Replace the cutter. If the paper is not cut cleanly, replace the cutter. U “Replacing the Cutter” on page 125 o A light is visible inside the printer. o This is not a failure.
SC-P9500 Series/SC-P7500 Series User's Guide Problem Solver o Is the color measurement chart sufficiently dry? o If the ink has not dried sufficiently, the correct color measurement result cannot be acquired. When using commercially available paper, if the drying time is not increased beyond the standard time, ink will not be dried sufficiently. Set a longer drying time in the RIP or application you are using.
SC-P9500 Series/SC-P7500 Series User's Guide Appendix Appendix Options and Consumable Products The following options and consumable products are available for use with your printer. (As of November, 2019) For the latest information, see the Epson Web site. Epson Special Media U “Epson Special Media Table” on page 156 Ink cartridges Epson recommends the use of genuine Epson ink cartridges. Epson cannot guarantee the quality or reliability of non-genuine ink.
SC-P9500 Series/SC-P7500 Series User's Guide Appendix SC-P9570/SC-P7570 Part number Color Name 700 ml 350 ml 150ml Photo Black T44H1 T44P1 T44W1 Cyan T44H1 T44P2 T44W2 Vivid Magenta T44H3 T44P3 T44W3 Yellow T44H4 T44P4 T44W4 Light Cyan T44H5 T44P5 T44W5 Vivid Light Magenta T44H6 T44P6 T44W6 Light Black T44H7 T44P7 T44W7 Matte Black T44H8 T44P8 T44W8 Light Light Black T44H9 T44P9 T44W9 Orange T44HA T44PA T44WA Green T44HB T44PB T44WB Violet T44HD T44PD T44W
SC-P9500 Series/SC-P7500 Series User's Guide Appendix Others Product Part number Explanation Maintenance Box T6997 Replacement part for when the message Not Enough Space is displayed for the maintenance box. U “Replacing Maintenance Box” on page 124 Auto Cutter Spare Blade C12C815331 U “Replacing the Cutter” on page 125 Roll Media Adapter SCRPA3 When loading roll paper, these attach to both ends of the paper core.
SC-P9500 Series/SC-P7500 Series User's Guide Appendix Absorption pad replacement kit (absorption pads for borderless printing) The pad replacement kit contains three types of borderless printing pad. The type of pad depends on where the absorption pads for borderless printing are installed. SC-P9500 Series SC-P7500 Series A: Notched type B: Straight type C: Wide type See the following for the installation instructions. U “The reverse side of the printed paper is soiled.
SC-P9500 Series/SC-P7500 Series User's Guide Appendix Supported Media We recommend you use the following Epson special media for high-quality printing results. Note: For information about the media types and appropriate settings for printing on paper other than Epson special media or when using raster image processing (RIP) software, see the documentation supplied with the paper, or contact the dealer of the paper or the manufacturer of the RIP.
SC-P9500 Series/SC-P7500 Series User's Guide Appendix Borderless Printing Available for all paper widths. Auto Color Measurement Device Mounter Available for all paper widths. Auto Take-up Reel Unit Printed side out and printed side in winding is available for all paper widths. Premium Luster Photo Paper (260) Paper Thickness 0.
SC-P9500 Series/SC-P7500 Series User's Guide Appendix Premium Glossy Photo Paper (170) Paper Thickness 0.18 mm Roll core size 2 inches Paper Type (printer driver) Photo Paper - Premium Glossy Photo Paper (170) Type of black ink Photo Black (BK) ICC profile EPSON_SC-P9500_7500_PremiumGlossyPhotoPaper170.icc Paper Width 420 mm/A2 610 mm/24 inches 728 mm/B1* 914 mm/36 inches* 1118 mm/44 inches* * SC-P7500 Series is not supported. Borderless Printing Paper that is 420 mm/A2 wide is not supported.
SC-P9500 Series/SC-P7500 Series User's Guide Appendix ICC profile EPSON_SC-P9500_7500_PhotoPaperGloss250.icc Paper Width 432 mm/17 inches 610 mm/24 inches 914 mm/36 inches* 1118 mm/44 inches* * SC-P7500 Series is not supported. Borderless Printing Available for all paper widths. Auto Color Measurement Device Mounter Available for all paper widths. Auto Take-up Reel Unit Printed side out and printed side in winding is available for all paper widths.
SC-P9500 Series/SC-P7500 Series User's Guide Appendix Borderless Printing Not supported Auto Color Measurement Device Mounter Available for all paper widths. Auto Take-up Reel Unit Paper that is 329 mm/13 inches wide is not supported. Printed side out and printed side in winding is available for other paper widths. Singleweight Matte Paper Paper Thickness 0.
SC-P9500 Series/SC-P7500 Series User's Guide Appendix Enhanced Matte Paper Paper Thickness 0.2 mm Roll core size 3 inches Paper Type (printer driver) Enhanced Matte Type of black ink Matte Black (MB) ICC profile EPSON_SC-P9500_7500_EnhancedMattePaper.icc Paper Width 432 mm/17 inches 610 mm/24 inches 914 mm/36 inches* 1118 mm/44 inches* * SC-P7500 Series is not supported. Borderless Printing Not supported Auto Color Measurement Device Mounter Available for all paper widths.
SC-P9500 Series/SC-P7500 Series User's Guide Appendix Paper Width 432 mm/17 inches 610 mm/24 inches 1118 mm/44 inches* * SC-P7500 Series is not supported. Borderless Printing Not supported Auto Color Measurement Device Mounter Available for all paper widths. However, color measurement accuracy is not guaranteed. Auto Take-up Reel Unit Printed side out and printed side in winding is available for all paper widths. Enhanced Synthetic Paper Thickness 0.
SC-P9500 Series/SC-P7500 Series User's Guide Appendix Roll core size 2 inches Paper Type (printer driver) Enhanced Low Adhesive Synthetic Type of black ink Matte Black (MB) ICC profile EPSON_SC-P9500_7500_EnhancedLowAdhesiveSyntheticPaper.icc Paper Width 610 mm/24 inches 1118 mm/44 inches* * SC-P7500 Series is not supported.
SC-P9500 Series/SC-P7500 Series User's Guide Appendix Auto Color Measurement Device Mounter Not supported Premium Semigloss Photo Paper Paper Thickness 0.27 mm Paper Type (printer driver) Premium Semigloss Photo Paper Type of black ink Photo Black (BK) ICC profile EPSON_SC-P9500_7500_PremiumSemiglossPhotoPaper.icc Paper Width A3 S-B/A3+ A2 Borderless Printing Not supported Auto Color Measurement Device Mounter Only A2 size is supported. Premium Luster Photo Paper Paper Thickness 0.
SC-P9500 Series/SC-P7500 Series User's Guide Appendix Type of black ink Matte Black (MB) ICC profile EPSON_SC-P9500_7500_PhotoQualityInkJetPaper.icc Paper Width A3 S-B/A3+ A2 Borderless Printing Not supported Auto Color Measurement Device Mounter Not supported Archival Matte Paper Paper Thickness 0.2 mm Paper Type (printer driver) Archival Matte Paper Type of black ink Matte Black (MB) ICC profile EPSON_SC-P9500_7500_ArchivalMattePaper.
SC-P9500 Series/SC-P7500 Series User's Guide Appendix ICC profile EPSON_SC-P9500_7500_WatercolorPaper-RadiantWhite.icc Paper Width S-B/A3+ Borderless Printing Not supported Auto Color Measurement Device Mounter Not supported UltraSmooth Fine Art Paper Thickness 0.46 mm UltraSmooth Fine Art Paper Watercolor Paper - Radiant White Type of black ink Matte Black (MB) ICC profile EPSON_SC-P9500_7500_UltraSmoothFineArtpaper.icc Paper Width S-B/A3+ A2 US-C* * SC-P7500 Series is not supported.
SC-P9500 Series/SC-P7500 Series User's Guide Appendix Paper Width 610 mm (24") × 762 mm (30") 762 mm (30") × 1016 mm (40")* * SC-P7500 Series is not supported. Borderless Printing Not supported Auto Color Measurement Device Mounter Not supported Supported Commercially Available Paper When using commercially available paper, make sure you register the paper information.
SC-P9500 Series/SC-P7500 Series User's Guide Appendix *1 The printable area is 610 mm (24 inches). U “Cut Sheets Printable Area” on page 48 *2 762 mm for thick paper. 254 mm/10 inch, 300 mm/11.
SC-P9500 Series/SC-P7500 Series User's Guide Appendix Roll core size Set the paper core size for the roll paper being loaded. Paper Feed Offset Optimizes the paper feed when printing. By adjusting the gap between the data size and the print size, you can reduce the chance of banding (horizontal banding) or uneven colors. Example of entering settings When printing at a data size of 100 mm and a print size of 101 mm, the offset is 1.0%. Therefore, you would enter a value of -1.0%.
SC-P9500 Series/SC-P7500 Series User's Guide Appendix Make custom paper settings on the control panel A Notes When Moving or Transporting the Printer Select General Settings - Printer Settings Custom Paper Setting on the control panel. This section describes precaution when moving and transporting the product. Notes When Moving the Printer B Select a paper number from 1 to 30 to save the settings. C Set the paper information.
SC-P9500 Series/SC-P7500 Series User's Guide Appendix D See the "Setup Guide" (booklet) supplied with the printer for the installation method, and install in the original location before the printer was removed. Remove the optional auto take-up reel unit or SpectroProofer mounter if they are installed. U Setup Guide (booklet) supplied with optional items E Caution: Unlock the casters. ❏ The printer is heavy. When you pack or move the printer, use four or more people when carrying it.
SC-P9500 Series/SC-P7500 Series User's Guide Appendix When you move the printer while packaging it, place your hands at the positions in the illustration, and then lift. See the Choosing a Place for the Printer section of the "Setup Guide" (booklet) in advance to make sure the location is suitable for installing the printer. A See the "Setup Guide" to install the printer. U "Setup Guide" (booklet) c Important: Make sure you lock the casters after installing the printer.
SC-P9500 Series/SC-P7500 Series User's Guide Appendix System Requirements Software for this printer can be used in the following environments. (As of November, 2019) Supported OS and other elements may change. For the latest information, see the Epson Web site. Printer Driver Windows Operating system Windows 10 / Windows 10 x64 Windows 8.1/Windows 8.
SC-P9500 Series/SC-P7500 Series User's Guide Appendix Web Config Web Config is software installed in the printer that will run in a web browser on a computer or smart device connected to the same network as the printer. U Administrator's Guide Windows Browser Internet Explorer 11, Microsoft Edge, Firefox*1, Chrome*1 Connection method with the printer*2 Wired LAN connection *1 Use the latest version. *2 See the following for details on the network interfaces.
SC-P9500 Series/SC-P7500 Series User's Guide Appendix Epson Edge Dashboard c Important: Make sure the computer on which the Epson Edge Dashboard is installed meets the following requirements. If these requirements are not met, the software cannot monitor the printer correctly. ❏ Disable your computer's hibernate function. ❏ Disable the sleep function so that the computer does not enter sleep status. Windows Operating system Windows 10 / Windows 10 x64 Windows 8.1/Windows 8.
SC-P9500 Series/SC-P7500 Series User's Guide Appendix Specifications Table Printer Specifications Humidity The (A) to (D) letters used in the table represent the printer models as shown below.
SC-P9500 Series/SC-P7500 Series User's Guide Appendix Interface Specifications c Important: Ethernet*1 Standards IEEE802.3u (100BASE-TX) IEEE802.3ab (1000BASE-T) IEEE802.3az (Energy Efficient Ethernet)*2 ❏ We recommend that you remove and shake the installed ink cartridges once every six months to ensure good print quality.
SC-P9500 Series/SC-P7500 Series User's Guide Where To Get Help Where To Get Help Contacting Epson Support Technical Support Web Site Before Contacting Epson If your Epson product is not operating properly and you cannot solve the problem using the troubleshooting information in your product documentation, contact Epson support services for assistance. If Epson support for your area is not listed below, contact the dealer where you purchased your product.
SC-P9500 Series/SC-P7500 Series User's Guide Where To Get Help Help for Users in North America Help for Users in Taiwan Epson provides the technical support services listed below. Contacts for information, support, and services are: World Wide Web (https:// www.epson.com.tw) Internet Support Visit Epson’s support website at https://epson.com/ support and select your product for solutions to common problems.
SC-P9500 Series/SC-P7500 Series User's Guide Where To Get Help Telephone number Fax number Address 03-5325077 03-5320092 1F., No.9, Ln. 379, Sec. 1, Jingguo Rd., North Dist., Hsinchu City 300, Taiwan 04-23011502 04-23011503 3F., No.30, Dahe Rd., West Dist., Taichung City 40341, Taiwan (R.O.C.) 04-23805000 04-23806000 No.530, Sec. 4, Henan Rd., Nantun Dist., Taichung City 408, Taiwan 05-2784222 05-2784555 No.463, Zhongxiao Rd., East Dist., Chiayi City 600, Taiwan 06-2221666 06-2112555 No.
SC-P9500 Series/SC-P7500 Series User's Guide Where To Get Help Epson HelpDesk (Phone: (65) 6586 3111) World Wide Web (https://www.epson.co.
SC-P9500 Series/SC-P7500 Series User's Guide Where To Get Help Makassar MTC Karebosi Lt. Ill Kav. P7-8 JI. Ahmad Yani No.49 Makassar Epson Trading (M) Sdn. Bhd. Phone: (62)411-350147/411-350148 Phone: 603-56288288 Fax: 603-56288388/399 Head Office. Help for Users in Hong Kong Epson Helpdesk To obtain technical support as well as other after-sales services, users are welcome to contact Epson Hong Kong Limited.
SC-P9500 Series/SC-P7500 Series User's Guide Where To Get Help Location Telephone number Fax number Cochin 0484-2357950 0484-2357950 Coimbatore 0422-2380002 NA Pune 020-30286000 / 30286001 /30286002 020-30286000 Ahmedabad 079-26407176 / 77 079-26407347 ❏ Enquiries on repair service and warranty Helpline For Service, Product info or to order a cartridge 18004250011 (9AM - 9PM) - This is a Toll-free number.